Blog
How to Use Your Digital Planner in GoodNotes: A Step-by-Step Guide
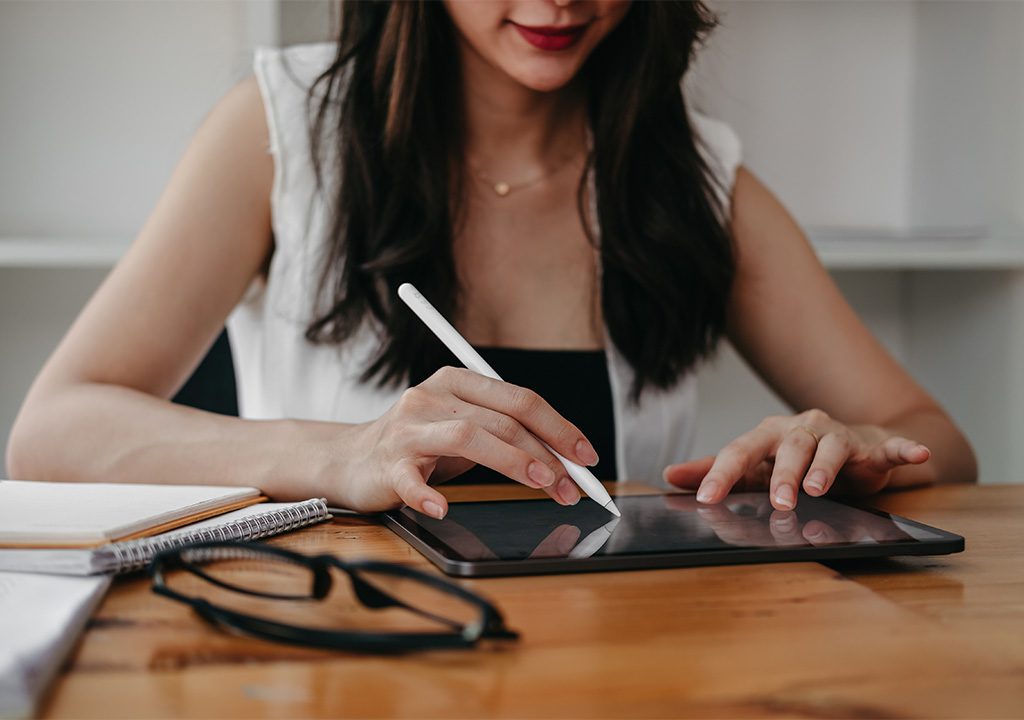
Table of Contents
This tutorial covers the most common questions and tasks for using our digital planners with GoodNotes, based on feedback and inquiries we’ve received from users. From setting up your planner to troubleshooting and customization, this guide will help you get started and make the most out of your digital planning experience.
Getting Started with Your Planner
Open Planner in GoodNotes
Follow these steps to open your planner in GoodNotes:
- Locate your planner file in the Files app, Google Drive, or wherever it’s saved.
- Tap and hold the file, then select “Share” from the menu that appears.
- In the Share menu, scroll through the app options at the top until you find GoodNotes.
- If you don’t see GoodNotes, tap “More” to view additional apps and select it from there.
- Tap on GoodNotes.
- If prompted, choose “Add as a New Document” to import your planner as a new file.
- If it’s your first time opening a file, GoodNotes may automatically import it as a new document.
Your planner is now ready to use in GoodNotes. Proceed to set it up and start planning!
GoodNotes Basics: Writing Mode vs. Navigation Mode
GoodNotes has two main modes: Viewing Mode for navigating through pages using hyperlinks and Editing Mode for adding notes, drawings, or text to your planner. Switching between these modes is essential to get the most out of your planner. Here’s a quick guide:
Viewing Mode (Navigation):
- This mode lets you use hyperlinks to move between sections of your planner.
- Hyperlinks should now work, allowing you to jump to specific pages or sections.
- Tip: If hyperlinks aren’t working, you’re likely in Editing Mode—switch to Viewing Mode to enable them.
Editing Mode (Writing):
- Use this mode to write, draw, or type on your planner pages.
- To activate Editing Mode, tap the pen icon at the top right of the screen.
- In this mode, you can use your Apple Pencil or finger to annotate your planner.
- Important: Hyperlinks won’t work in Editing Mode.
Switching Between Modes:
- To switch between modes, simply tap the pen icon at the top right.
- Ensure you’re in Viewing Mode when using hyperlinks and Editing Mode when writing or drawing.
By understanding these two modes, you can easily navigate and personalize your planner for an optimal experience!
Understanding How Hyperlinks Work in GoodNotes
What Are Hyperlinks in GoodNotes?
Hyperlinks are interactive links embedded within your planner, designed to connect you to specific pages, sections, or features. For example, a monthly calendar link may take you to a daily page or a yearly overview.
Customizing Your Planner
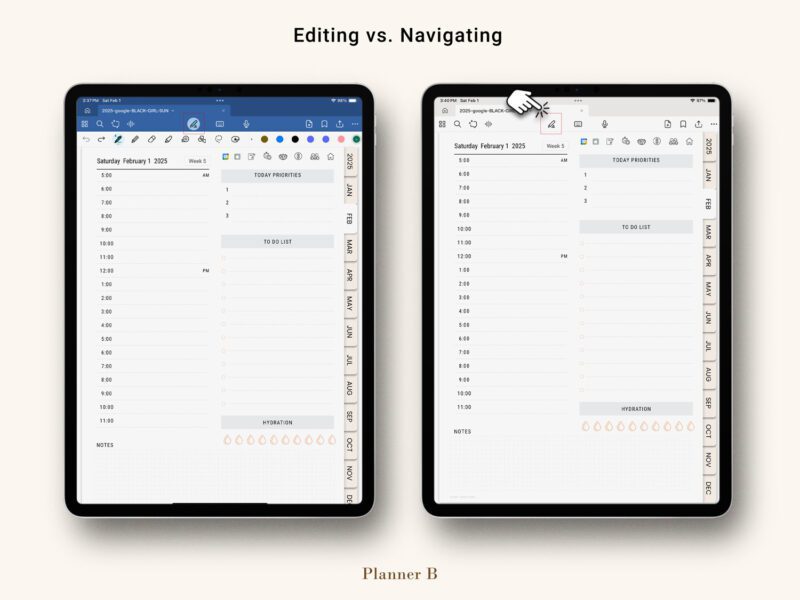
How to Change Your Planner Cover in GoodNotes
Your cover file is a PDF with multiple pages, each offering a unique design. To switch to a new cover in GoodNotes, follow these simple steps:
1. Set Up Split View
- Open your planner in GoodNotes.
- Tap the three dots at the top of the screen and select Split View.
- In the split view, browse your GoodNotes library and open the cover PDF file.
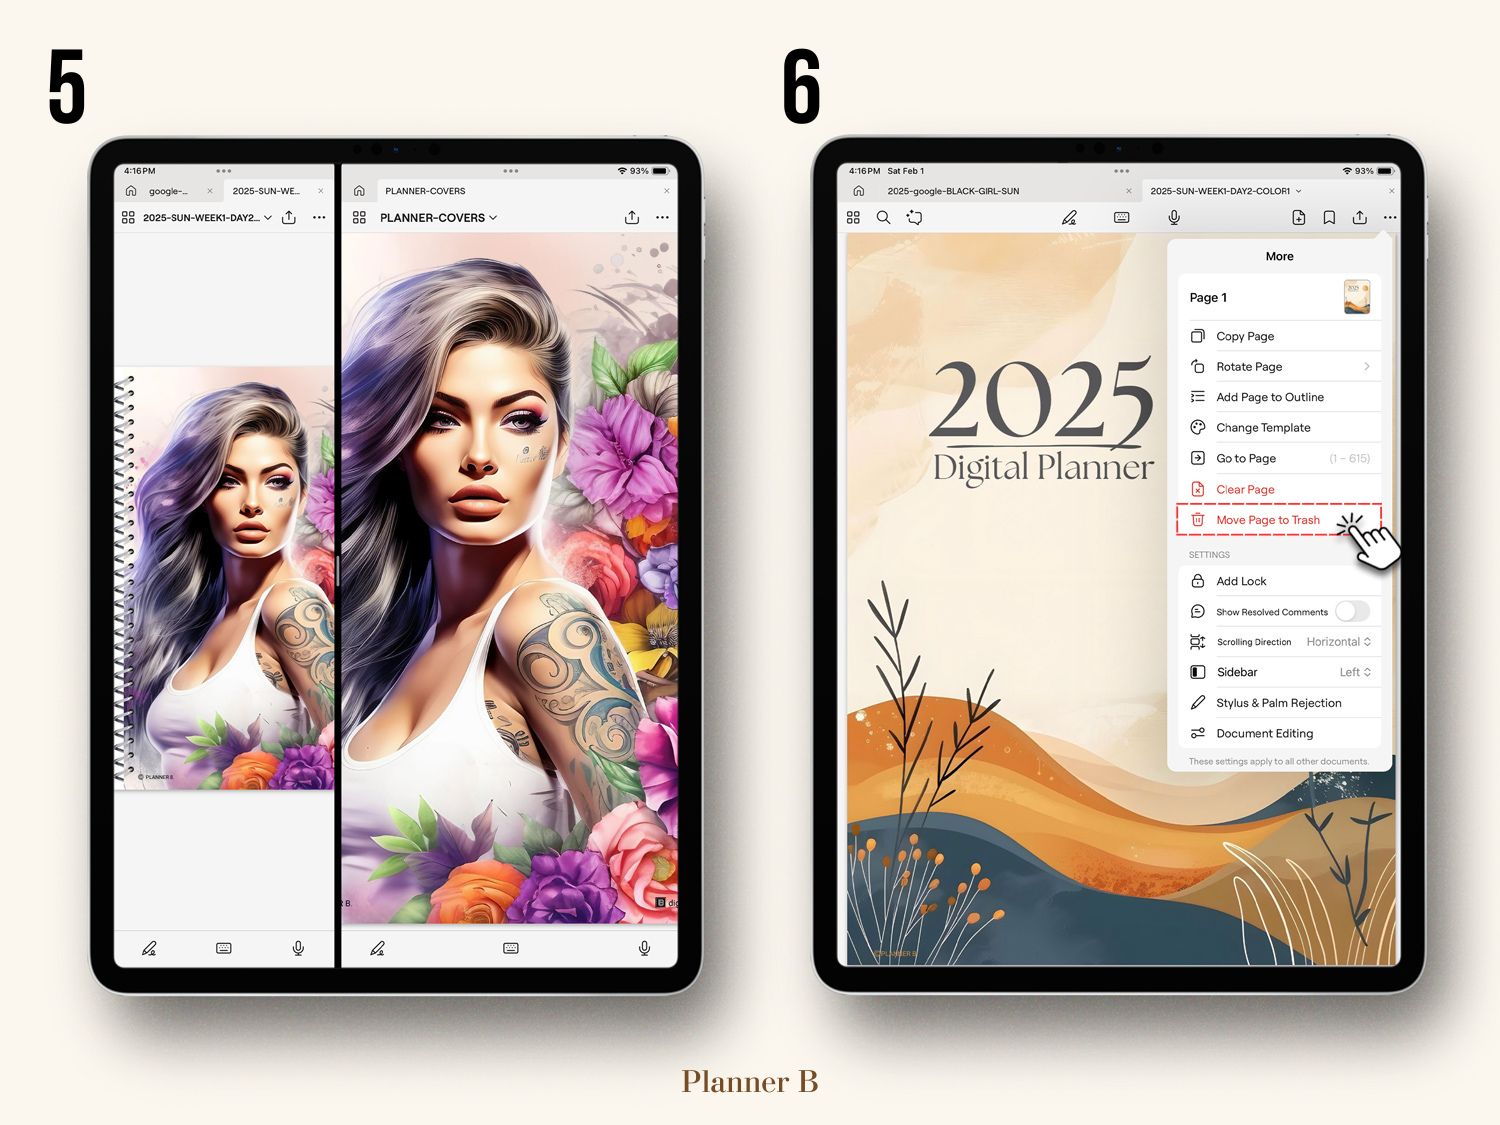
2. Select Your Desired Cover
- In the cover PDF, use the thumbnail view to quickly navigate through the available cover options.
- Scroll to the page with the cover design you want to use.
3. Copy the New Cover
- Tap and hold the thumbnail of your selected cover.
- From the menu that appears, choose “Copy Page.”
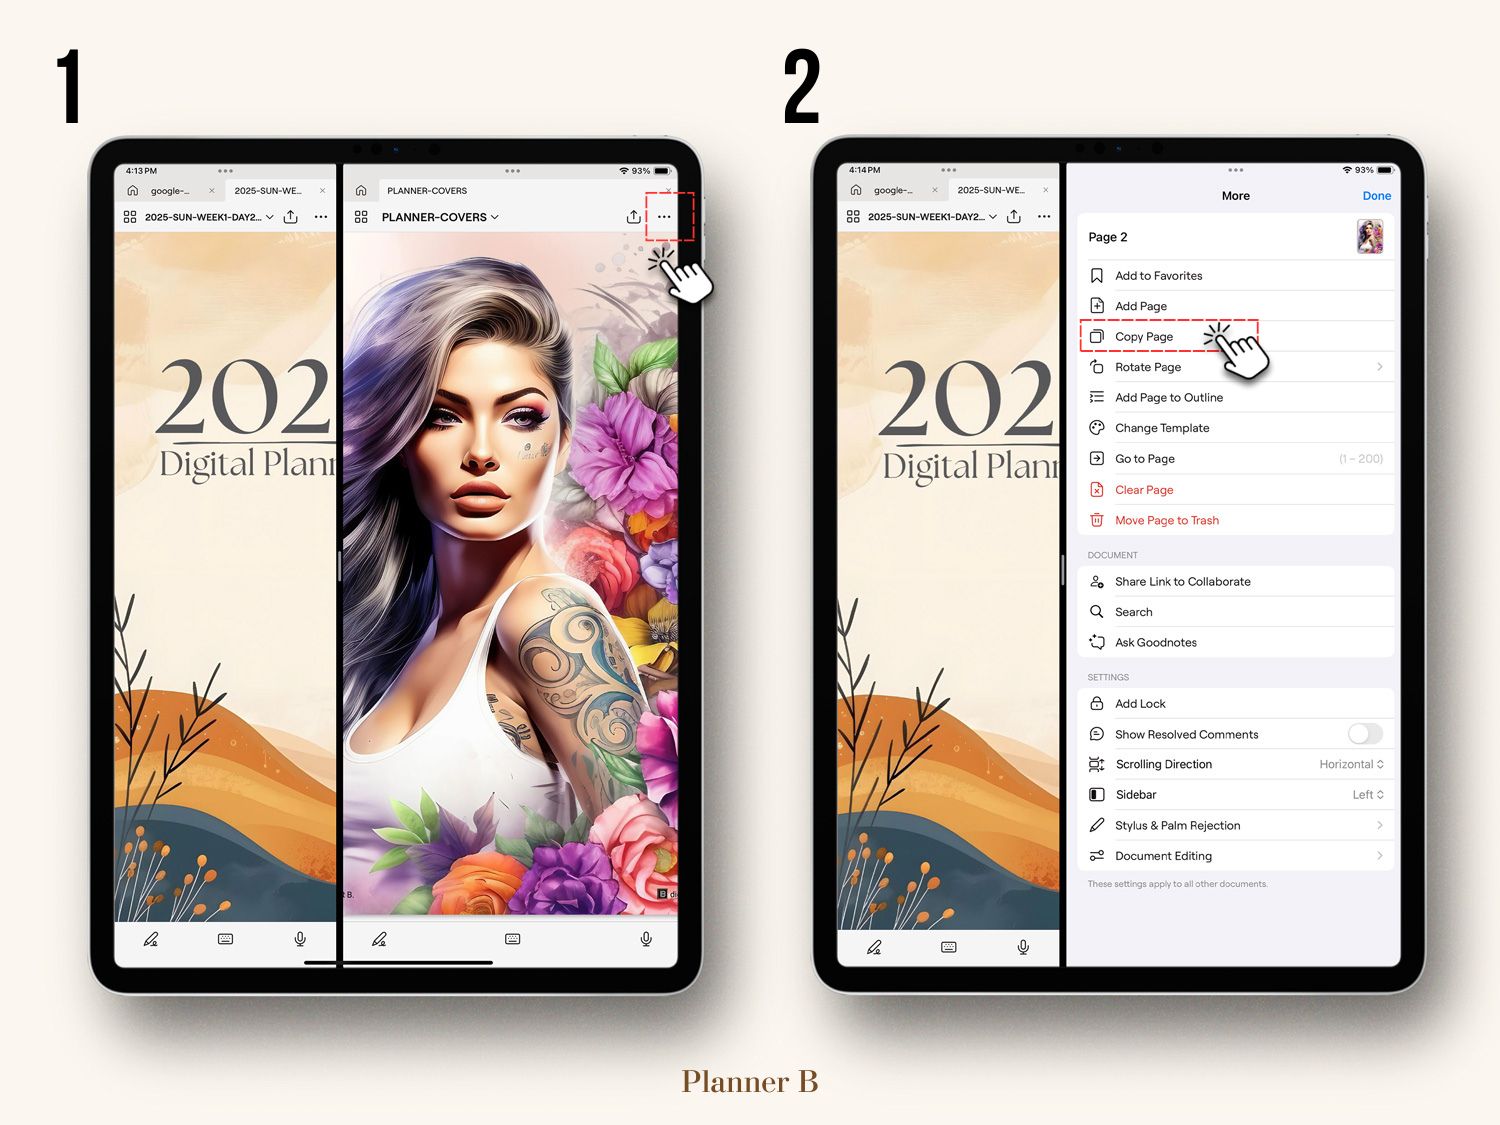
4. Switch to Your Planner
- On the planner side of the split view, navigate to the first page (the current cover) using the thumbnail view.
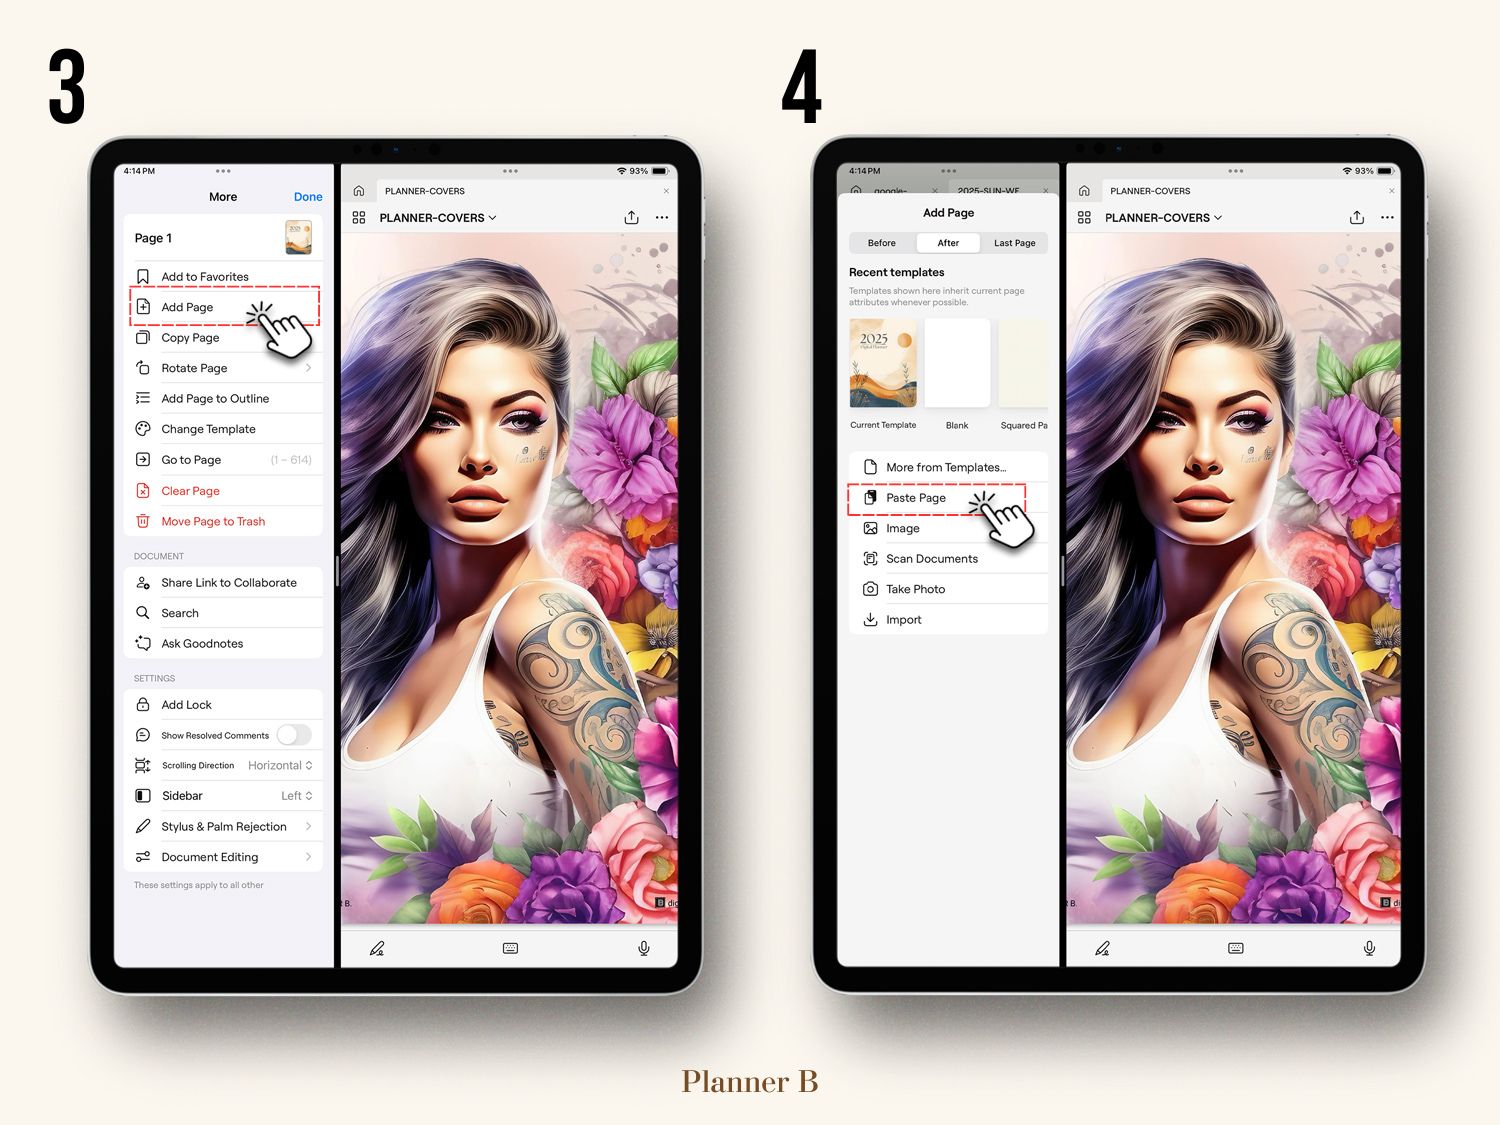
5. Replace or Add the New Cover
- Tap and hold on the thumbnail of the current cover, then select “Paste Page” to add the new cover.
- If you want, delete the old cover by tapping its thumbnail, selecting “Delete Page”, or keep it in your planner for future use.
By following these steps, you can easily refresh your planner with a new design that suits your style!
Using Tabs Instead of Split View in GoodNotes
While Split View can make the process easier, it’s not the only way to work with files in GoodNotes. You can use tabs to switch between your planner and other files just as effectively. Here’s how:
Steps to Use Tabs in GoodNotes:
- Open your planner in GoodNotes.
- Tap the “Documents” button in the top-left corner to return to your library.
- Open the cover PDF file, which will automatically open in a new tab.
- Switch between your planner and the cover file by tapping the tabs at the top of the screen.
Replace Your Cover Using Tabs:
Once both files are open in tabs:
- Navigate to the page with your desired cover in the cover file.
- Copy the cover page by tapping and holding its thumbnail and selecting “Copy Page.”
- Switch back to your planner tab, navigate to the current cover page, and Paste Page in the thumbnail view.
Using tabs is a simple and efficient alternative to Split View, allowing you to easily switch between files without needing to multitask on one screen.
Changing the Fonts in GoodNotes

Customizing fonts in GoodNotes is easy and allows you to personalize your notes or planner pages. Follow these steps to change fonts for both new and existing text:
1. Changing Fonts for New Text
To add and customize new text:
Activate the Text Tool:
- Tap the “T” icon in the toolbar at the top of the screen.
Create a Text Box:
- Tap anywhere on the page to place a text box.
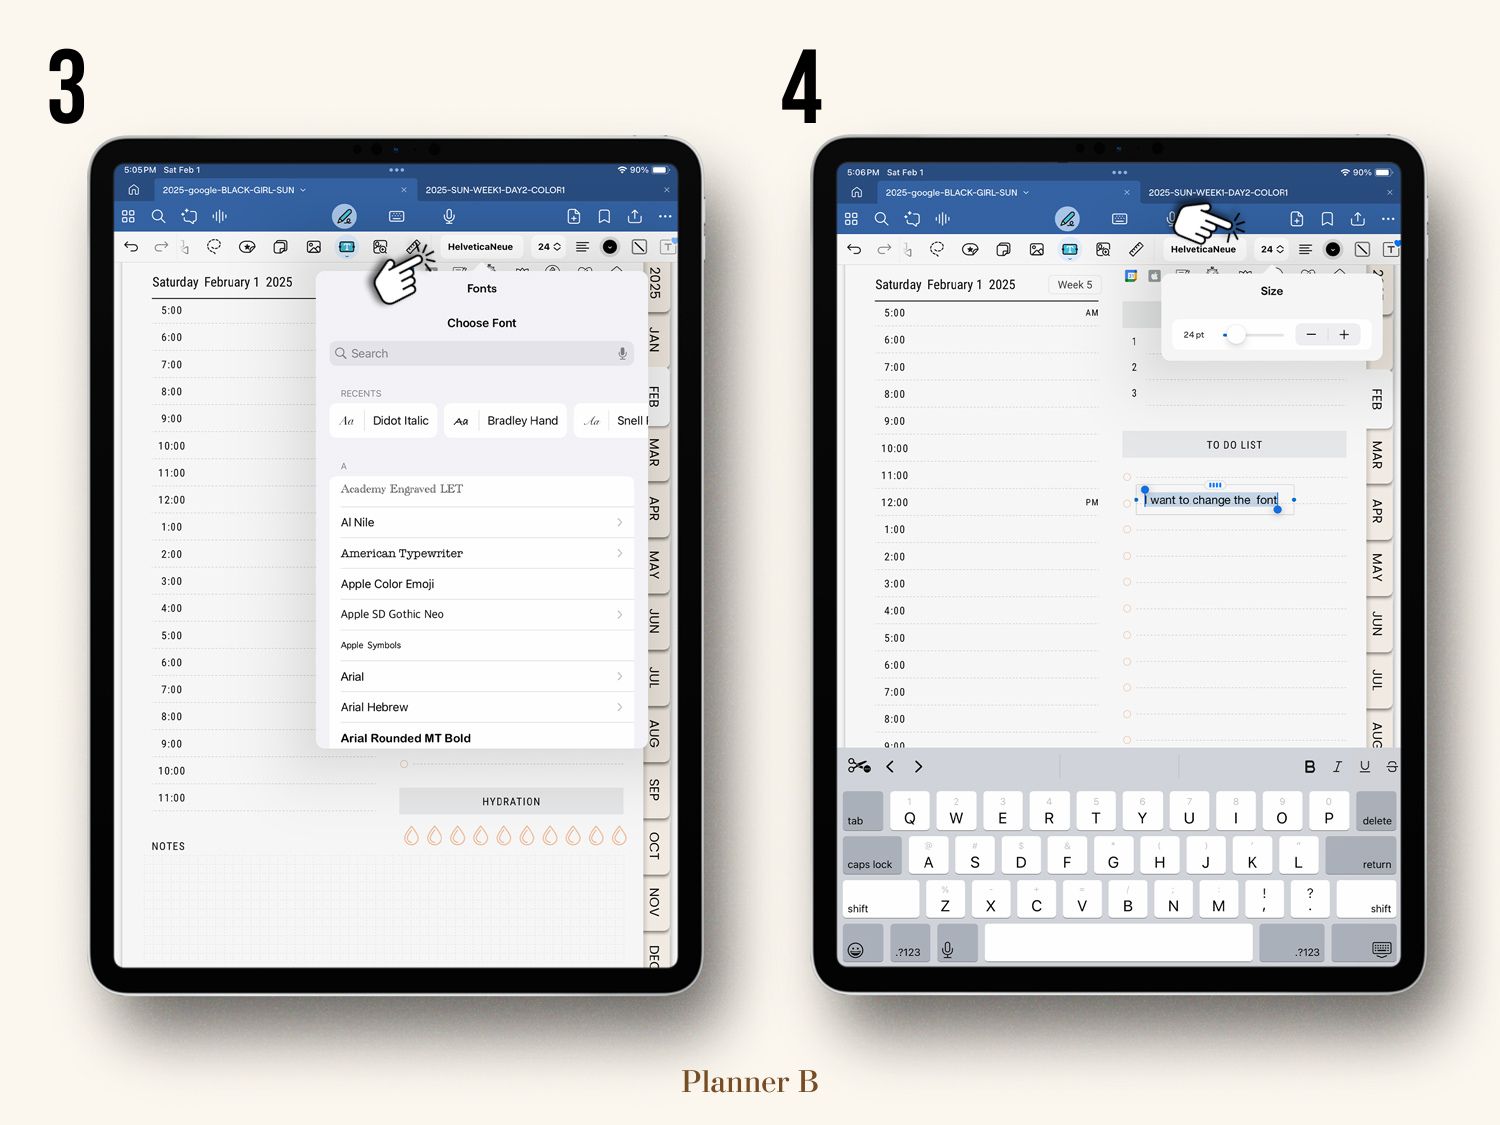
Customize the Font Style:
- When the text box is active, a toolbar will appear above the keyboard (or at the top of the screen).
- Tap the “Aa” icon or Font Style button to open font options.
- Choose from the list of available fonts and adjust the following:
- Font Size: Increase or decrease to fit your needs.
- Font Color: Pick a color to match your design.
- Font Style: Apply bold, italic, or underline effects.
- Alignment: Adjust text alignment (left, center, right, or justified).
2. Changing Fonts for Existing Text
To edit the font style of existing text:
Select the Text Box:
- Tap the text box that contains the text you want to edit.
Open Font Options:
- Once the text box is selected, the text formatting toolbar will appear.
- Tap the “Aa” icon or Font Style button.
Apply Font Changes:
- Adjust the font, size, color, or style using the options provided.
By following these steps, you can easily customize the look of your notes and planner pages in GoodNotes to suit your style and preferences.
How to Convert Handwriting to Text in GoodNotes
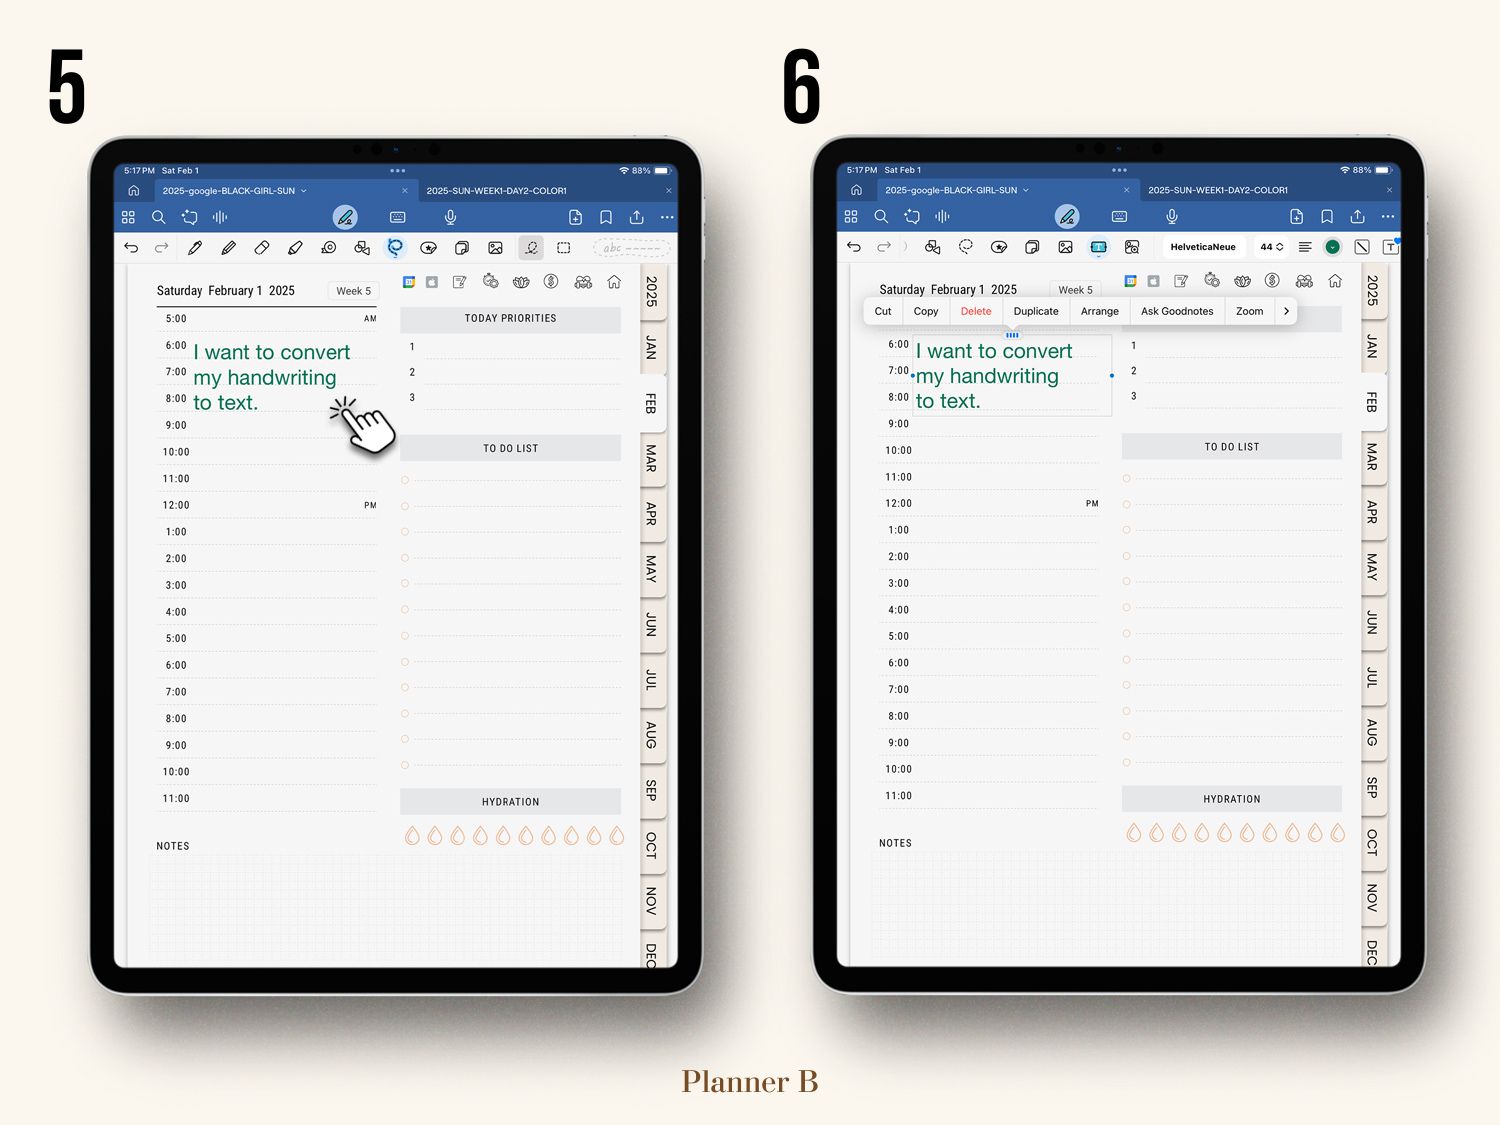

GoodNotes allows you to transform your handwritten notes into typed text for a cleaner, more polished look. Follow these steps to convert handwriting to text:
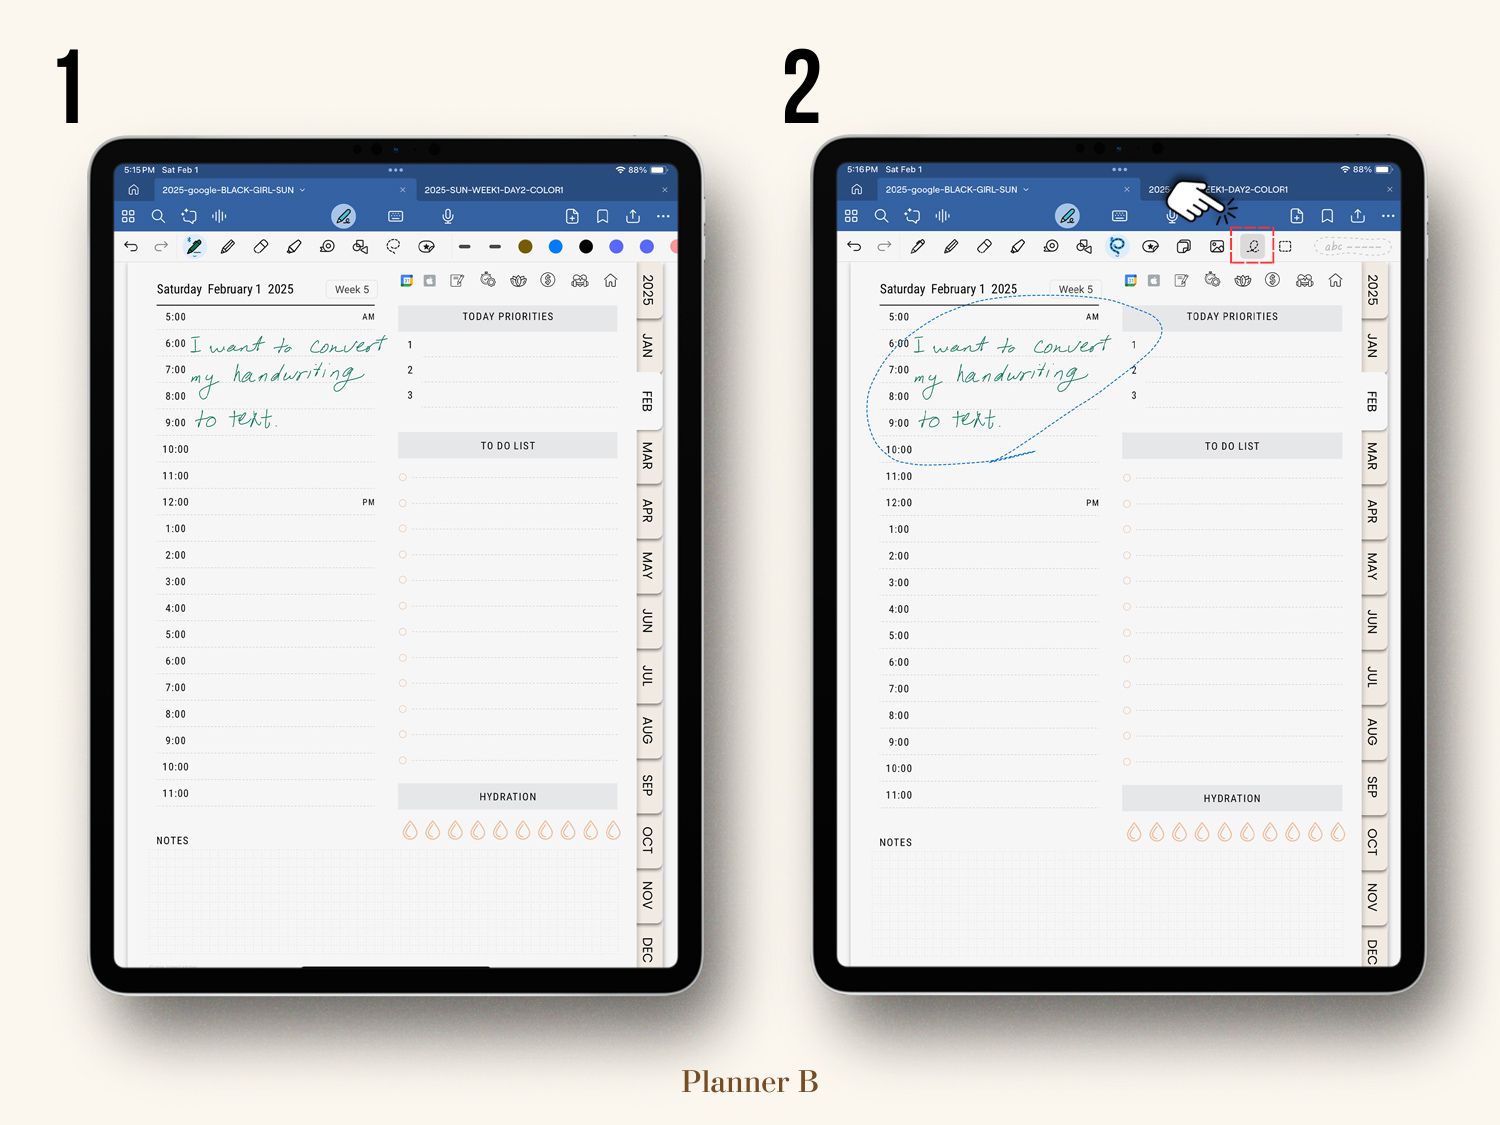
1. Write Using the Pen Tool
- Use your Apple Pencil to write on the page with the Pen Tool.
2. Select Your Handwriting
- Tap the Lasso Tool in the toolbar.
- Circle the handwriting you want to convert by drawing a loop around it.
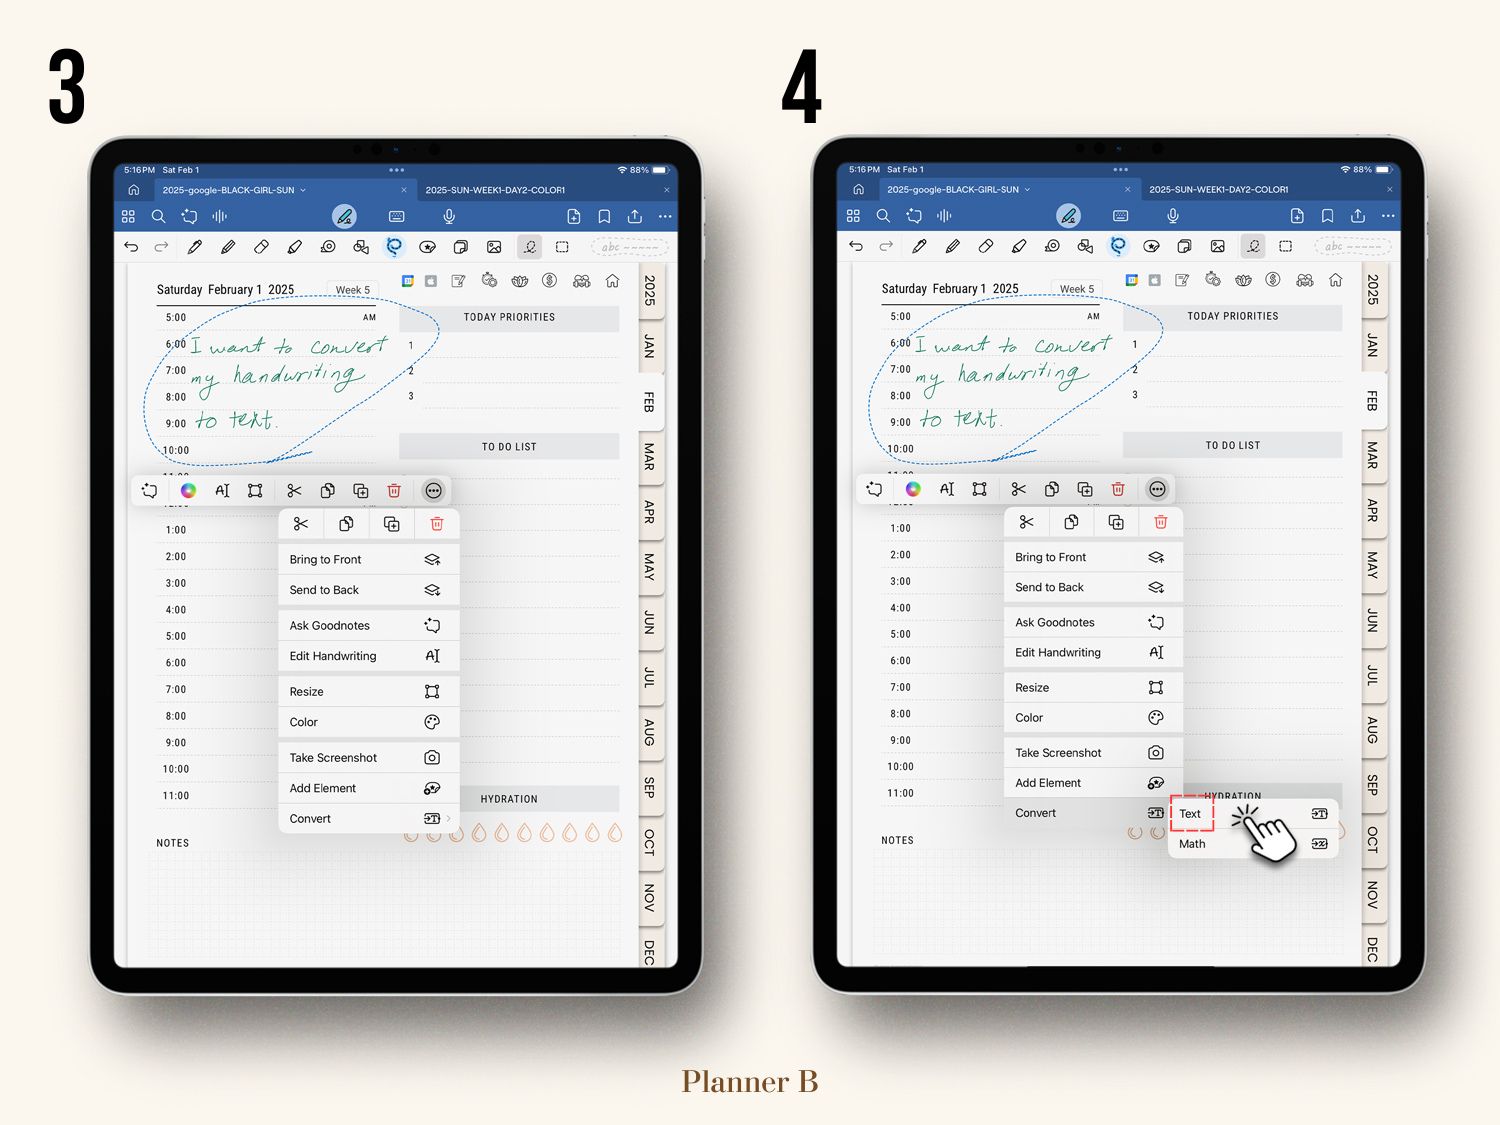
3. Convert Handwriting to Text
- Once selected, tap inside the lassoed area to bring up a menu.
- Choose “Convert” from the menu, and the handwritten text will automatically be transformed into typed text.
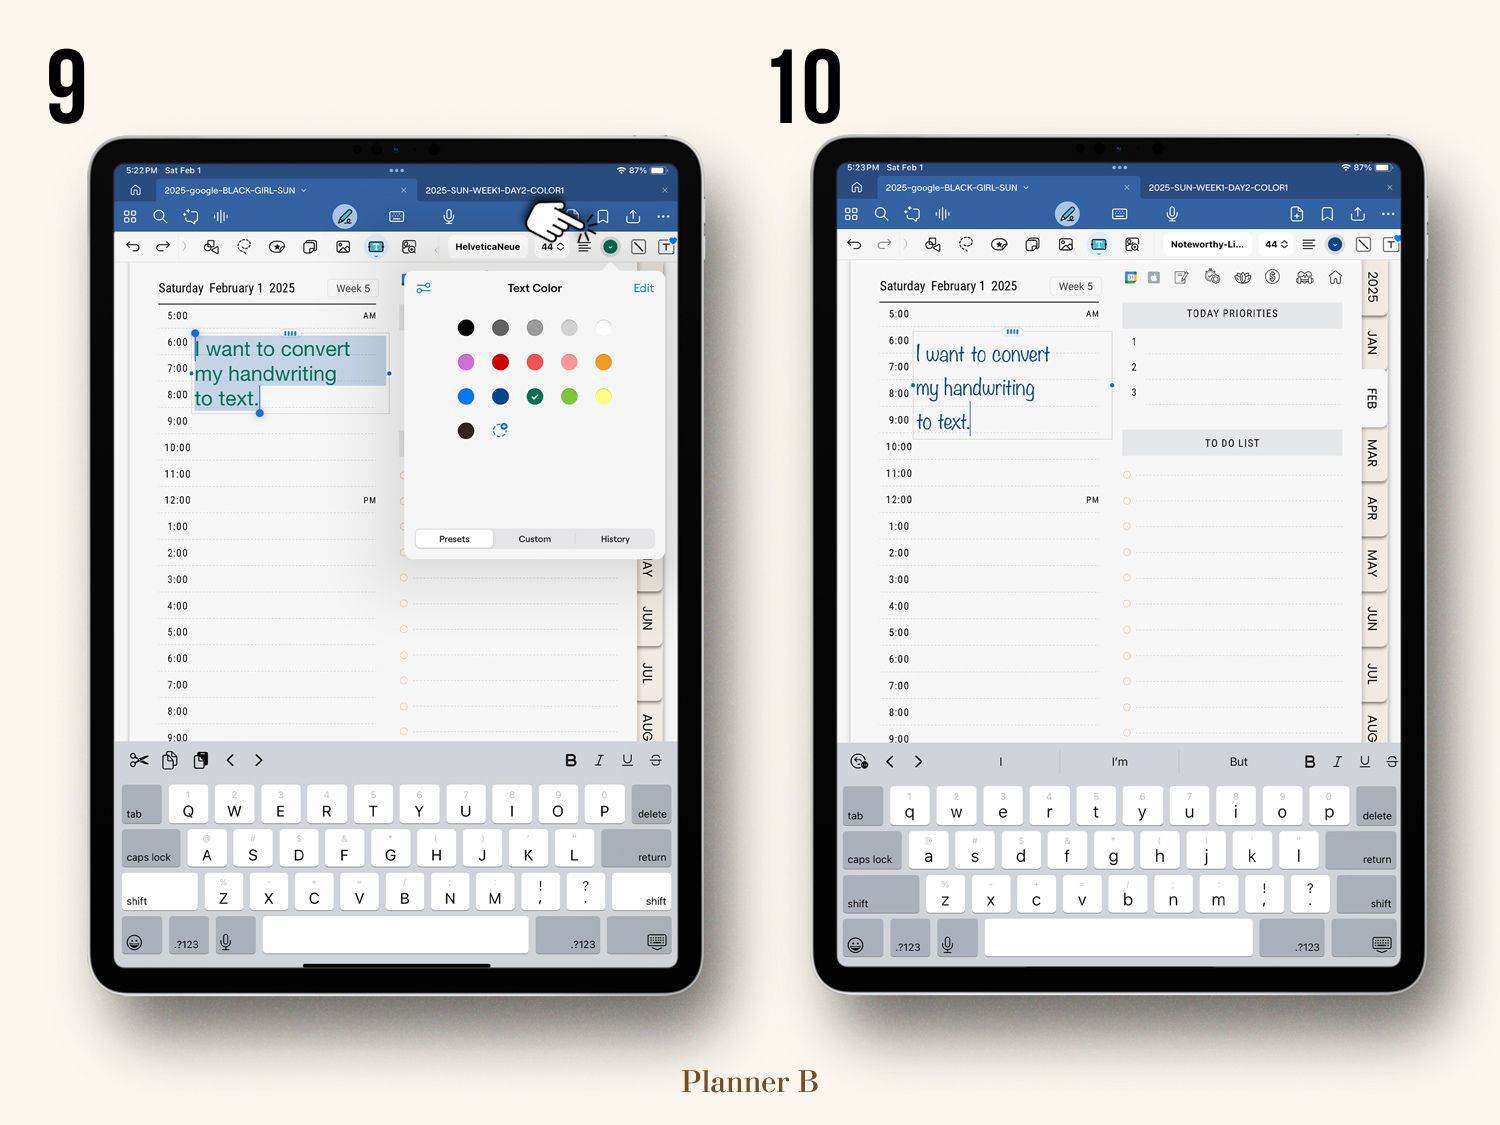
4. Edit the Converted Text
- After conversion, the text will appear in a text box.
- To edit or format it:
- Tap the text box to bring up the formatting toolbar.
- Adjust the font style, size, color, and alignment as desired.
- For a handwritten feel, choose a font that closely resembles handwriting.
By following these steps, you can quickly transform your handwritten notes into editable, typed text, making it easier to organize and share your work.
Expanding Your Planner
Adding a New Sheet to Your Planner
You can easily duplicate a page in your planner to add a new sheet of the same template. Follow these simple steps:
Navigate to the Page to Duplicate
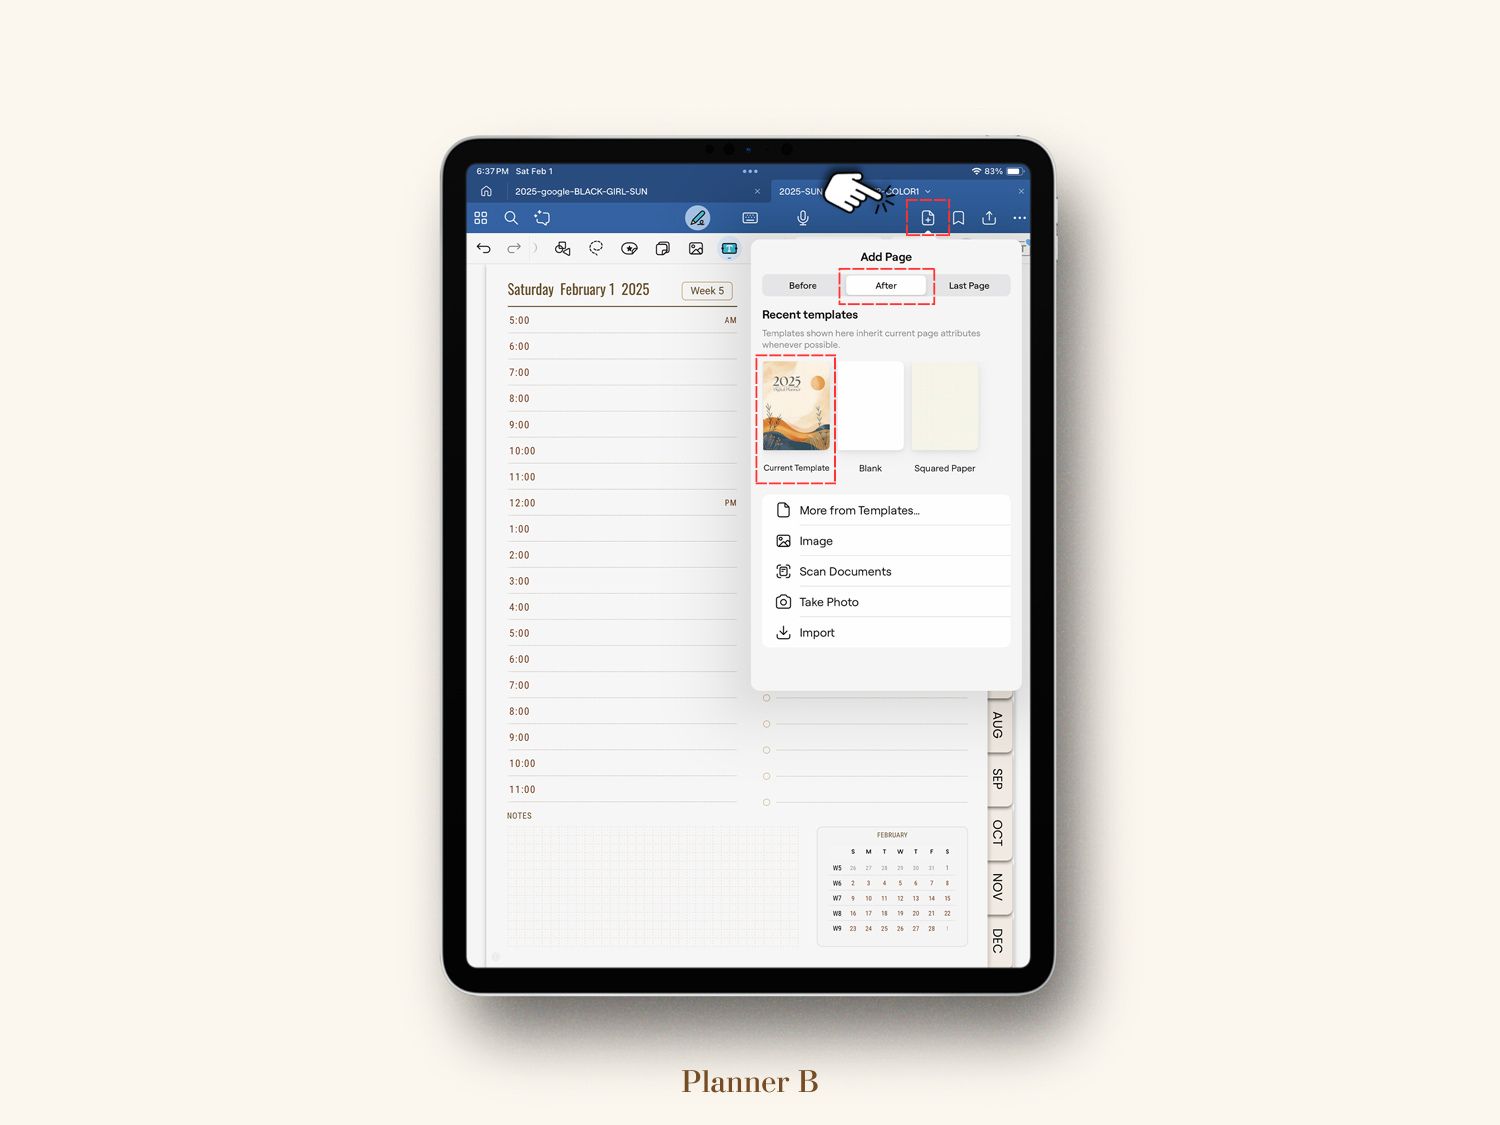
Go to the page in your planner that you’d like to add again.Find the “Add Page” Icon
Look for the icon in the top-right corner of the screen that resembles a sheet of paper with a “+” sign.Add a New Page
Tap the icon, and you’ll see options to add the page:- Before your current page.
- After your current page.
- At the end of the planner.
To insert a new sheet immediately following your current page:
- Select “current template.”
- Choose “after.”
This will duplicate the page and place it directly after the current one.
Repeat as Needed
You can repeat this process to add as many identical sheets as you want.
Important Note:
Hyperlinks in the planner will always direct you to the original page, even if you’ve duplicated it. To access the new sheets, you’ll need to manually navigate past the original page.
For reference, an attached image highlights the “Add Page” icon to help you locate it quickly.
By following these steps, you can easily customize your planner to include as many extra pages as you need.
How to Add Pages to Your Planner
In GoodNotes, you can easily add or remove pages to customize your planner. While new pages won’t have hyperlinks like the original ones, they’re perfect for duplicating templates and expanding your planner. GoodNotes also lets you move, organize, and delete pages, giving you complete control over your layout.
Key Points to Remember:
- New pages added in GoodNotes do not retain hyperlinks from the original planner.
- These pages can still be placed wherever you need them and used for additional notes, trackers, or templates.
Here’s how you can add pages to your planner:
- Navigate to the page you want to duplicate (e.g., an expense tracker or a weekly layout).
- Tap the “+” icon in the top-right corner of the screen.
- Select “Current Template”, then choose “After” to insert a new page with the same layout immediately after the current one.
- Repeat this process to add as many pages as you need for your planner.
This simple method allows you to expand your planner as needed while keeping it organized and functional. With GoodNotes, you have the flexibility to create a planner that works best for you.
Working with Stickers
How to Use Your Stickers: GoodNotes and Beyond
Your stickers are provided in two formats: GoodNotes sticker book and individual PNG files. This gives you the flexibility to use them in GoodNotes or any app that supports images. For GoodNotes users, the sticker book is the most convenient option, while PNG files are ideal for other apps.
Option 1: Using Stickers in GoodNotes
If you’re using GoodNotes, the sticker book format streamlines the process. Here’s how to use your stickers:
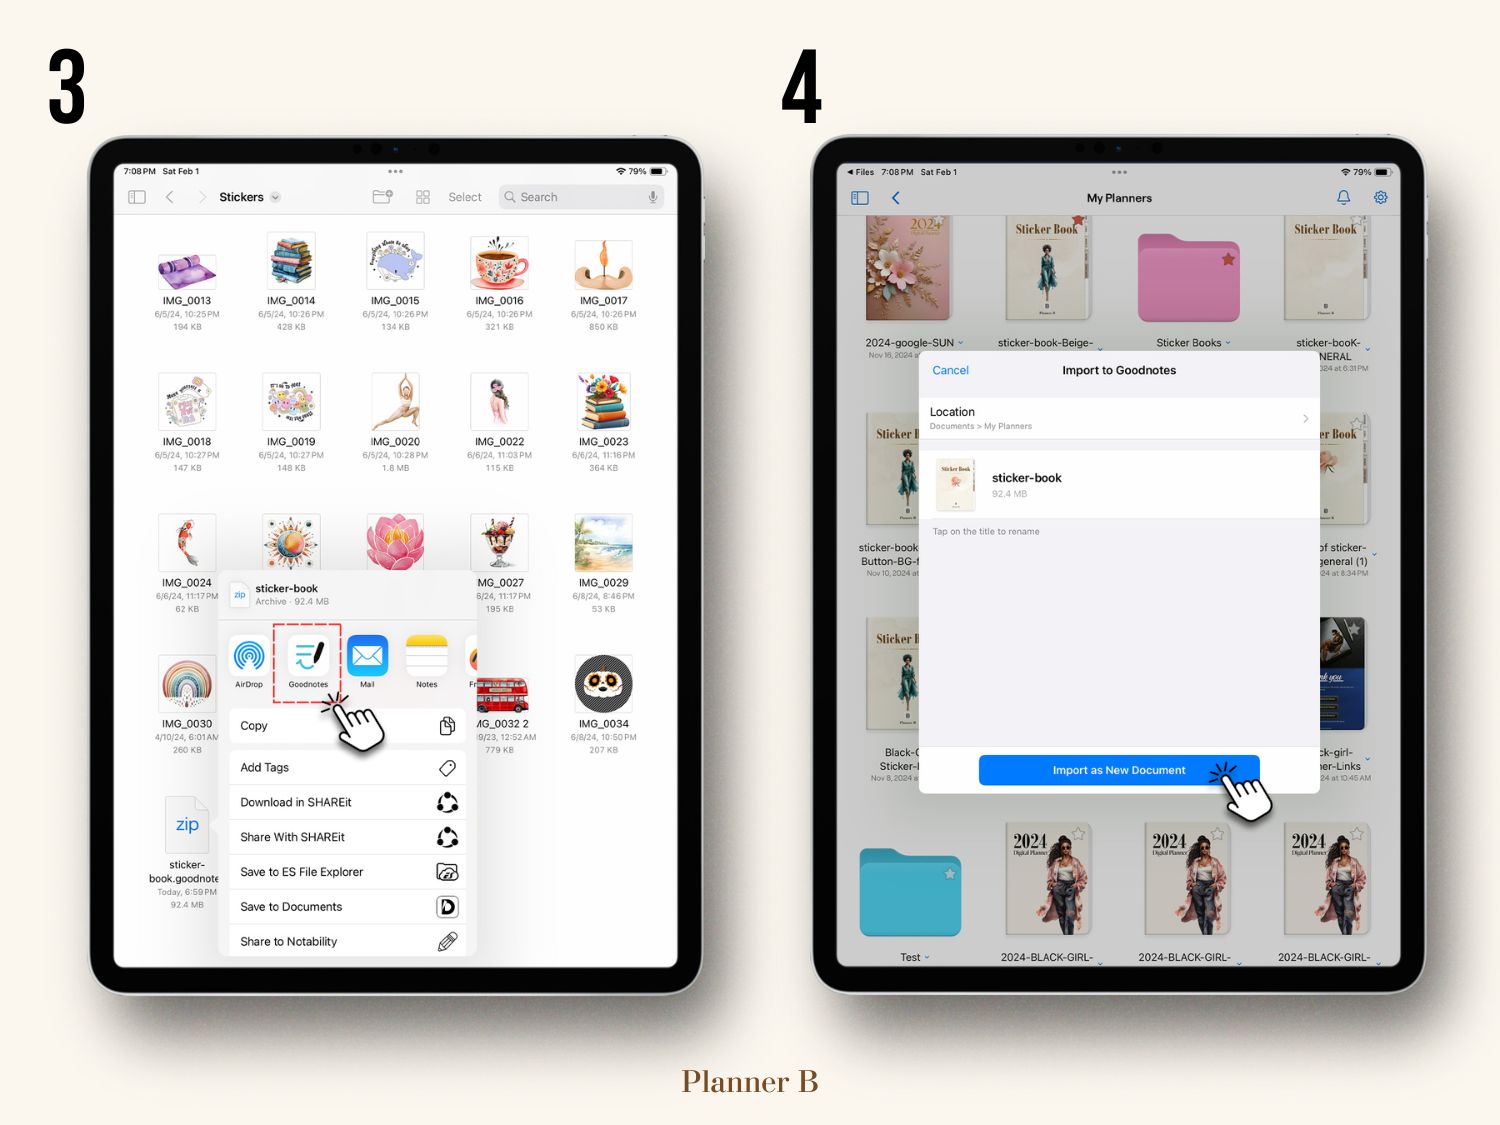
Import the Sticker Book
- Open GoodNotes and import the sticker book file just like you would with your planner.
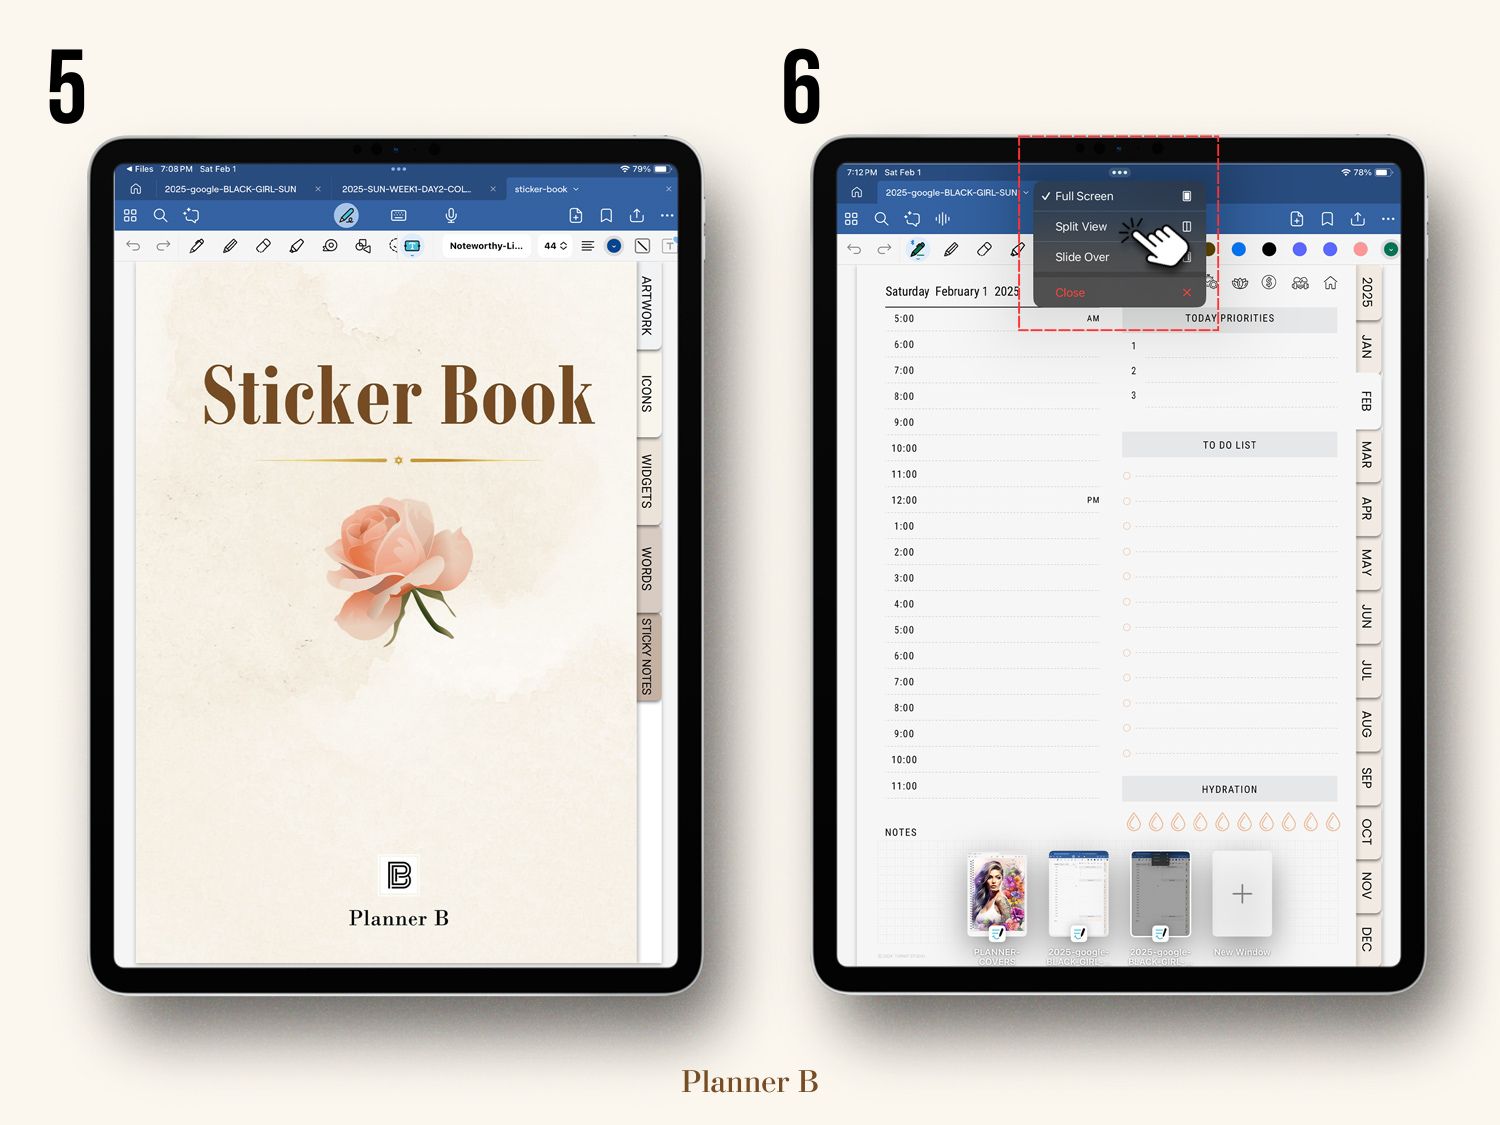
Set Up Split View
- Open your planner in one half of the screen and the sticker book in the other using Split View for easy access.
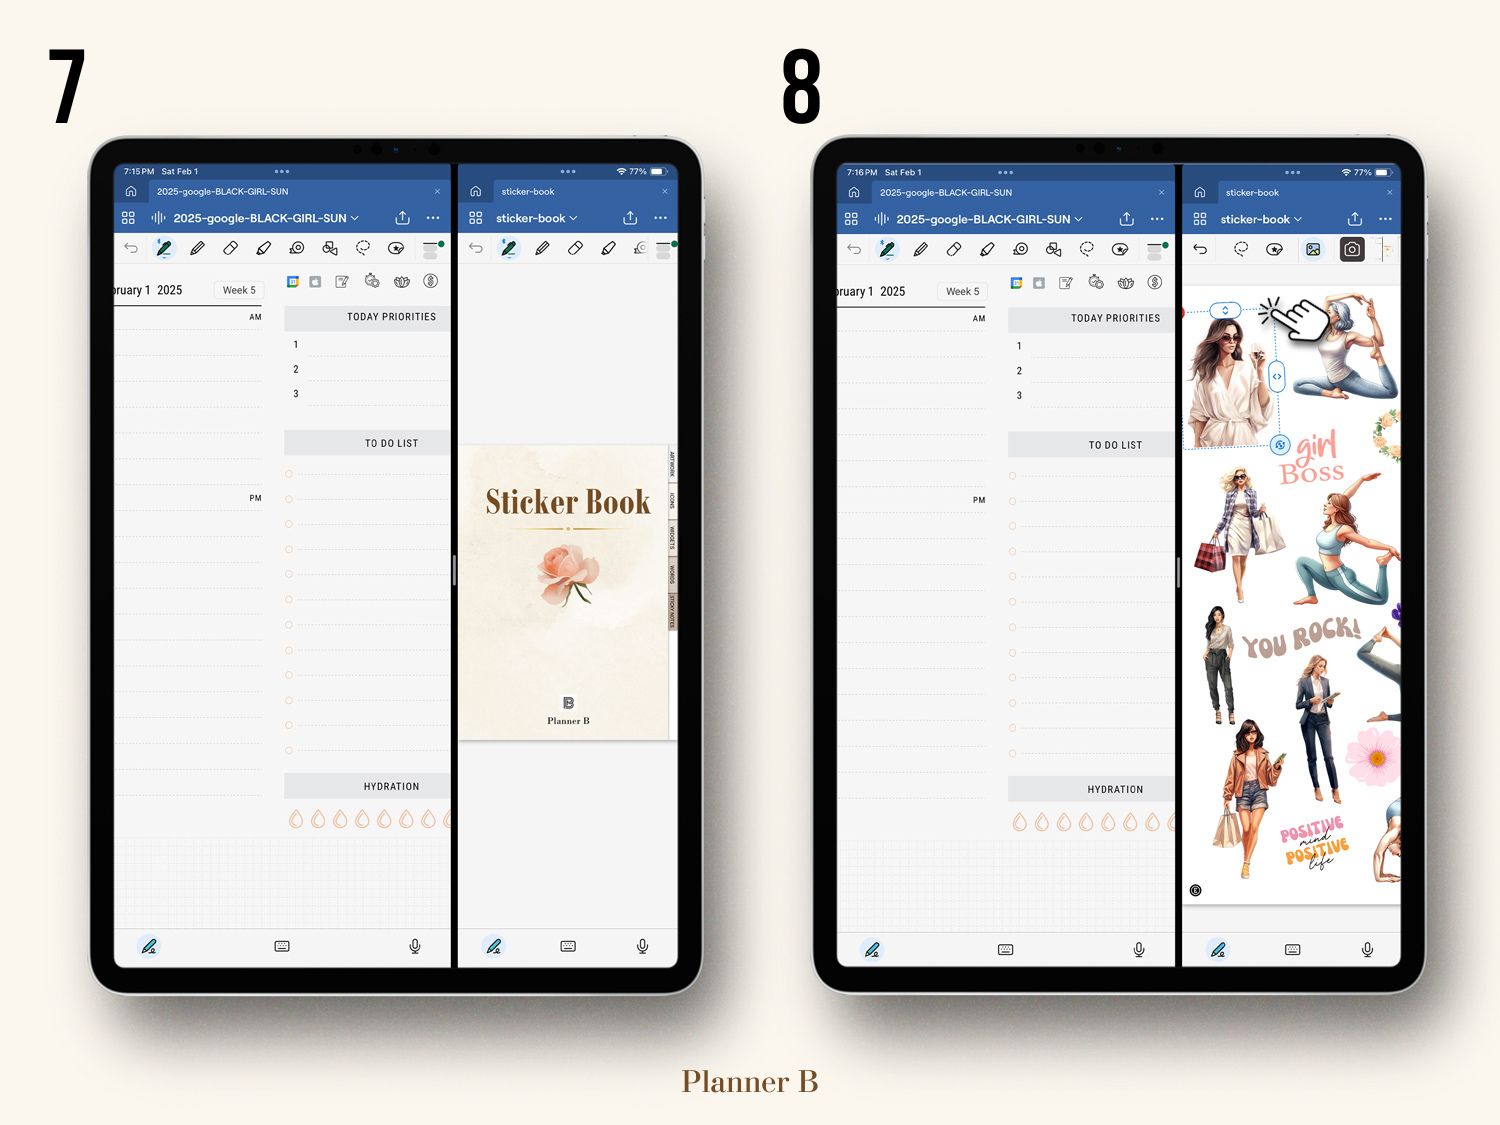
Select a Sticker
- Use the Lasso Tool to select and copy handwritten/digital stickers.
- For PNG stickers, use the Image Tool to select the desired sticker.
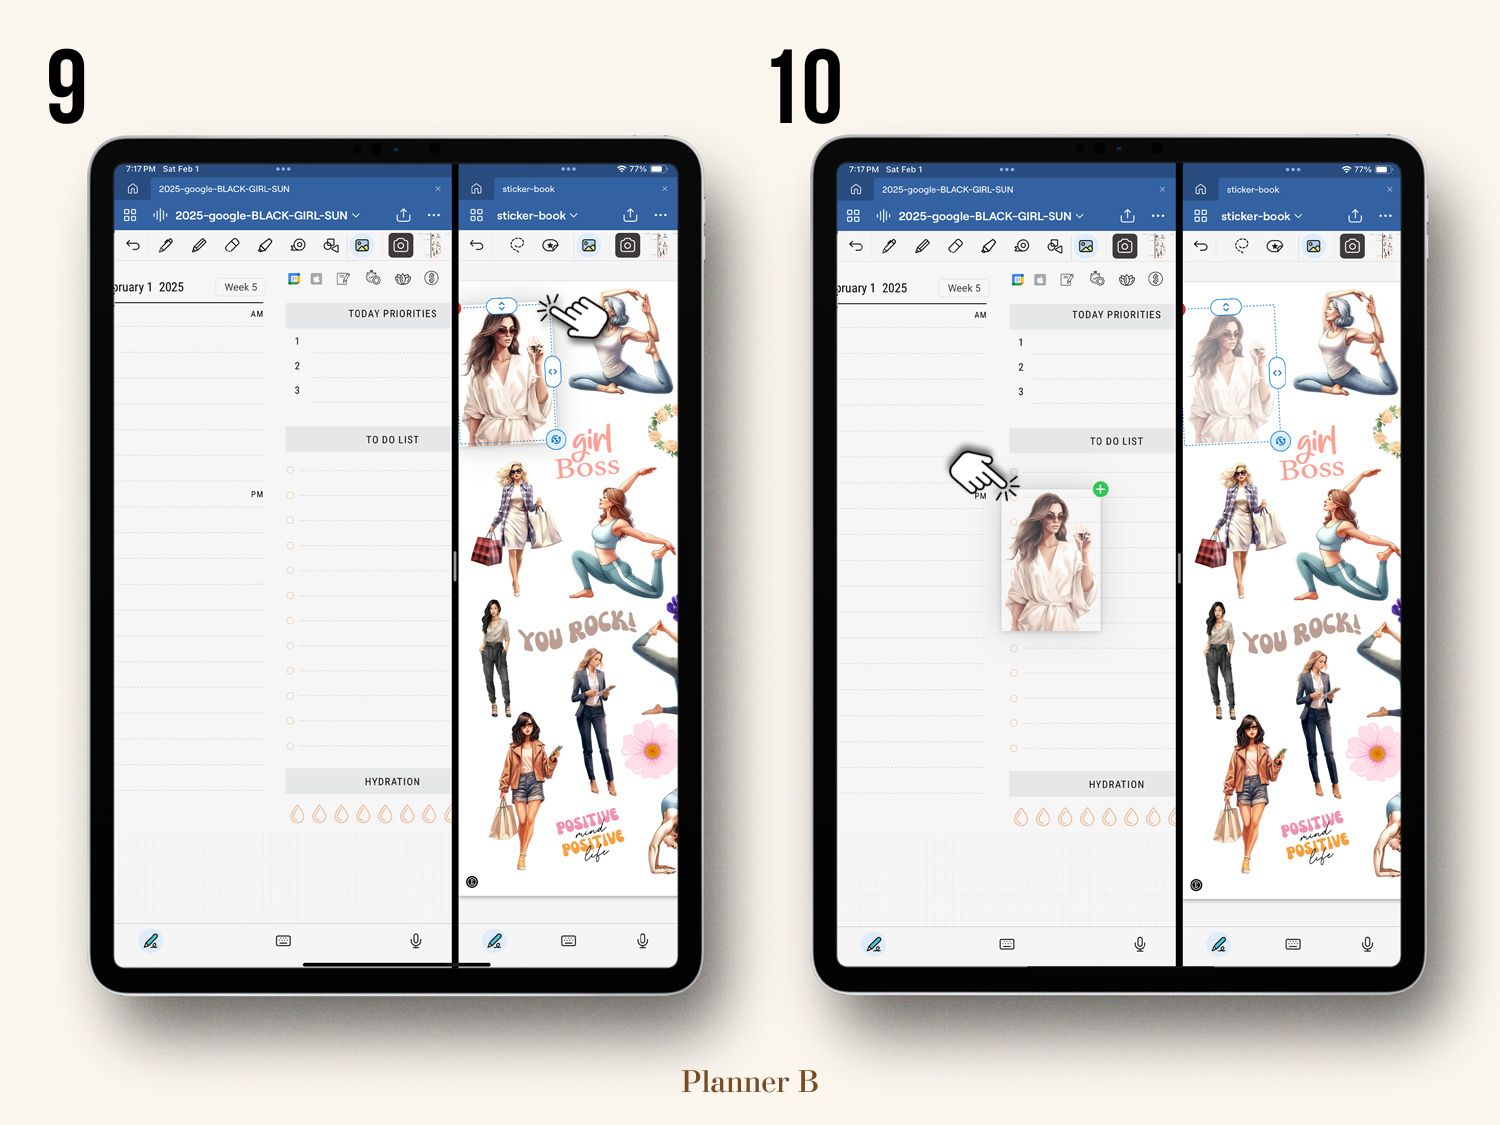
Copy and Paste the Sticker
- Once selected, copy the sticker and paste it into your planner. Position and resize it wherever you like!
Option 2: Using Individual PNG Stickers Anywhere
If you’re using other annotation apps or platforms, PNG files make your stickers versatile and easy to use.
Locate the PNG Sticker Files
- Access the folder containing your PNG stickers. This is usually included in your download or shared via a Google Drive link.
Open Your Annotation App
- Use any app that supports images, such as Notability, PDF Expert, or even graphic design tools.
Import the Stickers
- Drag and drop or import the PNG stickers directly from the folder into your app.
Position and Customize
- Resize, move, or position the sticker as needed within your document or design.
Tip: You can also use this method within GoodNotes, but the sticker book option is faster and more efficient for GoodNotes users.
With both formats available, your stickers are highly versatile, allowing you to personalize your planner or documents in any app or platform you prefer.
Using Your Digital Sticker Book in Goodnotes
If you’re using a digital sticker book with your planner, here’s a quick video guide that shows exactly how to import it, organize your stickers, and start decorating your pages effortlessly in Goodnotes.
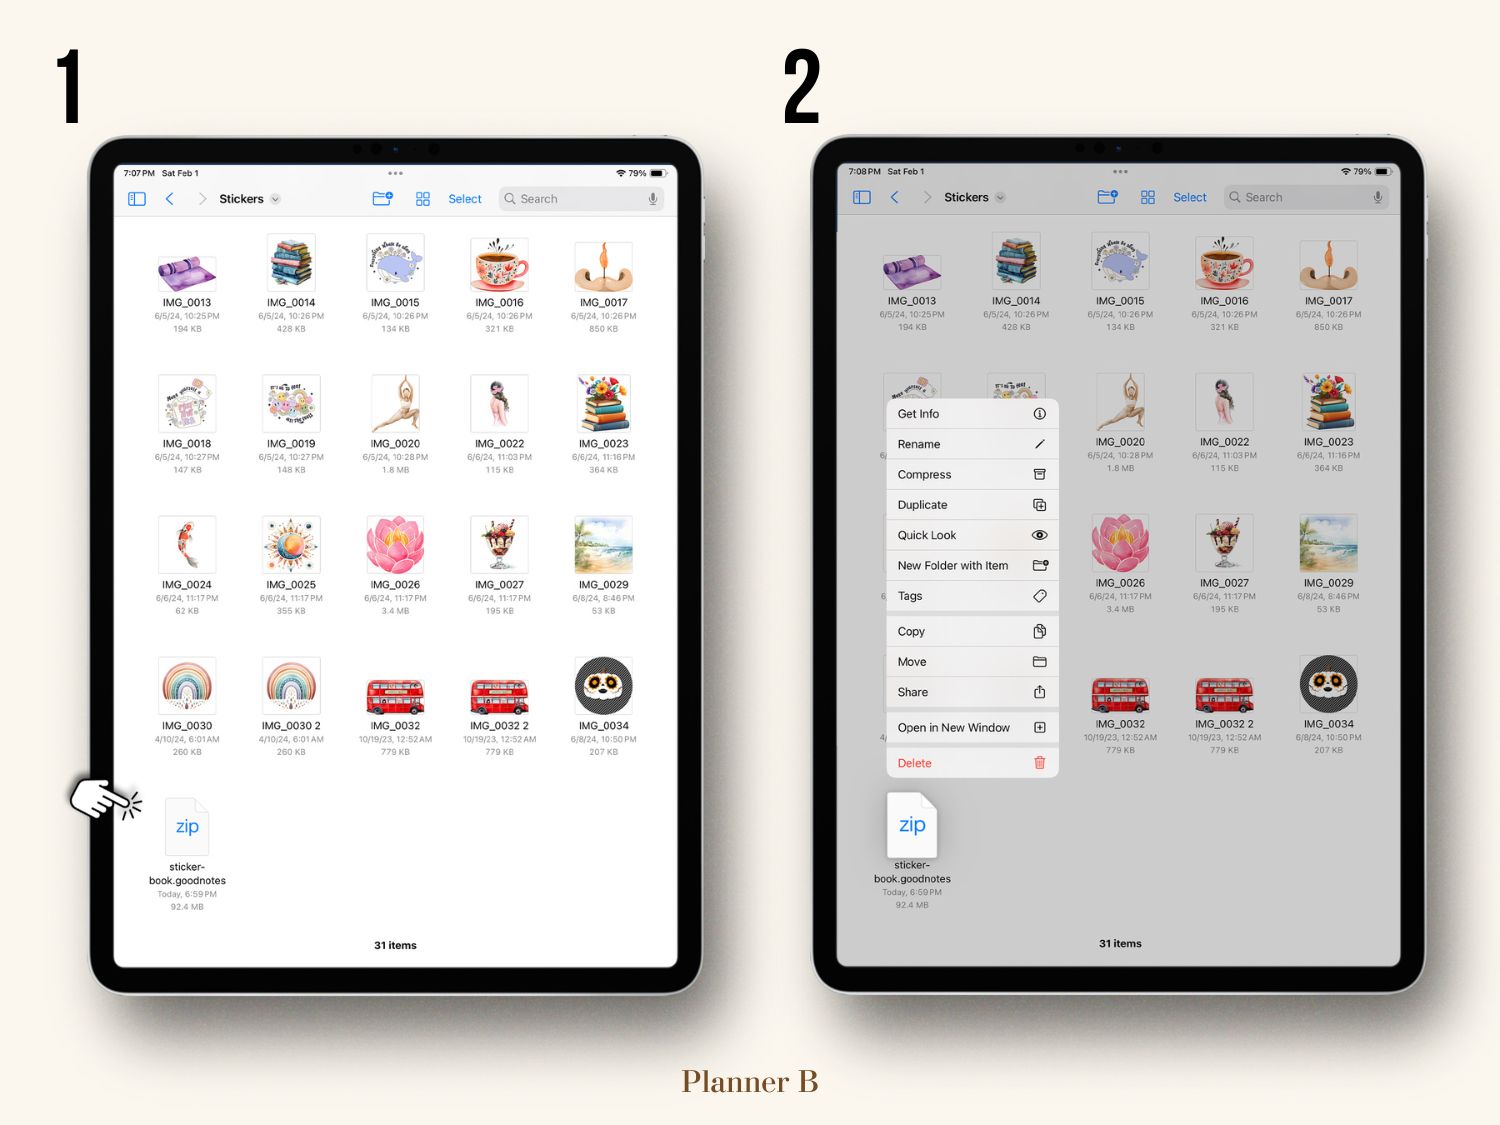
Sticker Book Open Issue in GoodNotes
If you're encountering the “missing document ID” error while trying to open your sticker book in GoodNotes, this usually indicates that the file wasn’t fully downloaded or is in an incomplete format. Here's how to resolve the issue and successfully import your sticker book.
What Causes the Error?
The “missing document ID” error happens when:
- The file wasn’t fully downloaded.
- The file format isn’t compatible with GoodNotes (it must be
.goodnotes).
Steps to Fix the Issue
Check the File Format and Size
- Ensure the downloaded file is in the
.goodnotesformat. - Verify the file size matches the expected size of the original file to confirm it was downloaded completely.
- Ensure the downloaded file is in the
Re-download the File
- Make sure your internet connection is stable during the download to prevent file corruption.
Delete the Incomplete File
- Remove the previously downloaded file from your device to avoid confusion when importing the new file.
Import the New File into GoodNotes
- Open GoodNotes and tap the + button in the toolbar.
- Select Import and navigate to the newly downloaded sticker book file.
- Once imported, the sticker book should open without issues.
Additional Tips
- If the problem persists, clear your device's cache or restart your device before attempting another download.
- Confirm that you have the latest version of GoodNotes installed, as older versions may struggle with certain file formats.
By re-downloading the file and following these steps, you should be able to resolve the issue and start using your sticker book in GoodNotes without further problems. Let me know if you'd like help with additional troubleshooting!
Stickers Are Not Just for GoodNotes
Stickers included in your download are not exclusive to GoodNotes or iOS devices. They are designed to work seamlessly on any device or with any annotation app. While the GoodNotes sticker book format is ideal for GoodNotes users, the individual PNG files offer universal compatibility for other platforms.
If you’re using an Android device or an annotation app like Xodo, here’s how to use the PNG stickers:
How to Use PNG Stickers on Any App
Locate Your Stickers
Open the folder containing the PNG stickers provided in your download.Set Up Split-Screen Mode
Open your planner in an annotation app (e.g., Xodo, PDF Expert, or similar) and display the PNG folder in split-screen mode for easy access.Drag and Drop Stickers
Select a sticker from the folder and drag it into your planner. Once imported, you can resize or move the sticker to fit your design.
This method ensures that your stickers are versatile, allowing you to personalize your planner regardless of the app or platform you’re using. If you’re using Android, note that GoodNotes for Android is still in development and may lack key features. Apps like Xodo are excellent alternatives for annotation tasks.
By using the PNG files, you have the flexibility to decorate your planner or documents on virtually any device. If you have questions or need further assistance, feel free to explore more in this guide.
Advanced Features and Tips
Using Search in GoodNotes
The search feature in GoodNotes is a powerful tool that allows you to quickly find specific text, handwriting, or documents within your library. This functionality is particularly useful for navigating large planners, finding notes, or locating specific keywords. Here's a detailed guide on how to use search effectively in GoodNotes.
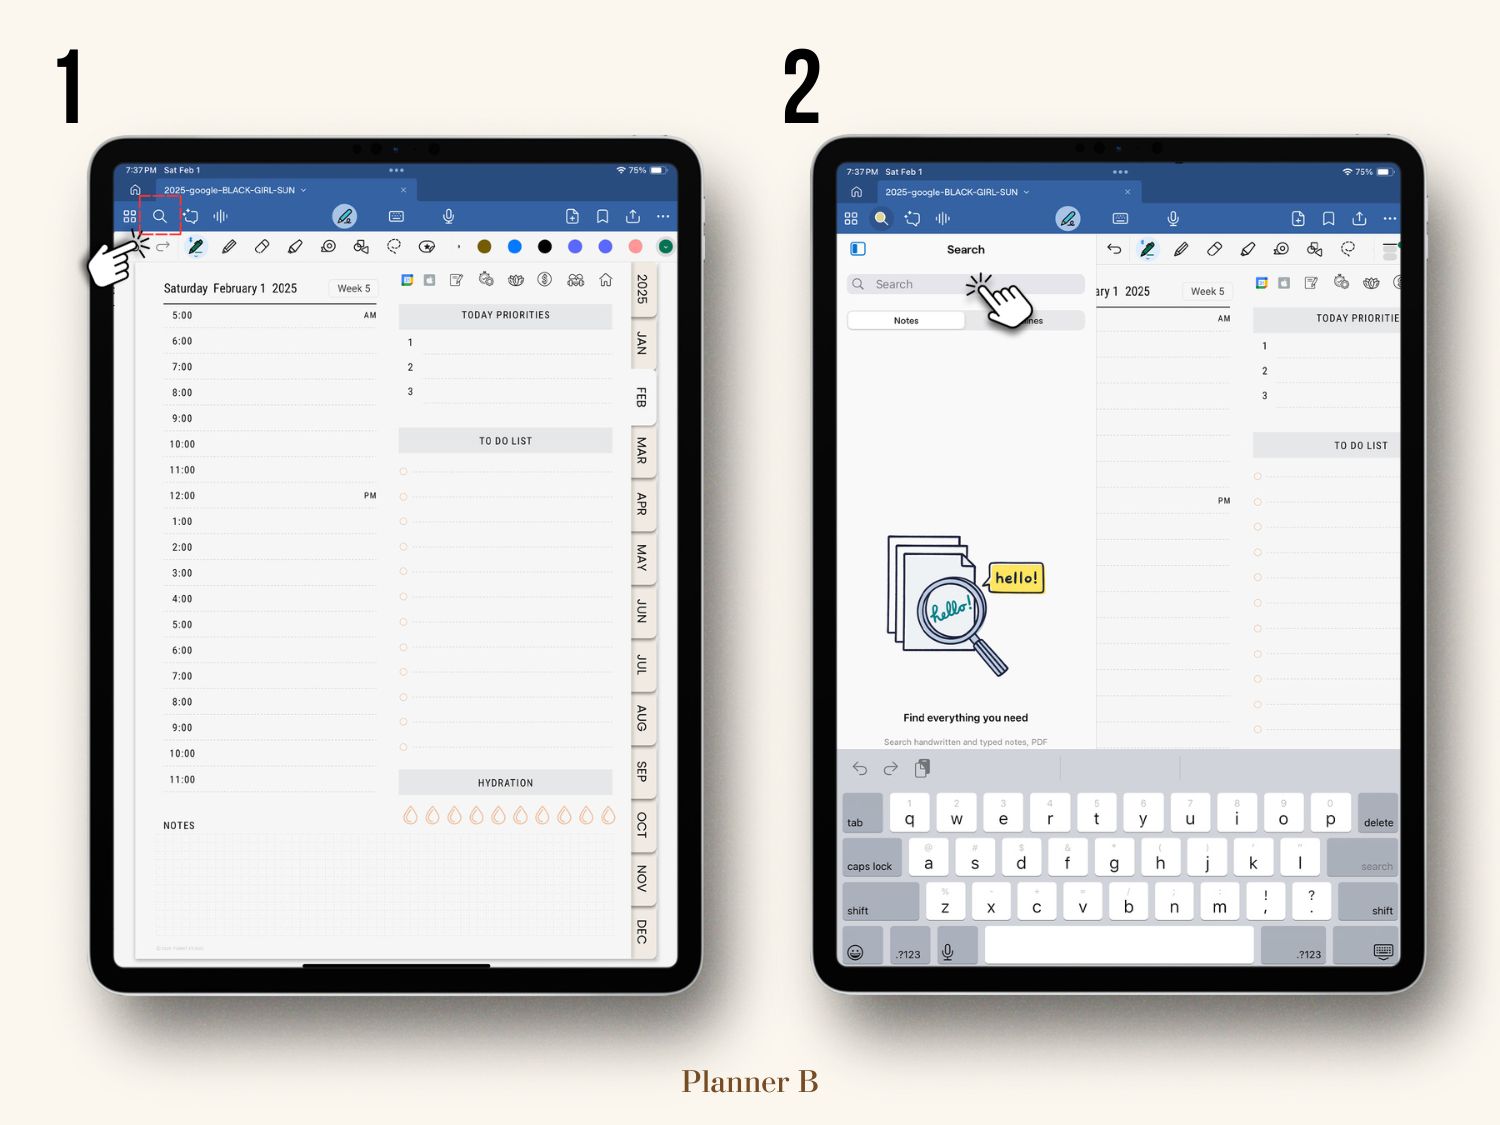
1. Accessing the Search Function
- At the top of the GoodNotes home screen, you’ll find the Search Bar. This is the starting point for all your searches.
- You can search from:
- The Library View, to find text across all your documents.
- An Open Document, to search within the current file.
2. What Can Be Searched?
GoodNotes supports searching for:
- Typed Text: Any text you’ve entered using the text tool.
- Handwriting: GoodNotes’ OCR (Optical Character Recognition) feature can identify handwritten text, as long as it is relatively neat.
- PDF Text: If your document is a PDF, text within the PDF can also be searched.
3. How to Search
Search Across Your Library:
- From the library screen, type your keyword into the search bar.
- Results will display matching documents and specific pages within those documents.
- Tap a result to open the document at the relevant page.
Search Within a Document:
- Open the document where you want to search.
- Tap the magnifying glass icon in the top toolbar.
- Type your keyword into the search field.
- GoodNotes will highlight all occurrences of the keyword throughout the document.
4. Using Filters for Better Results
GoodNotes allows you to refine your searches:
- Filter by handwriting, text, or document title for more precise results.
- Use specific keywords or phrases to narrow down your search.
5. Tips for Effective Searches
- Use Specific Keywords: The more precise your search term, the better the results.
- Handwriting Clarity: Ensure your handwriting is legible. GoodNotes is excellent at recognizing neat writing but may struggle with cursive or messy text.
- Use Tags or Labels: If you’ve organized documents with tags, you can search by tags to find grouped notes.
6. Troubleshooting Search Issues
- If GoodNotes isn’t finding your handwriting:
- Ensure you’ve enabled handwriting recognition in your app settings.
- Check that your document language matches the handwriting recognition language in GoodNotes.
- If text isn’t recognized in a PDF:
- Confirm that the PDF is text-based (some PDFs are image-based and cannot be searched).
7. Why Use Search in GoodNotes?
- Quickly locate specific information in large planners or journals.
- Find notes or entries from previous months without flipping through pages.
- Save time when working with extensive documents or when planning across multiple sections.
By mastering the search feature, you can easily navigate and manage your notes, making GoodNotes a more efficient tool for your daily needs. Let me know if you'd like additional details or examples for specific scenarios!
How to Back Up Your Planner in GoodNotes
Backing up your planner is essential to ensure you don’t lose your work due to accidental deletions, device issues, or app errors. GoodNotes offers several ways to create backups, giving you the peace of mind that your planner and notes are safe. Here’s a detailed guide to backing up your planner in GoodNotes.
1. Why Backing Up is Important
- Data Protection: Prevent loss of important notes and planner content.
- Accessibility: Easily restore your planner if you switch devices or reinstall GoodNotes.
- Version Management: Keep copies of your planner at different stages for reference.
2. Backup Options in GoodNotes
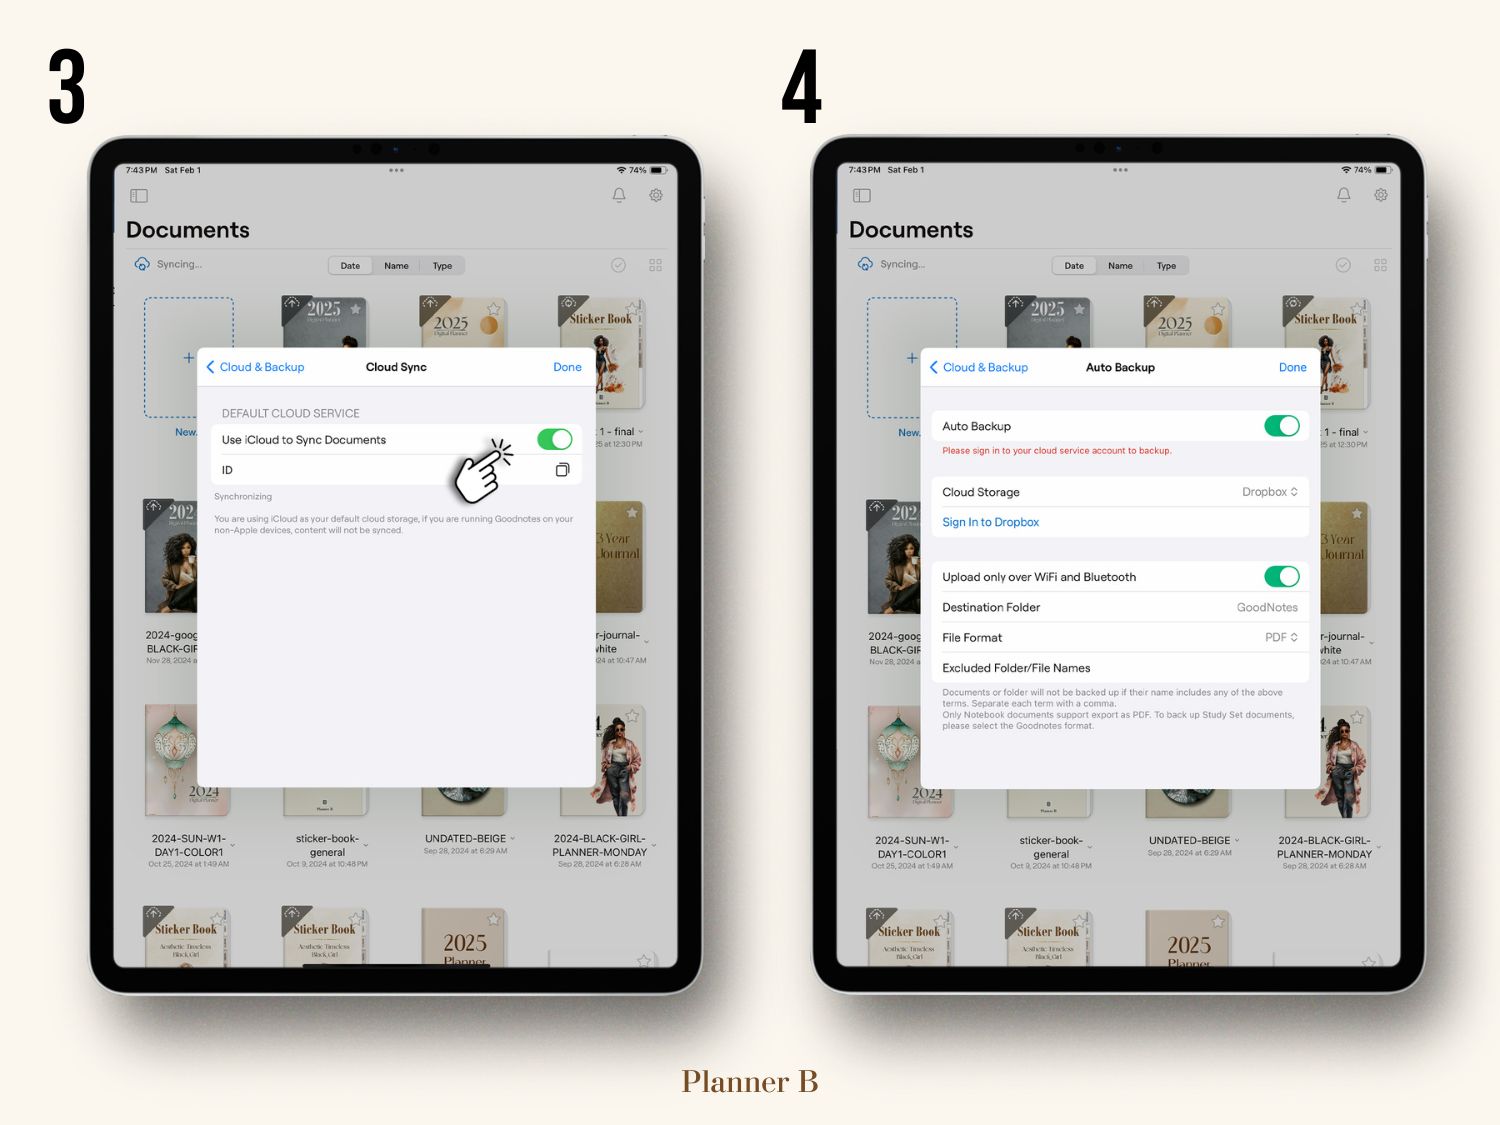
Automatic iCloud Sync
GoodNotes supports automatic syncing with iCloud to ensure your files are always up to date across all your Apple devices.
- How to Enable iCloud Sync:
- Go to Settings in GoodNotes.
- Tap iCloud Settings and toggle Sync GoodNotes Documents to enable automatic syncing.
- Once enabled, your planner will automatically back up to iCloud whenever changes are made.
Note: iCloud Sync doesn’t create permanent backups; it mirrors the current state of your documents. For long-term backups, use other options.
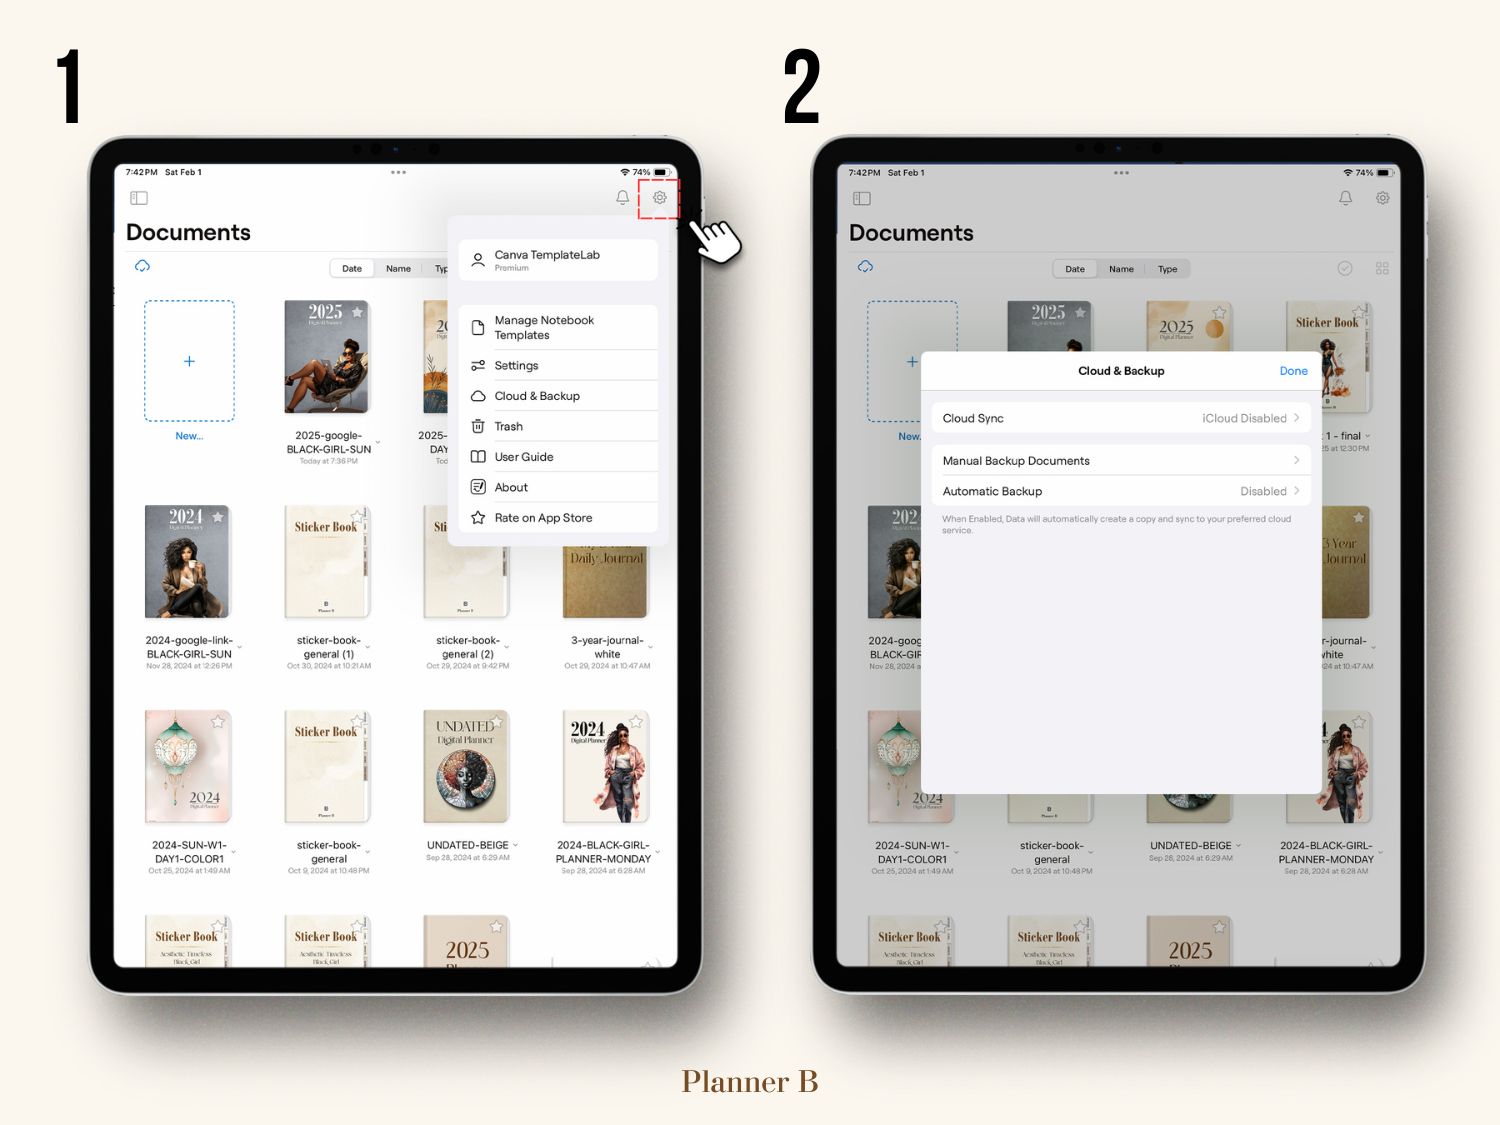
Manual Backups to Cloud Services
You can manually back up your planner to cloud services like Google Drive, Dropbox, or OneDrive.
- How to Create a Manual Backup:
- Open your planner in GoodNotes.
- Tap the Share icon (a box with an arrow pointing up) in the top toolbar.
- Select Export All or choose specific pages to back up.
- Choose the format (e.g., GoodNotes file or PDF).
- Save the file to your desired cloud storage or email it to yourself.
Automatic Backups to Third-Party Services
GoodNotes allows you to set up automatic backups to services like Google Drive or Dropbox.
- How to Enable Automatic Backups:
- Go to Settings in GoodNotes.
- Tap Backup Data and select Auto-Backup.
- Choose your preferred cloud storage and log in.
- GoodNotes will automatically back up all your files in the selected format.
3. Tips for Effective Backups
- Export in Multiple Formats: For added flexibility, back up your planner as both a GoodNotes file (for editing) and a PDF (for viewing on any device).
- Regular Backups: Schedule regular manual backups to ensure you always have an up-to-date copy of your planner.
- Label Backup Files: Use clear file names, such as “Planner_Backup_Jan2025,” to keep your backups organized.
4. Restoring Your Planner from a Backup
- To restore your planner, open GoodNotes and tap the + button in the library view.
- Select Import and navigate to the location of your backup file.
- Import the file, and it will appear in your library, ready to use.
Backing up your planner is a simple but crucial step to protect your work and ensure it’s always accessible. By using the options GoodNotes provides, you can customize a backup strategy that fits your needs. Let me know if you’d like more details on any step!
How to Delete Pages Without Losing Content in GoodNotes
Deleting pages in your planner can help streamline your workflow and remove unnecessary content. However, it’s important to do this carefully to ensure you don’t accidentally lose important notes or disrupt the structure of your planner. Here’s how to delete pages effectively while maintaining your content and planner functionality.
Steps to Safely Delete Pages
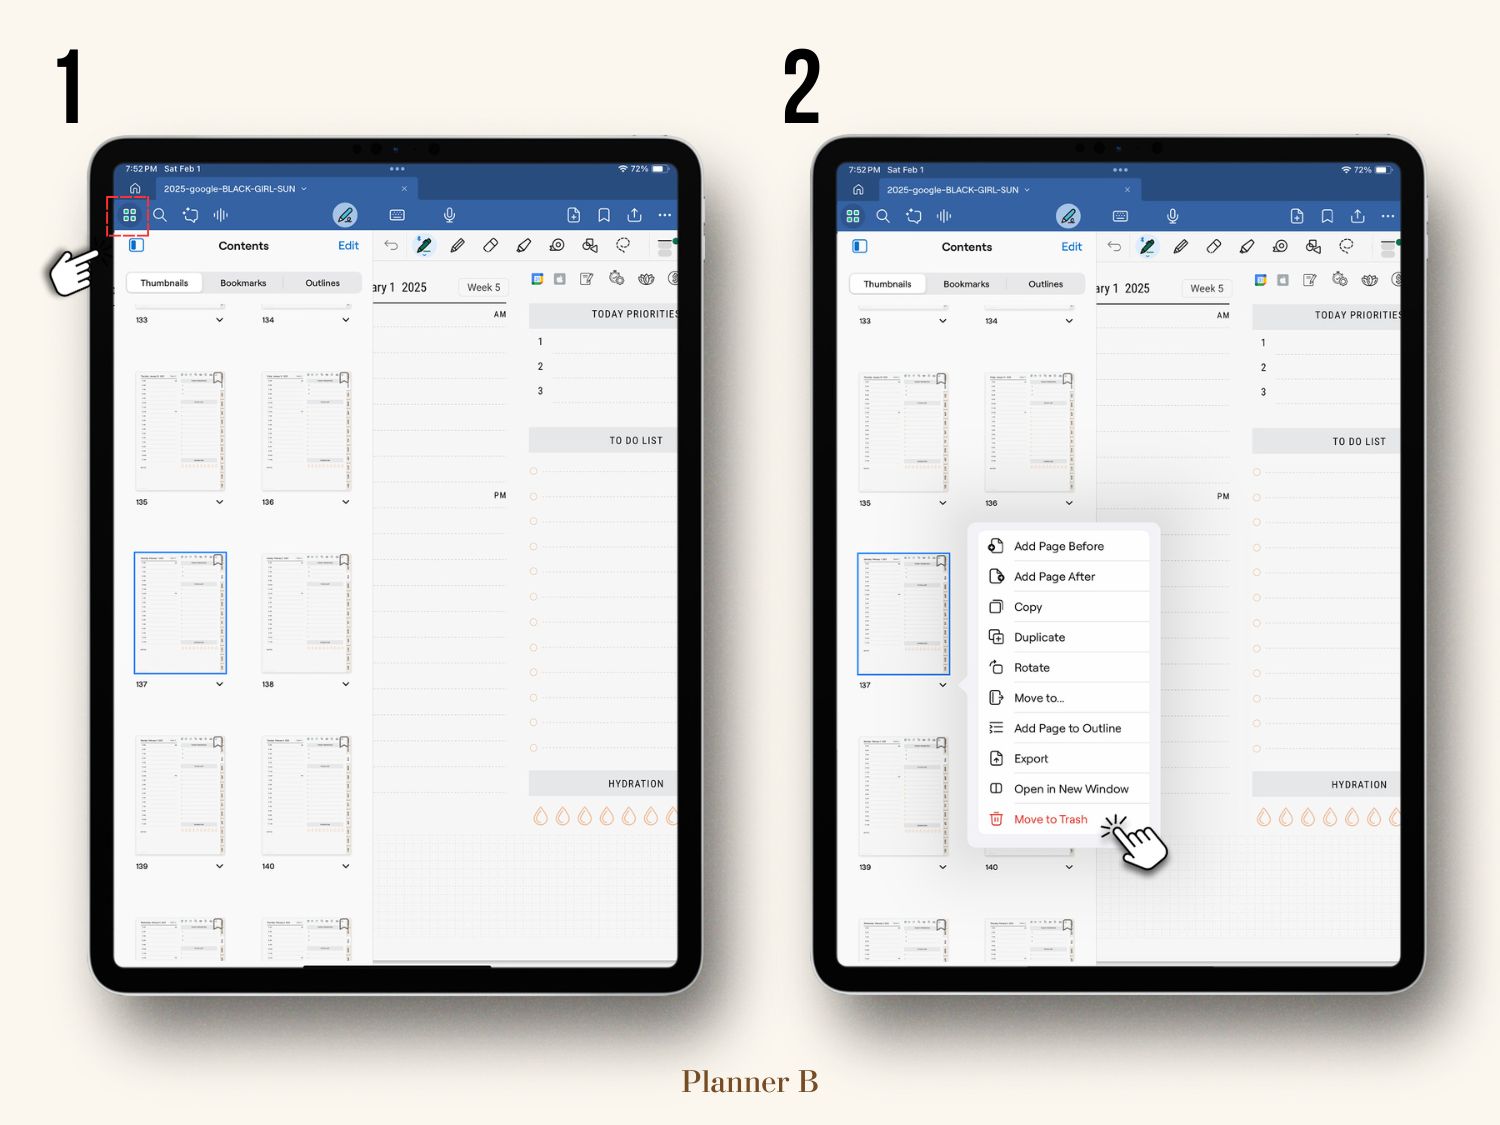
Open the Thumbnail View
- Tap the thumbnail icon in the top toolbar to view all pages in your planner. This makes it easy to locate the page(s) you want to delete.
Select the Page to Delete
- Scroll through the thumbnail view and find the page you want to remove.
Delete the Page
- Tap and hold the thumbnail of the page.
- Select “Delete” from the options that appear.
Confirm the Deletion
- GoodNotes will prompt you to confirm. Tap “Delete” to finalize.
Key Considerations
- Hyperlinked Pages: Deleting a hyperlinked page will cause the hyperlink to redirect to the next existing page or fail to work. Be cautious when removing core pages like calendars or index pages.
- Duplicated Pages: If the page you’re deleting was a duplicate (e.g., a template you added), removing it won’t affect the original page or its hyperlinks.
- Back Up Before Deleting: If you’re unsure about deleting a page, create a backup of your planner to ensure you can restore the content if needed.
By following these steps, you can safely delete pages in GoodNotes without losing important content or disrupting your planner’s structure.
Device-Specific Tips and Troubleshooting
Apple Pencil vs. Non-Apple Pencil in GoodNotes
GoodNotes is designed to work with a variety of input methods, including the Apple Pencil, third-party styluses, and even your finger. However, certain features are optimized for the Apple Pencil due to its advanced functionality and seamless integration with iOS devices. Here’s a comparison to help you understand the differences:
Features Optimized for the Apple Pencil
Pressure Sensitivity
The Apple Pencil supports pressure-sensitive writing, allowing you to vary line thickness based on how hard you press. Third-party styluses without this feature will produce uniform line thickness.Tilt Support
The Apple Pencil detects tilt, making it ideal for shading and creating artistic effects. Most non-Apple styluses lack this capability.Palm Rejection
Apple Pencil provides precise palm rejection, so you can rest your hand on the screen while writing or drawing without causing accidental marks. Some third-party styluses may struggle with reliable palm rejection.Double-Tap Functionality (Apple Pencil 2nd Gen)
The Apple Pencil 2nd Gen includes a double-tap feature, allowing you to switch between tools like the pen and eraser or activate other shortcuts. This feature is exclusive to the Apple Pencil 2nd Gen.Accuracy and Responsiveness
The Apple Pencil delivers pixel-perfect precision and near-zero latency, making writing and drawing smoother and more natural. Non-Apple styluses might not be as accurate or responsive, especially for detailed work.
Features That Work with Any Stylus or Finger
- Writing and annotating.
- Highlighting text or sections.
- Navigating with hyperlinks in Navigation Mode.
- Adding shapes, text, or images.
- Dragging and dropping stickers.
- Using tools like the lasso, eraser, and highlighter.
Which Should You Choose?
- Apple Pencil: Best for users who value precision, advanced features like pressure sensitivity and tilt, and a seamless experience on iPads.
- Non-Apple Styluses or Fingers: Work well for basic tasks like writing, highlighting, and navigation but may lack the advanced functionality of the Apple Pencil. These options are cost-effective and suitable for casual users.
By understanding the capabilities of the Apple Pencil versus other input methods, you can choose the one that best suits your needs while making the most of GoodNotes’ versatile features. Let me know if you'd like to expand on any specific points!
Optimizing GoodNotes for Different Devices
GoodNotes is a versatile app designed to work seamlessly across multiple devices, including iPads, iPhones, and Macs. However, to get the best experience, it’s important to optimize the app based on the device you’re using. Here’s a detailed guide to ensure smooth performance and functionality on each platform.
1. Optimizing GoodNotes on iPad
The iPad is the most popular device for GoodNotes users, offering the full range of features.
- Enable Apple Pencil Features:
- If you use an Apple Pencil, ensure that it’s paired and features like pressure sensitivity and tilt support are active in GoodNotes settings.
- Use Split View for Multitasking:
- Open your planner and sticker book side-by-side using Split View for more efficient navigation and sticker placement.
- Adjust Palm Rejection Settings:
- In GoodNotes settings, customize palm rejection for your writing style to avoid accidental marks while writing.
- Keyboard Shortcuts:
- If using a connected keyboard, learn GoodNotes keyboard shortcuts to quickly navigate, undo actions, or switch tools.
2. Optimizing GoodNotes on iPhone
GoodNotes on iPhone offers a compact version of the app, ideal for quick notes and on-the-go access.
- Zoom In for Precision:
- Use the zoom tool or pinch-to-zoom gestures to write or draw accurately on smaller screens.
- Use Templates Wisely:
- Opt for planner templates designed for smaller screens to make navigation and note-taking easier.
- Sync with iCloud:
- Enable iCloud Sync to ensure your notes are updated and accessible across devices.
3. Optimizing GoodNotes on Mac
GoodNotes on Mac is ideal for reviewing, organizing, and typing notes with a keyboard.
- Keyboard Navigation:
- Familiarize yourself with Mac-specific keyboard shortcuts to enhance productivity.
- Use the Search Function:
- Take advantage of GoodNotes’ search feature on Mac to quickly locate notes, pages, or keywords within your planner.
- Export and Print:
- Use the Mac’s export functionality to create PDFs or print specific pages from your planner with ease.
4. General Tips for All Devices
- Update GoodNotes:
- Regularly update GoodNotes to access new features, bug fixes, and performance improvements.
- Optimize File Size:
- Large planners or notebooks can affect performance. Split them into smaller sections if you experience lag.
- Organize Your Library:
- Use folders, tags, and bookmarks to keep your library tidy and make it easier to find specific files.
- Enable Auto-Backup:
- Set up automatic backups to a cloud service like Google Drive or Dropbox to safeguard your files.
By tailoring GoodNotes settings and workflows to your specific device, you can maximize efficiency and ensure a smoother digital planning experience. Let me know if you’d like to explore any of these points further!
This guide provided practical steps and answers to help you get started and make the most of your planner in GoodNotes. Thank you for exploring this tutorial! We hope it has equipped you with the tools and inspiration to confidently use your planner. If you have further questions or need assistance, feel free to reach out, we’re always here to help.