Blog
Step-by-Step Guide to Your Custom Planner Generator
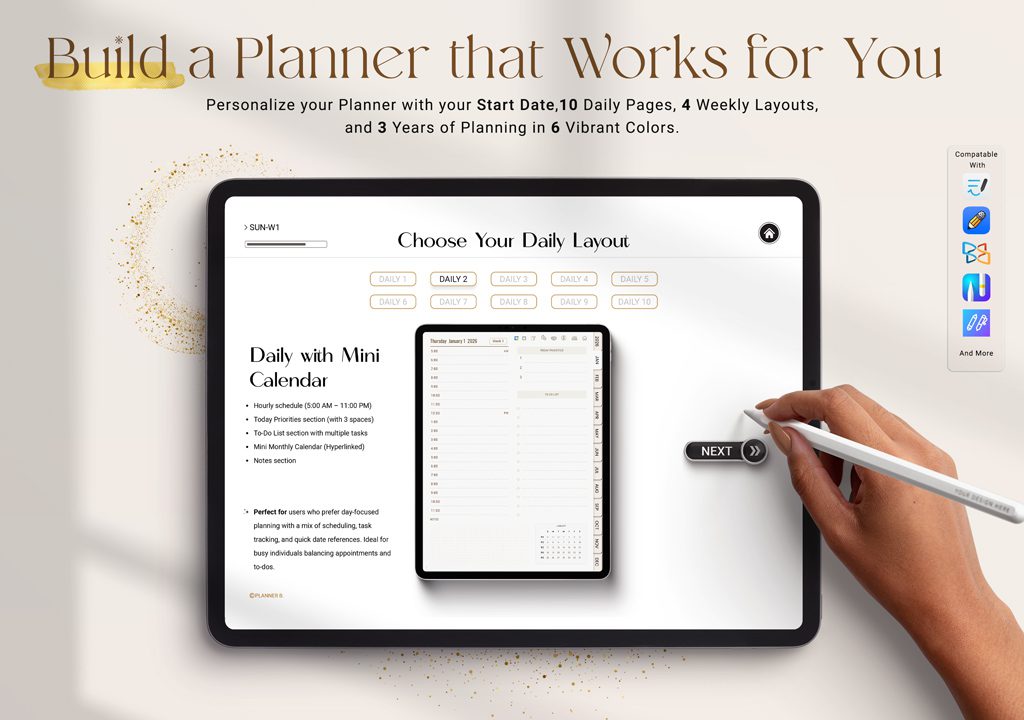
Table of Contents
With our easy-to-use planner generator, you can create a personalized planner step by step, customizing each feature to match your needs. Follow this guide to make the most of the generator PDF and enjoy every part of designing your ideal digital planner!
After Purchase: What You’ll Receive
Download Links
Once you’ve purchased, you’ll receive two PDFs:
- The Planner Generator PDF – This is where you’ll make your custom planner selections.
- The Resource PDF – This contains:
- A link to this guide (to walk you through each step).
- A link to the Google Drive folder for a GoodNotes sticker book including 340+ pre-cropped stickers, along with separate individual PNGs.
- A link to the Google Drive folder for a set of 200 beautiful covers.
Let’s walk through the Planner Generator PDF to get you started!
Step-by-Step Process in the Planner Generator PDF
Step 1: Choosing Your Start Date
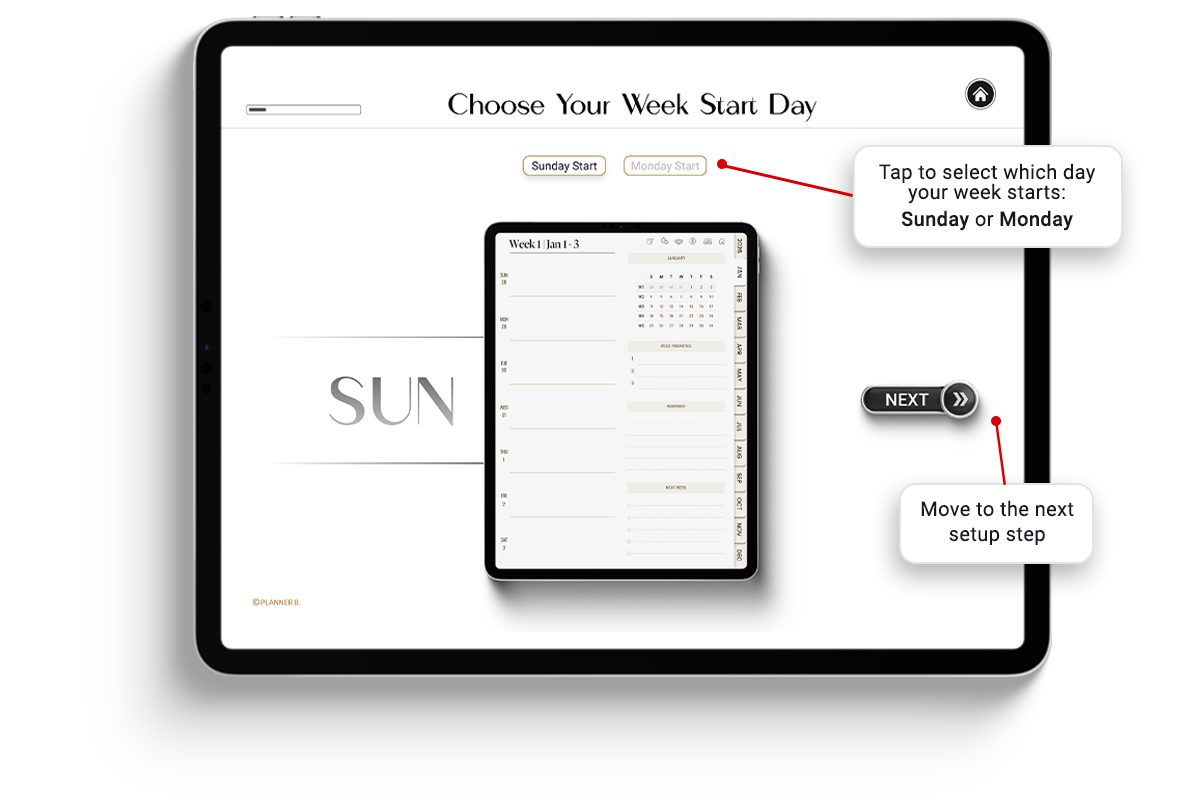
The first page of the Planner Generator PDF invites you to select a start date for your planner. Simply click on the start date that best suits you. Once you’ve made your choice, click NEXT to move to the next option.
Step 2: Selecting a Weekly Layout
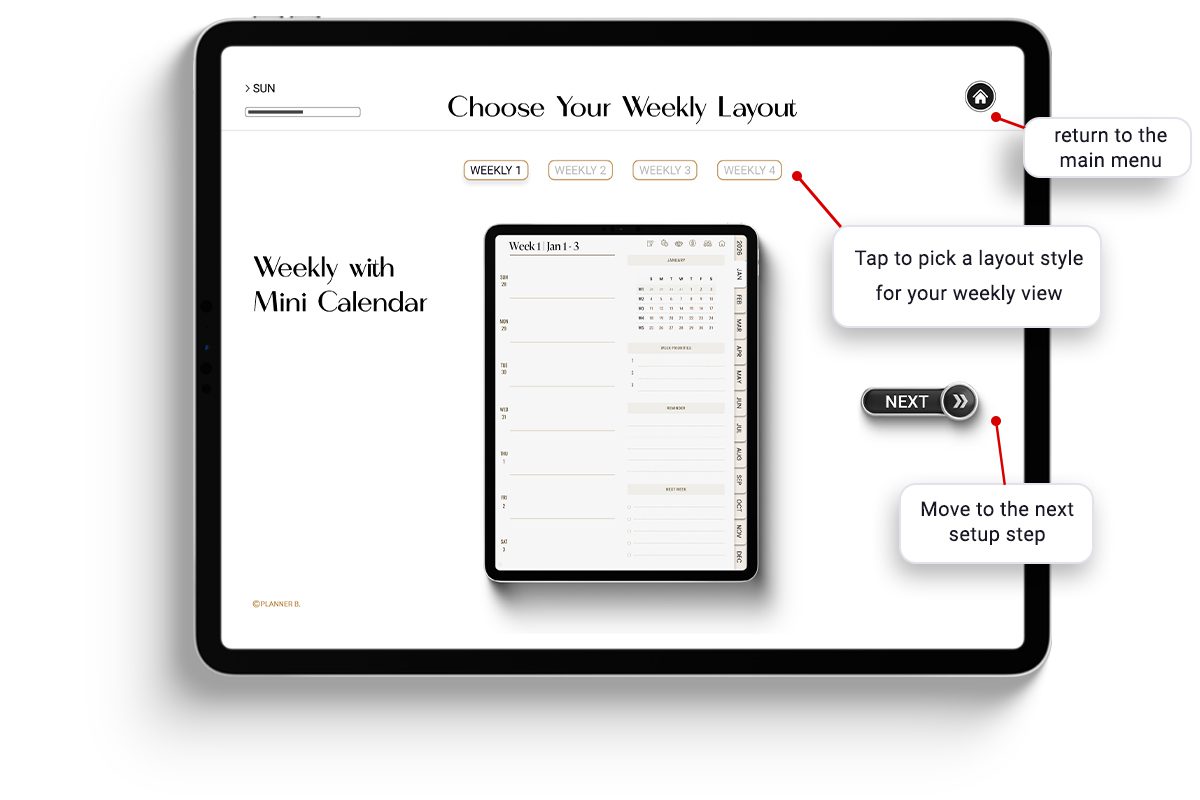
The weekly layout options allow you to shape how each week is displayed in your planner. There are four unique weekly layouts to choose from:
- Weekly Option 1 (Weekly with Mini Calendar): A classic layout that works well for those who like structure.
- Weekly Option 2 (Weekly Essentials): A minimalist design for those who prefer simplicity.
- Weekly Option 3 (Hourly): Hourly schedule (5:00 AM – 11:00 PM), a balanced layout with a little extra room for notes.
- Weekly Option 4 (Vertical): A 3-section open-space design for free-form weekly planning.
Click on each layout to preview its style, and once you’re satisfied with your choice, you’ll be directed to the daily layout options.
Step 3: Exploring Daily Layouts
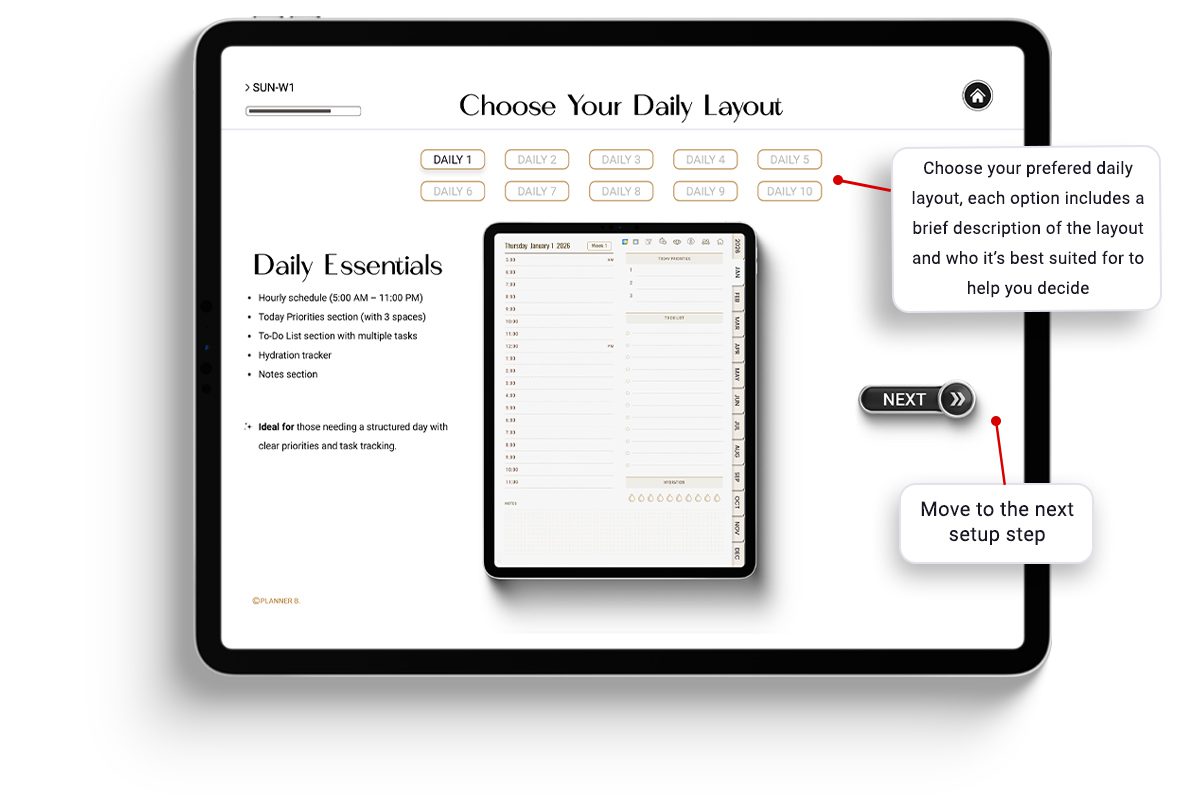
Next, you’ll choose from 10 unique daily layout options, each designed for different types of users. When you click on a daily layout, you’ll see a preview along with a brief description to help you decide if it suits your planning needs. The descriptions provide who can benefit most from each style, ensuring you select the best layout for your lifestyle.
Step 4: Finalizing Your Planner
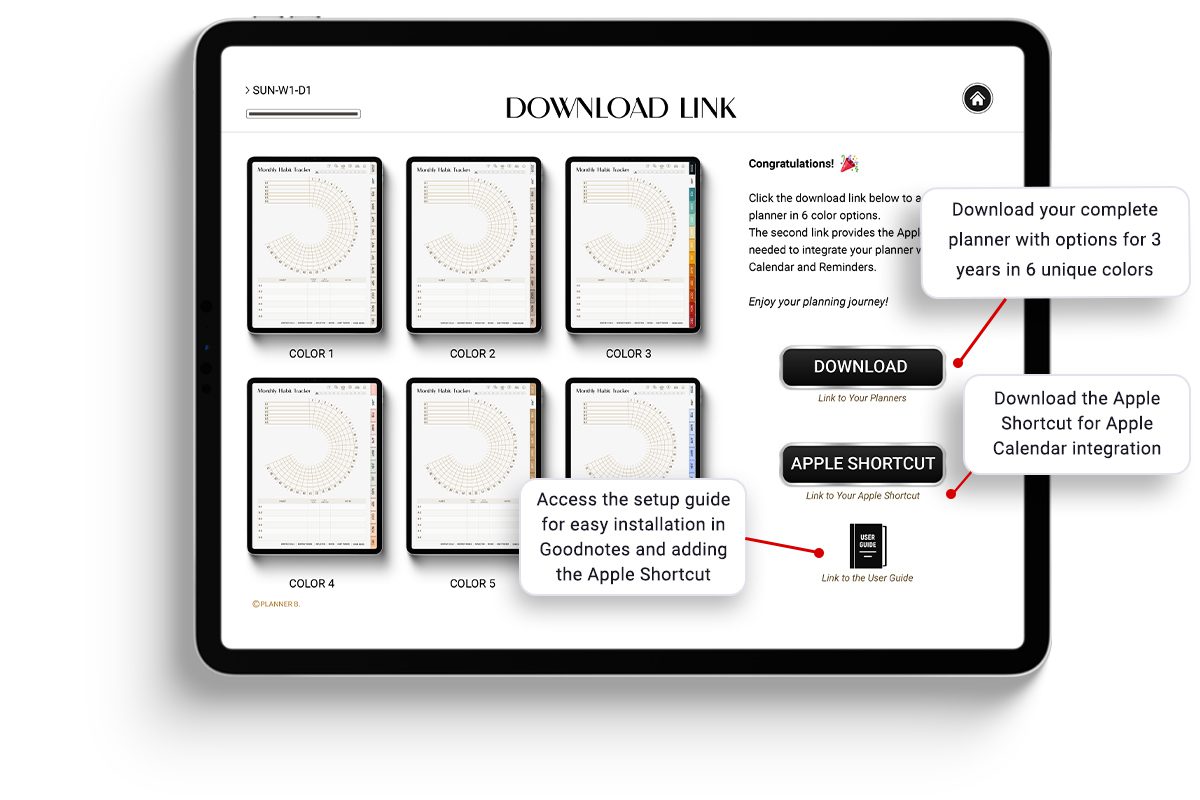
Once you’ve chosen your start date, weekly, and daily layouts, you’ll reach the final page. Here, you’ll find:
- Your Planner Download Links:
- Download links for planners in 6 color options across three years (2024, 2025, and 2026). Choose the color that appeals to you, and you’re ready to go!
- Apple Shortcut Integration:
- A link to install the Apple Shortcut to integrate your planner with Apple Calendar, Reminders, and more.
- User Guide Access:
- If you haven’t accessed the guide yet, a direct link is available for further assistance.
Setting Up Your Planner in GoodNotes and Apple Shortcut Integration
Congratulations on creating your custom planner! Now it’s time to set it up in GoodNotes and integrate it with Apple’s Shortcuts for a seamless experience. Let’s go through each step and explore the planner’s standout features so you can get the most out of it!
Step 1: Installing the Apple Shortcut for Calendar and Reminder Integration
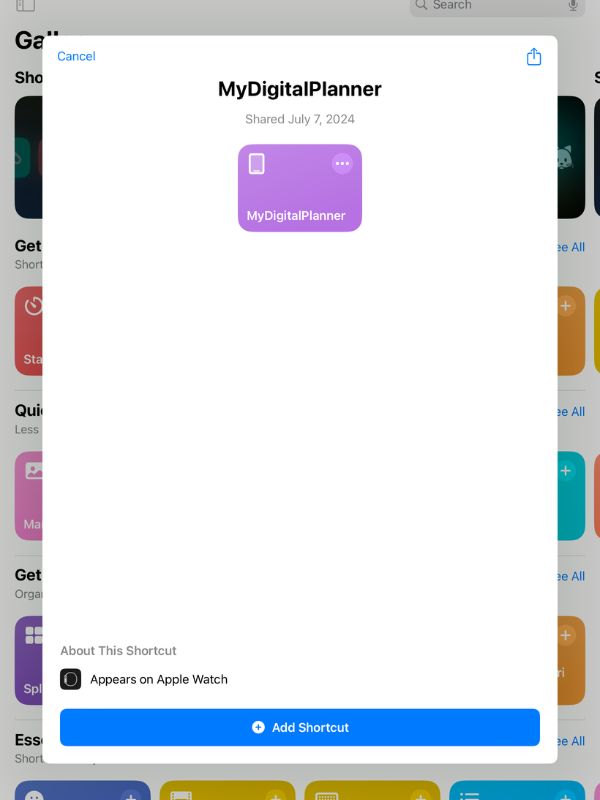
To integrate your planner with Apple Calendar and Reminders, you’ll first need to install the custom Apple Shortcut included with your planner. This shortcut allows you to connect events, reminders, and other planning tools directly with your planner.
- Locate the Shortcut Link: In the final step of your Planner Generator PDF, find the link for the Apple Shortcut.
- Install the Shortcut: Tap the link to install the shortcut on your iPad. Follow the prompts to grant necessary permissions.
- Configure the Shortcut: Once installed, open the shortcut settings to customize your preferences, like calendar access and reminders.
Now, your planner is integrated with Apple Calendar and Reminders, making it easy to sync events and stay organized.
Step 2: Importing Your Planner into GoodNotes
- Open GoodNotes: Launch GoodNotes on your iPad and go to the Documents section.
- Import Your Planner PDF: Tap New > Import and select your planner file. This will open your planner in GoodNotes.
- Enable Hyperlinks: Ensure you’re in Read Mode (not editing mode) so that hyperlinks are clickable. This allows you to navigate quickly through the planner’s sections and dates.
Your planner is now ready to use in GoodNotes!
Navigating Your Planner
Understanding the Structure and Navigation:
Your planner is designed for easy navigation, allowing you to quickly move between different sections and pages.
Here's how to navigate through your planner:
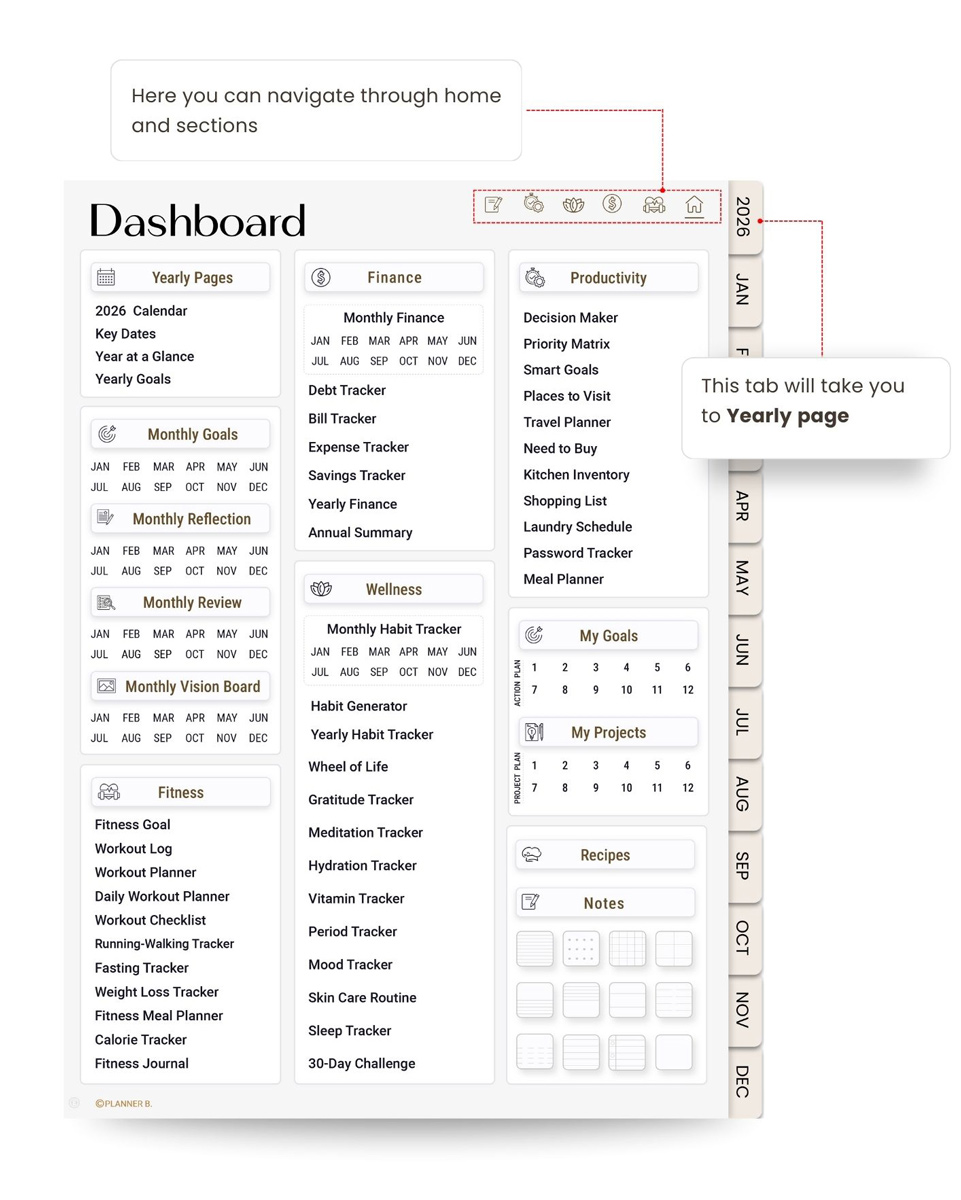
Main Navigation Page (Home/Index Page):
The first page you’ll encounter after opening your planner is the Main Navigation Page (also referred to as the Home or Index page). This page serves as the central hub of your planner.
You can access all the sections and pages of the planner through hyperlinks embedded within this page. To navigate to a specific section, simply tap on the corresponding link.
Exploring the Calendar Page: Your Gateway to Easy Navigation
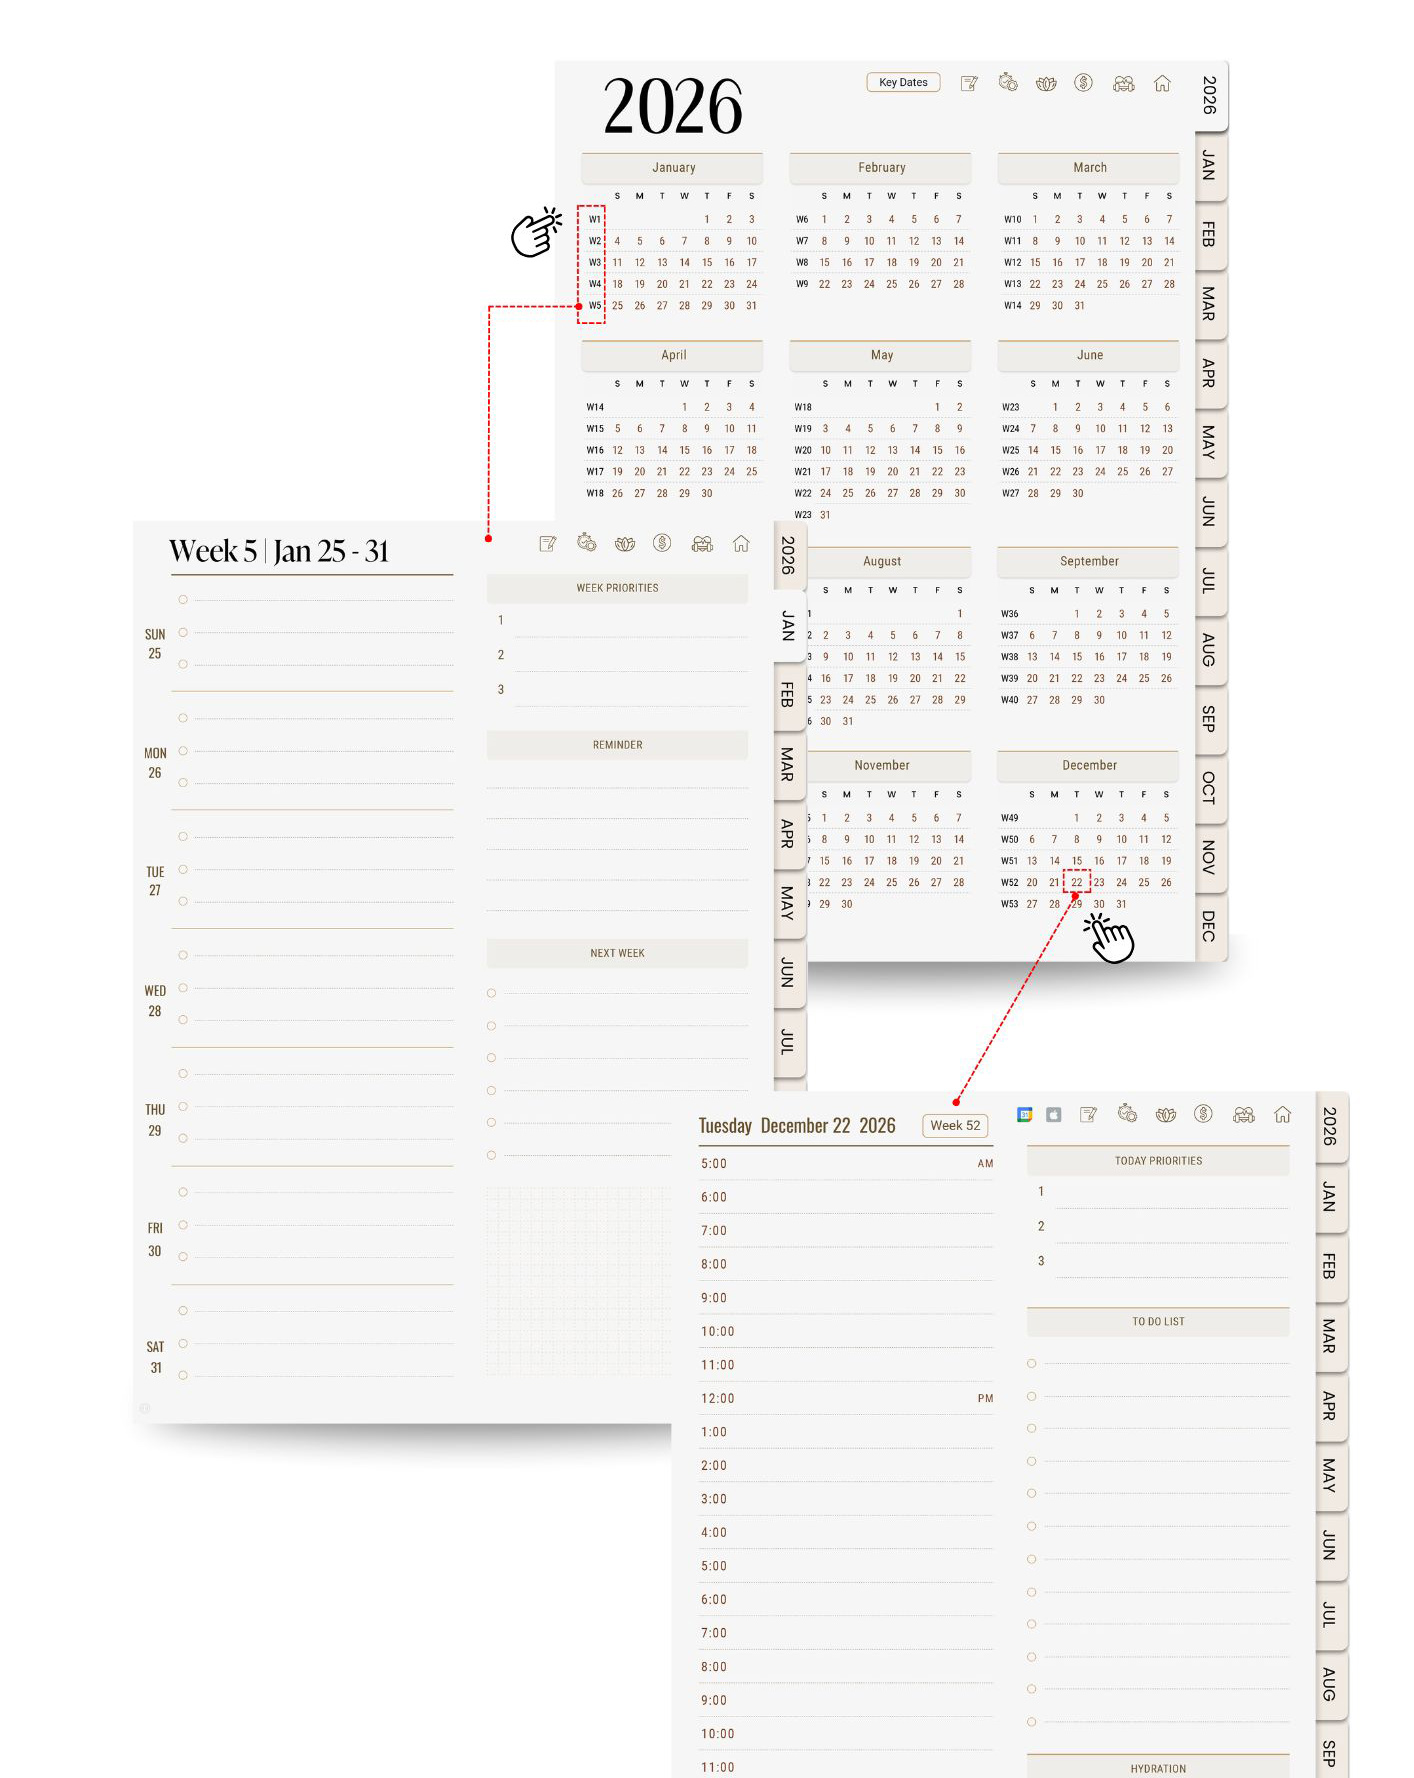
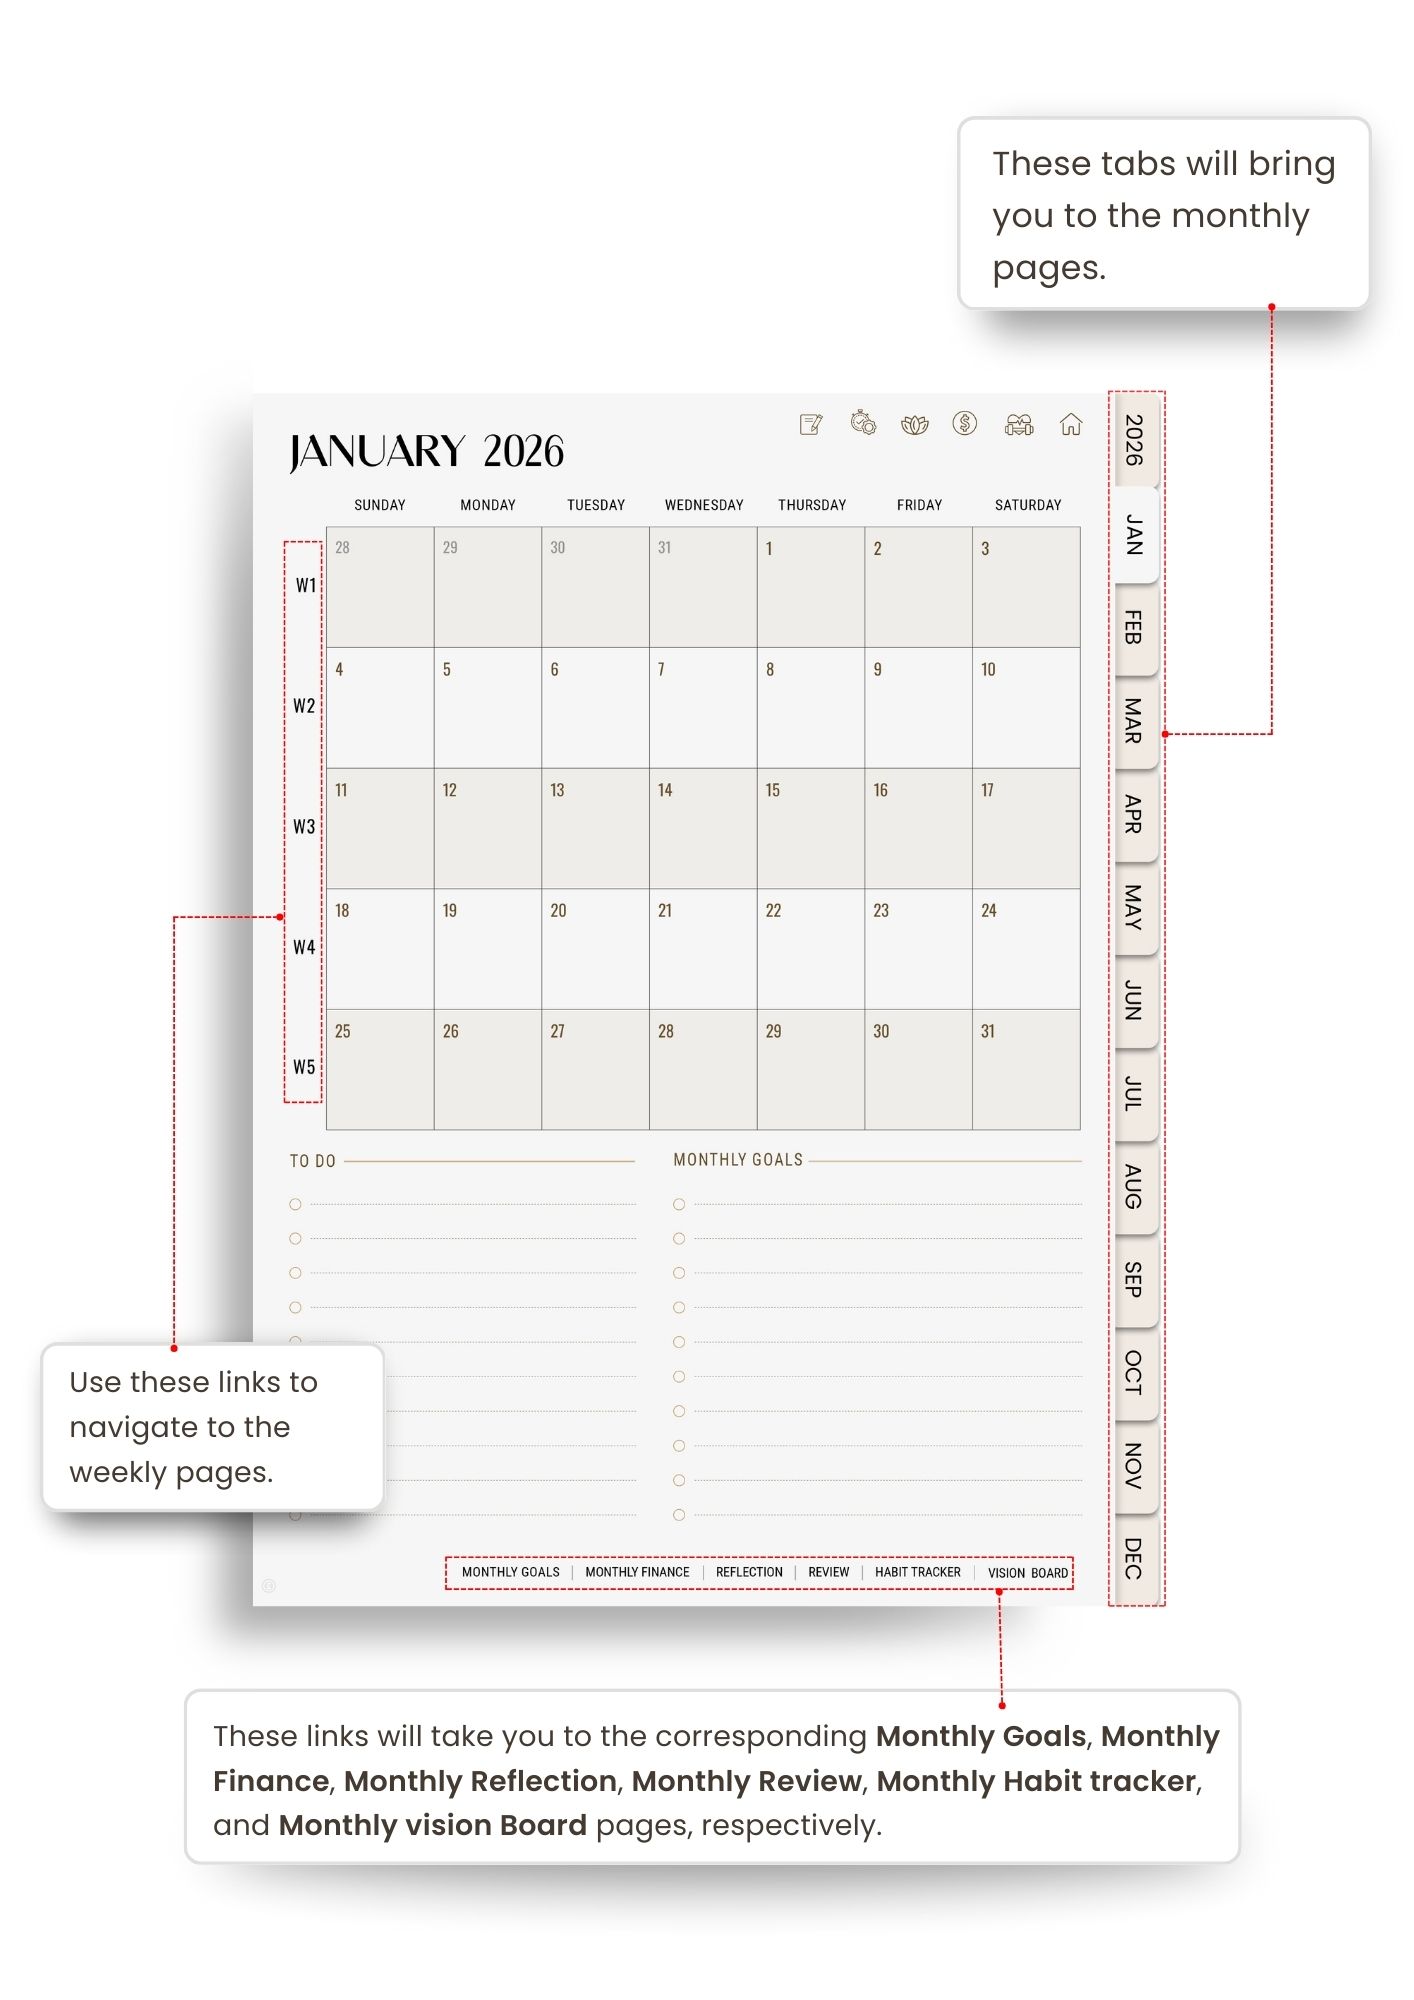
The Calendar page in your planner is designed to be your central hub, making it easy to access any daily or weekly page with just a tap. Here’s a quick overview of the key navigation links and icons available on the Calendar page:
Key Navigation Features on the Calendar Page
Daily Page Access:
- Each date on the monthly calendar is hyperlinked, allowing you to jump directly to the corresponding daily page. This makes it easy to review or update entries without scrolling through the entire planner.
Weekly Page Links:
- Each week is also linked from the Calendar page. These links take you to the weekly overview, ideal for seeing your full week at a glance and making adjustments to your plans as needed.
Section Index Page Links:
- At the top or bottom of the Calendar page, you’ll find small icon links that let you access the section header page. This page serves as your planner’s “table of contents,” where you can quickly navigate to different sections like Goals, Notes, or Monthly Reflections.
Icon Links for Easy Navigation:
- Throughout the Calendar page and other sections, you’ll see small icons for quick navigation. Tapping these icons allows you to jump seamlessly between daily, weekly, and other key sections, making it effortless to switch contexts.
Monthly Pages
Each month in your planner has a dedicated side tab, allowing you to jump directly to any monthly page. These tabs are accessible from any section, so you can quickly return to the current month or browse through other months at any time.
Using the Monthly Tabs:
- Simply tap the side tab for the month you want to view. This takes you directly to that month’s overview, where you can see all the important dates, goals, or events for that month.
From Monthly to Weekly and Daily:
- Once on a monthly page, each date is hyperlinked to the corresponding daily page, so you can quickly access the details of any specific day.
- Weekly links are also included on the monthly pages, allowing you to view an entire week at a glance. This makes it easy to check your weekly plans and stay organized.
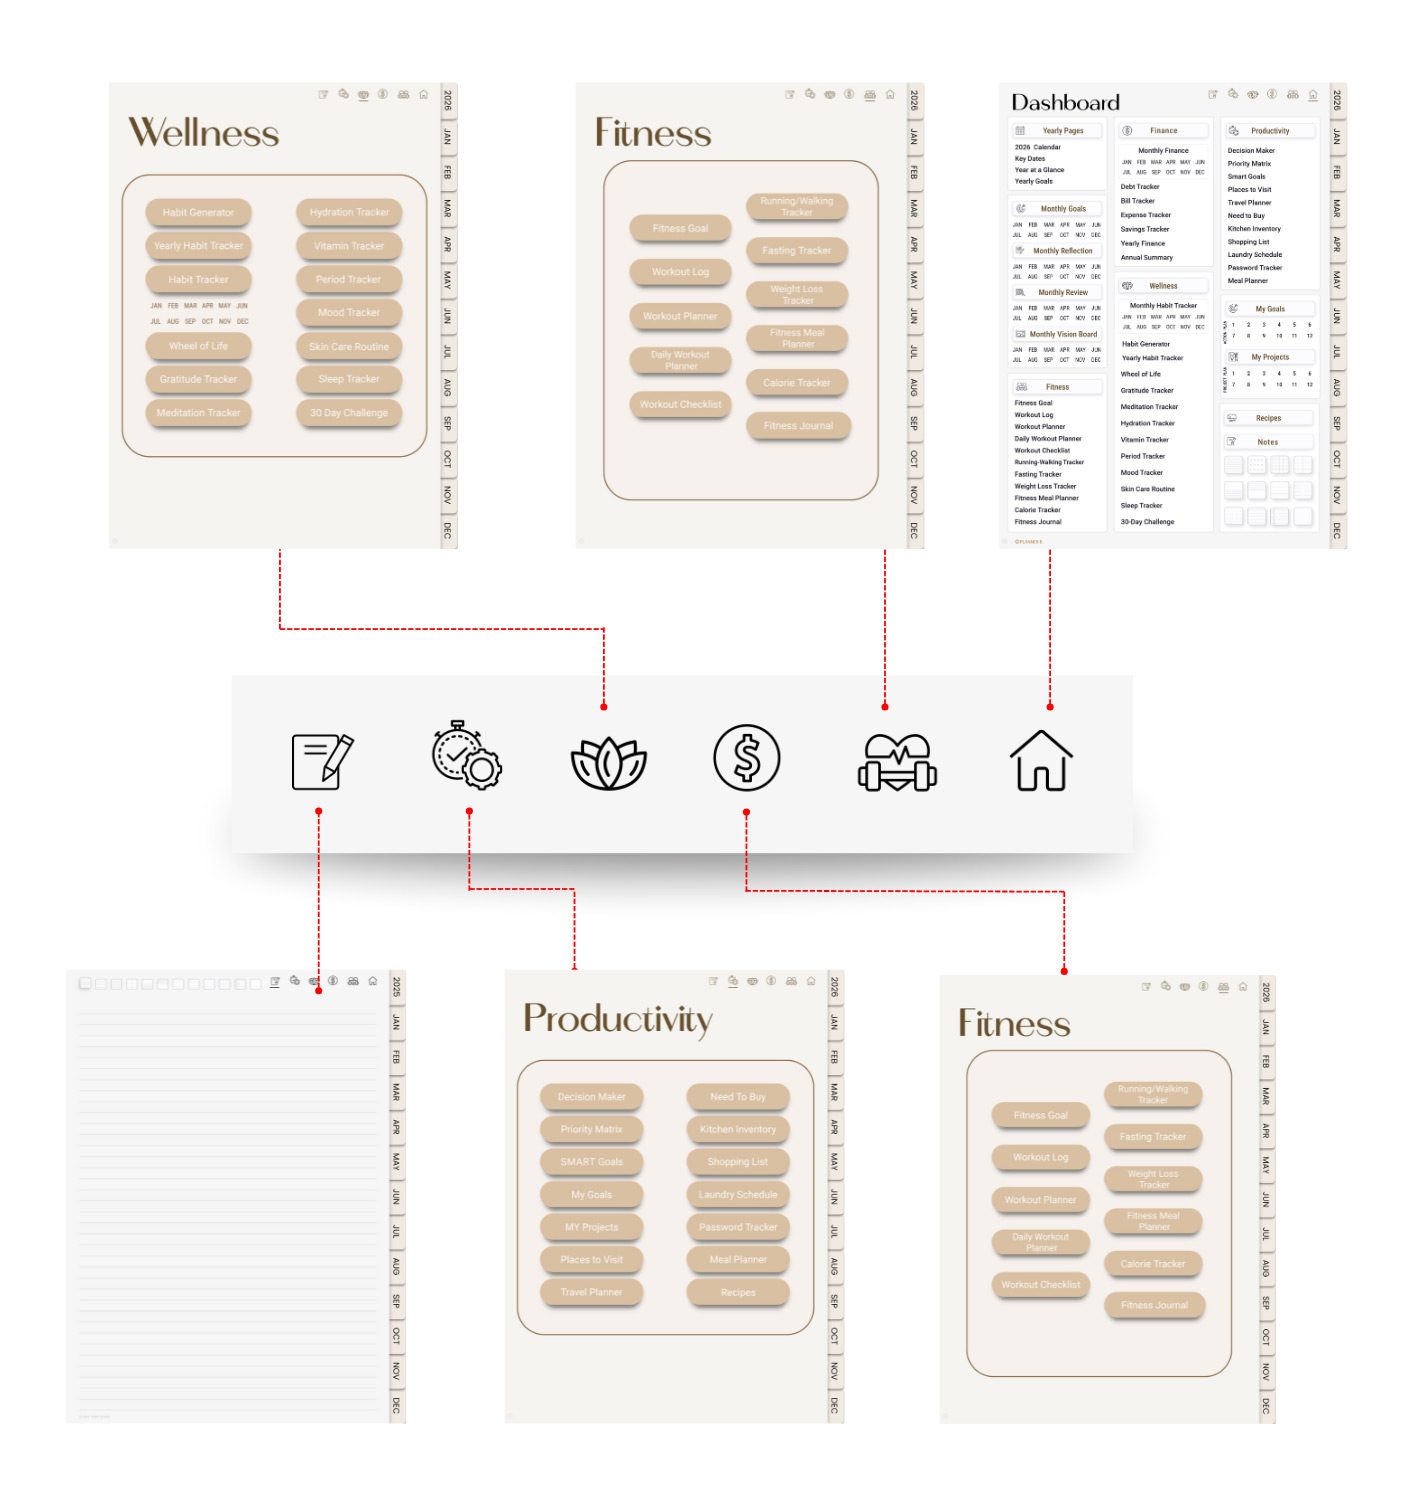
Quick Links on Every Page: Effortless Access to Key Sections and Extra Notes
One of the most convenient features of your planner is the set of quick links located at the top of every page. These links ensure that you’re never more than a tap away from any section, making navigation faster and more efficient.
Each section of your planner includes a Section Index Page. This page provides an overview of all the sub-pages within that section and is designed to help you navigate to specific sub-pages within the section efficiently.
Here’s how these links can enhance your planning experience:
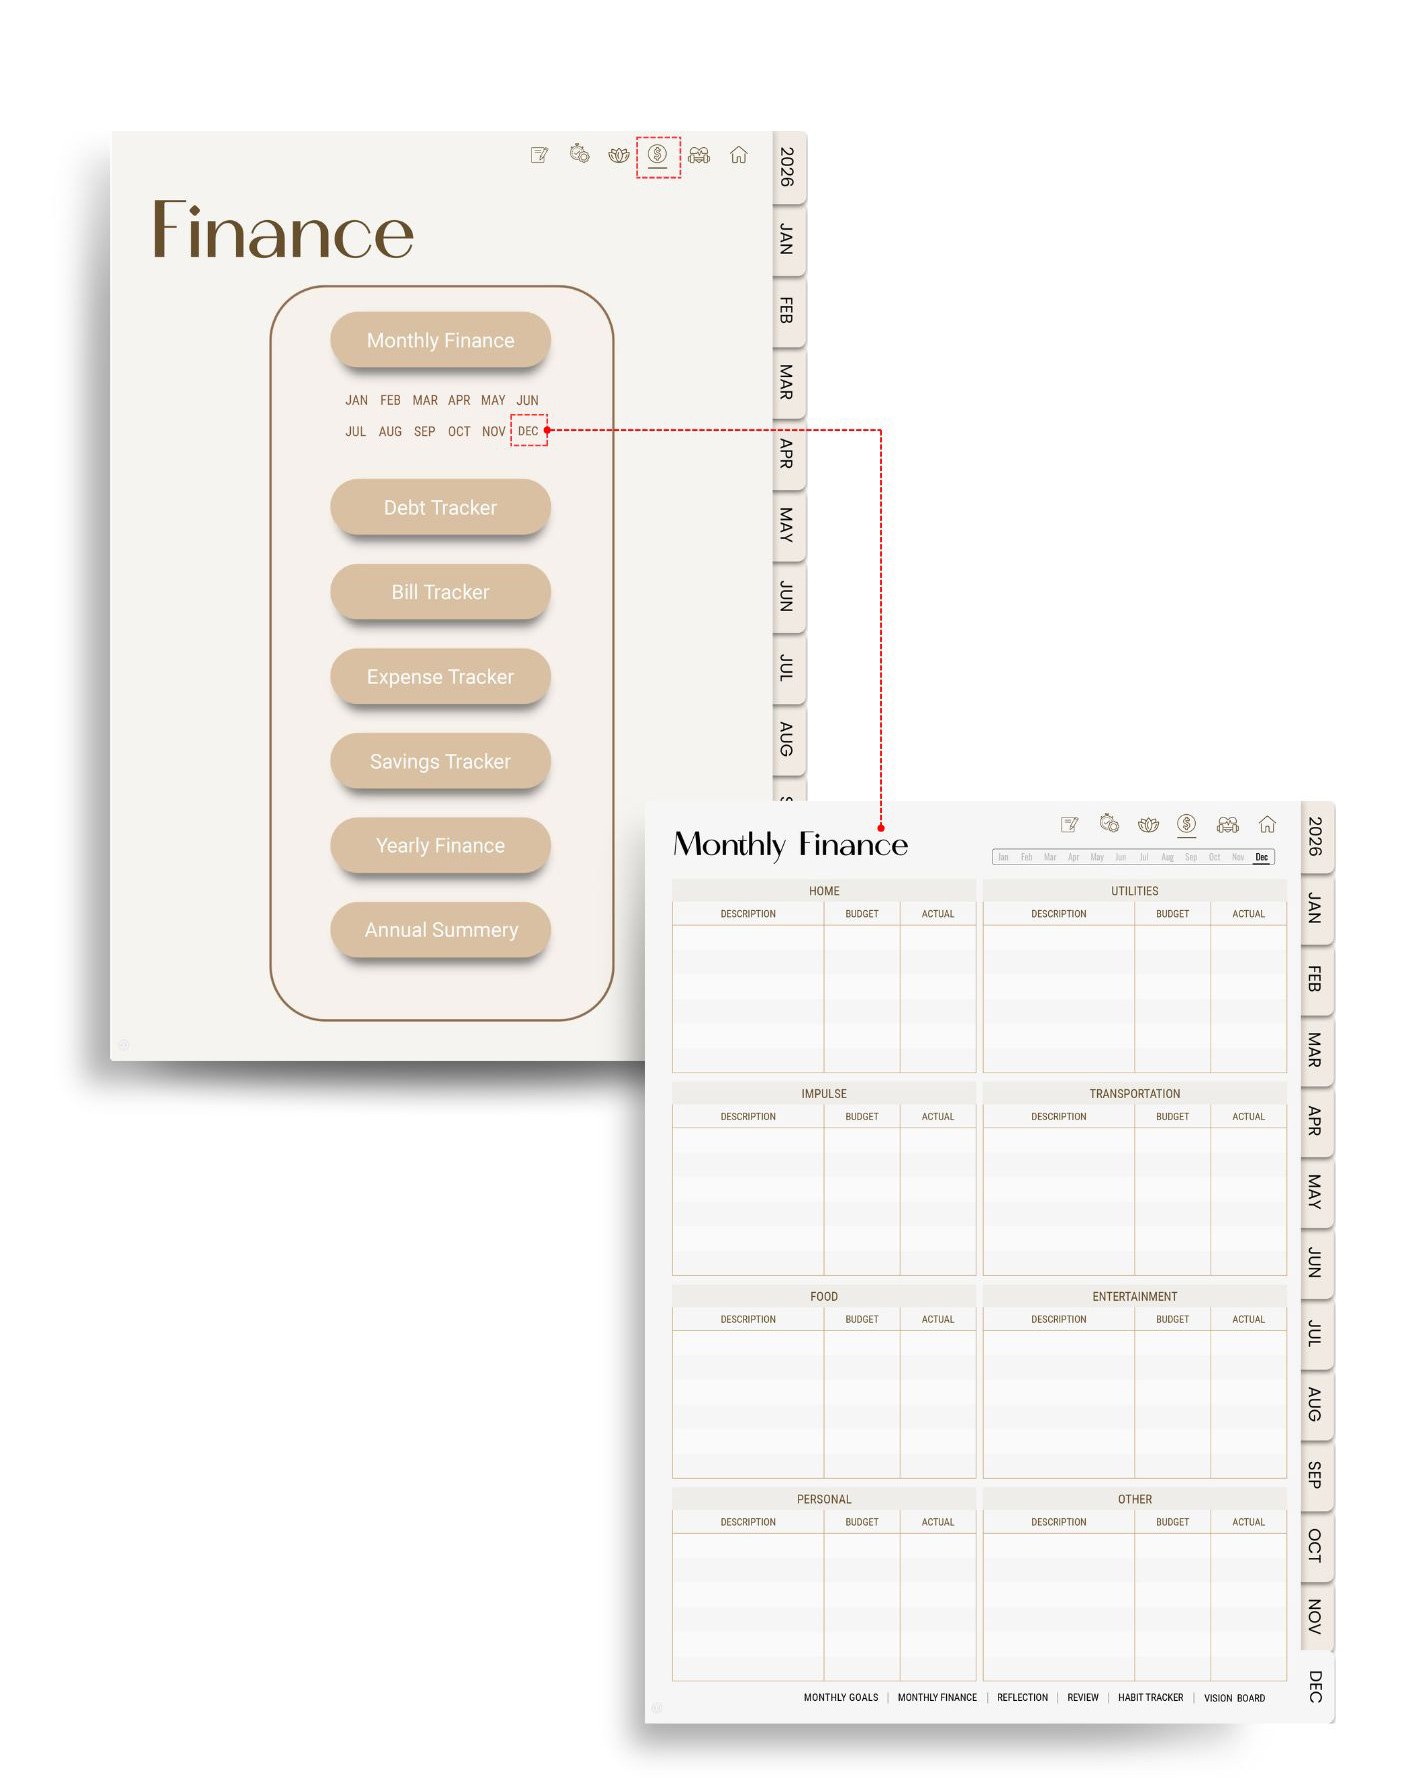
Monthly Templates with Easy Navigation: Finance, Habit Tracking, and More
Your planner’s section index pages make it even easier to jump directly to any month. For sections like Monthly Finance and Monthly Habit Tracking, which use monthly views, you can access each month directly from the index page without needing to navigate back to the start. This feature streamlines access, so you can jump right into the specific month you need with minimal steps.
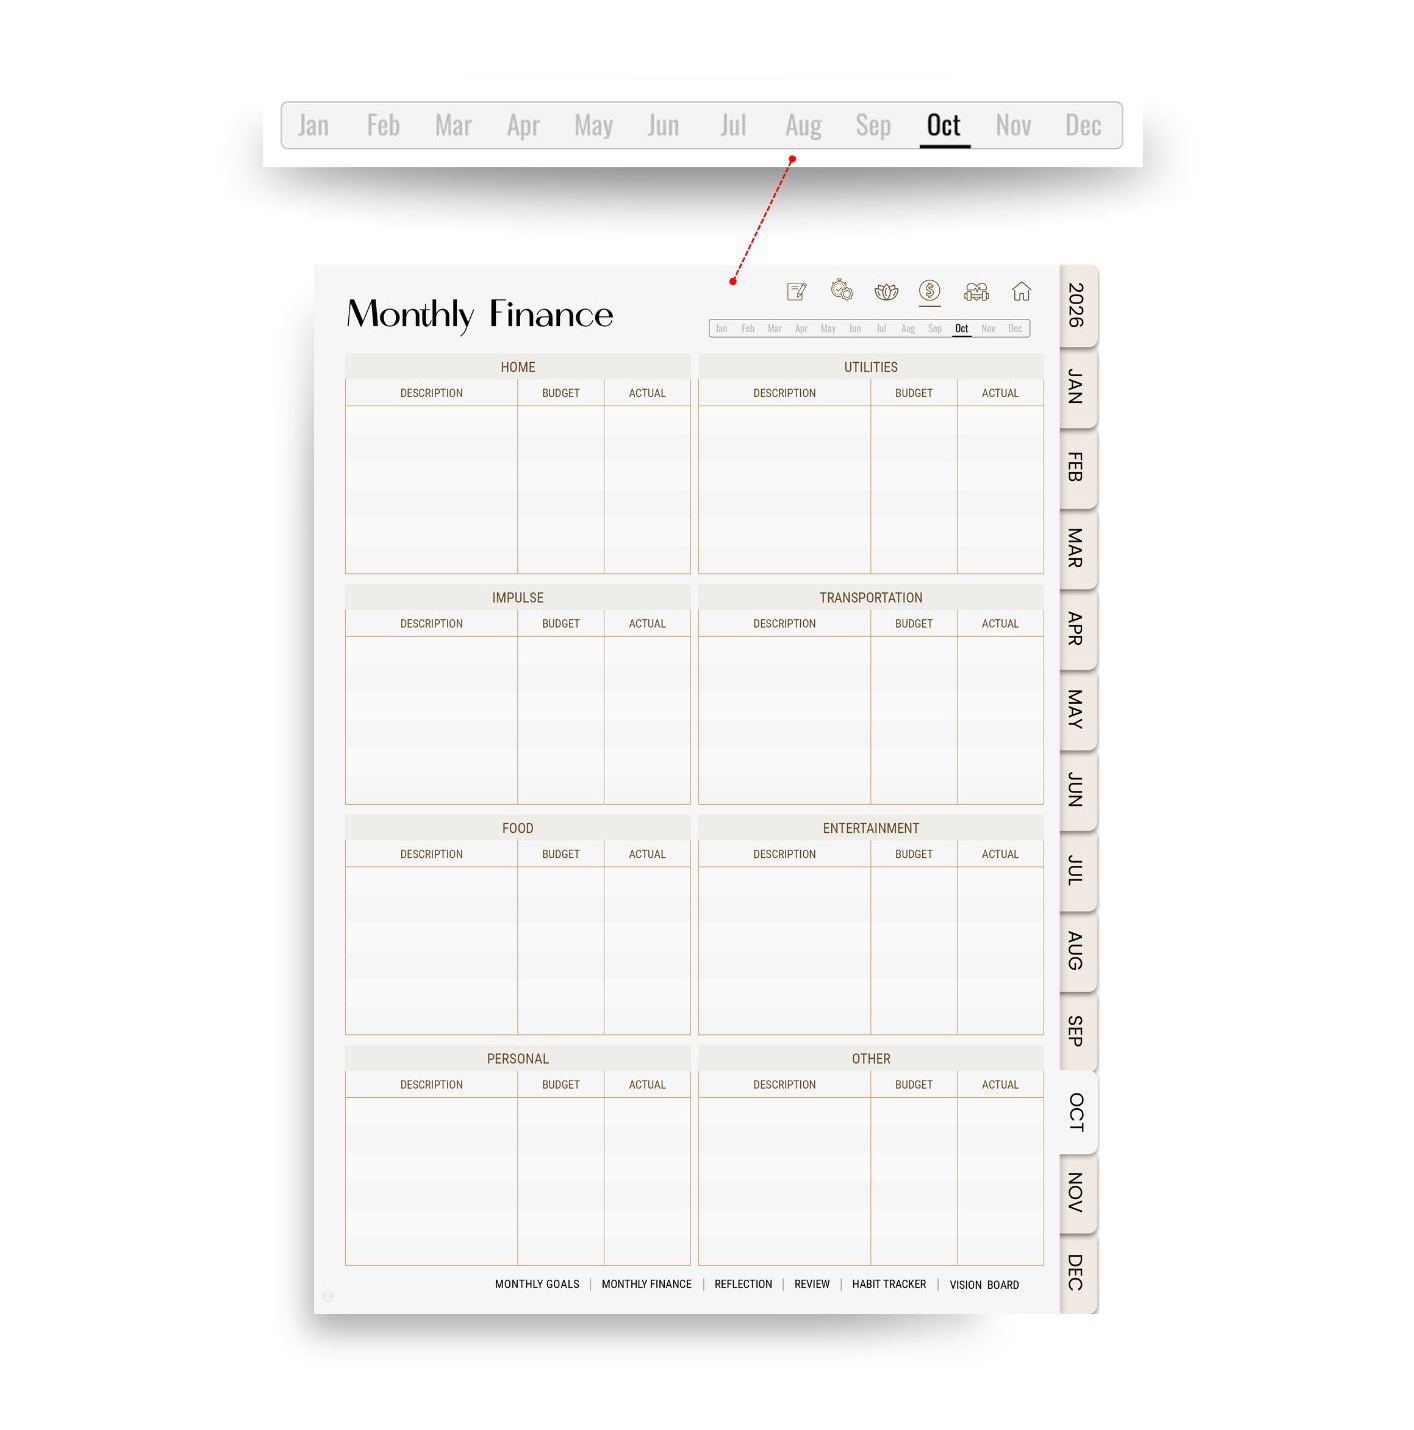
Tap on the month you wish to navigate using the links in the top navigation bar.
Your planner includes specialized sections with monthly templates, such as Monthly Finance and Monthly Habit Tracking, designed to help you track and manage specific areas of your life. These templates also come with a unique navigation bar at the top right, making it simple to move through months as you review and update your progress.
Calendar Integration on Daily Pages: Seamlessly Connect with Google and Apple Calendars
On each daily page of your planner, you’ll find Google Calendar and Apple Calendar links at the top, designed to help you stay organized by connecting your planner directly with your digital calendars. These links offer a seamless experience for checking or updating your schedule and adding reminders or events without leaving your planner.
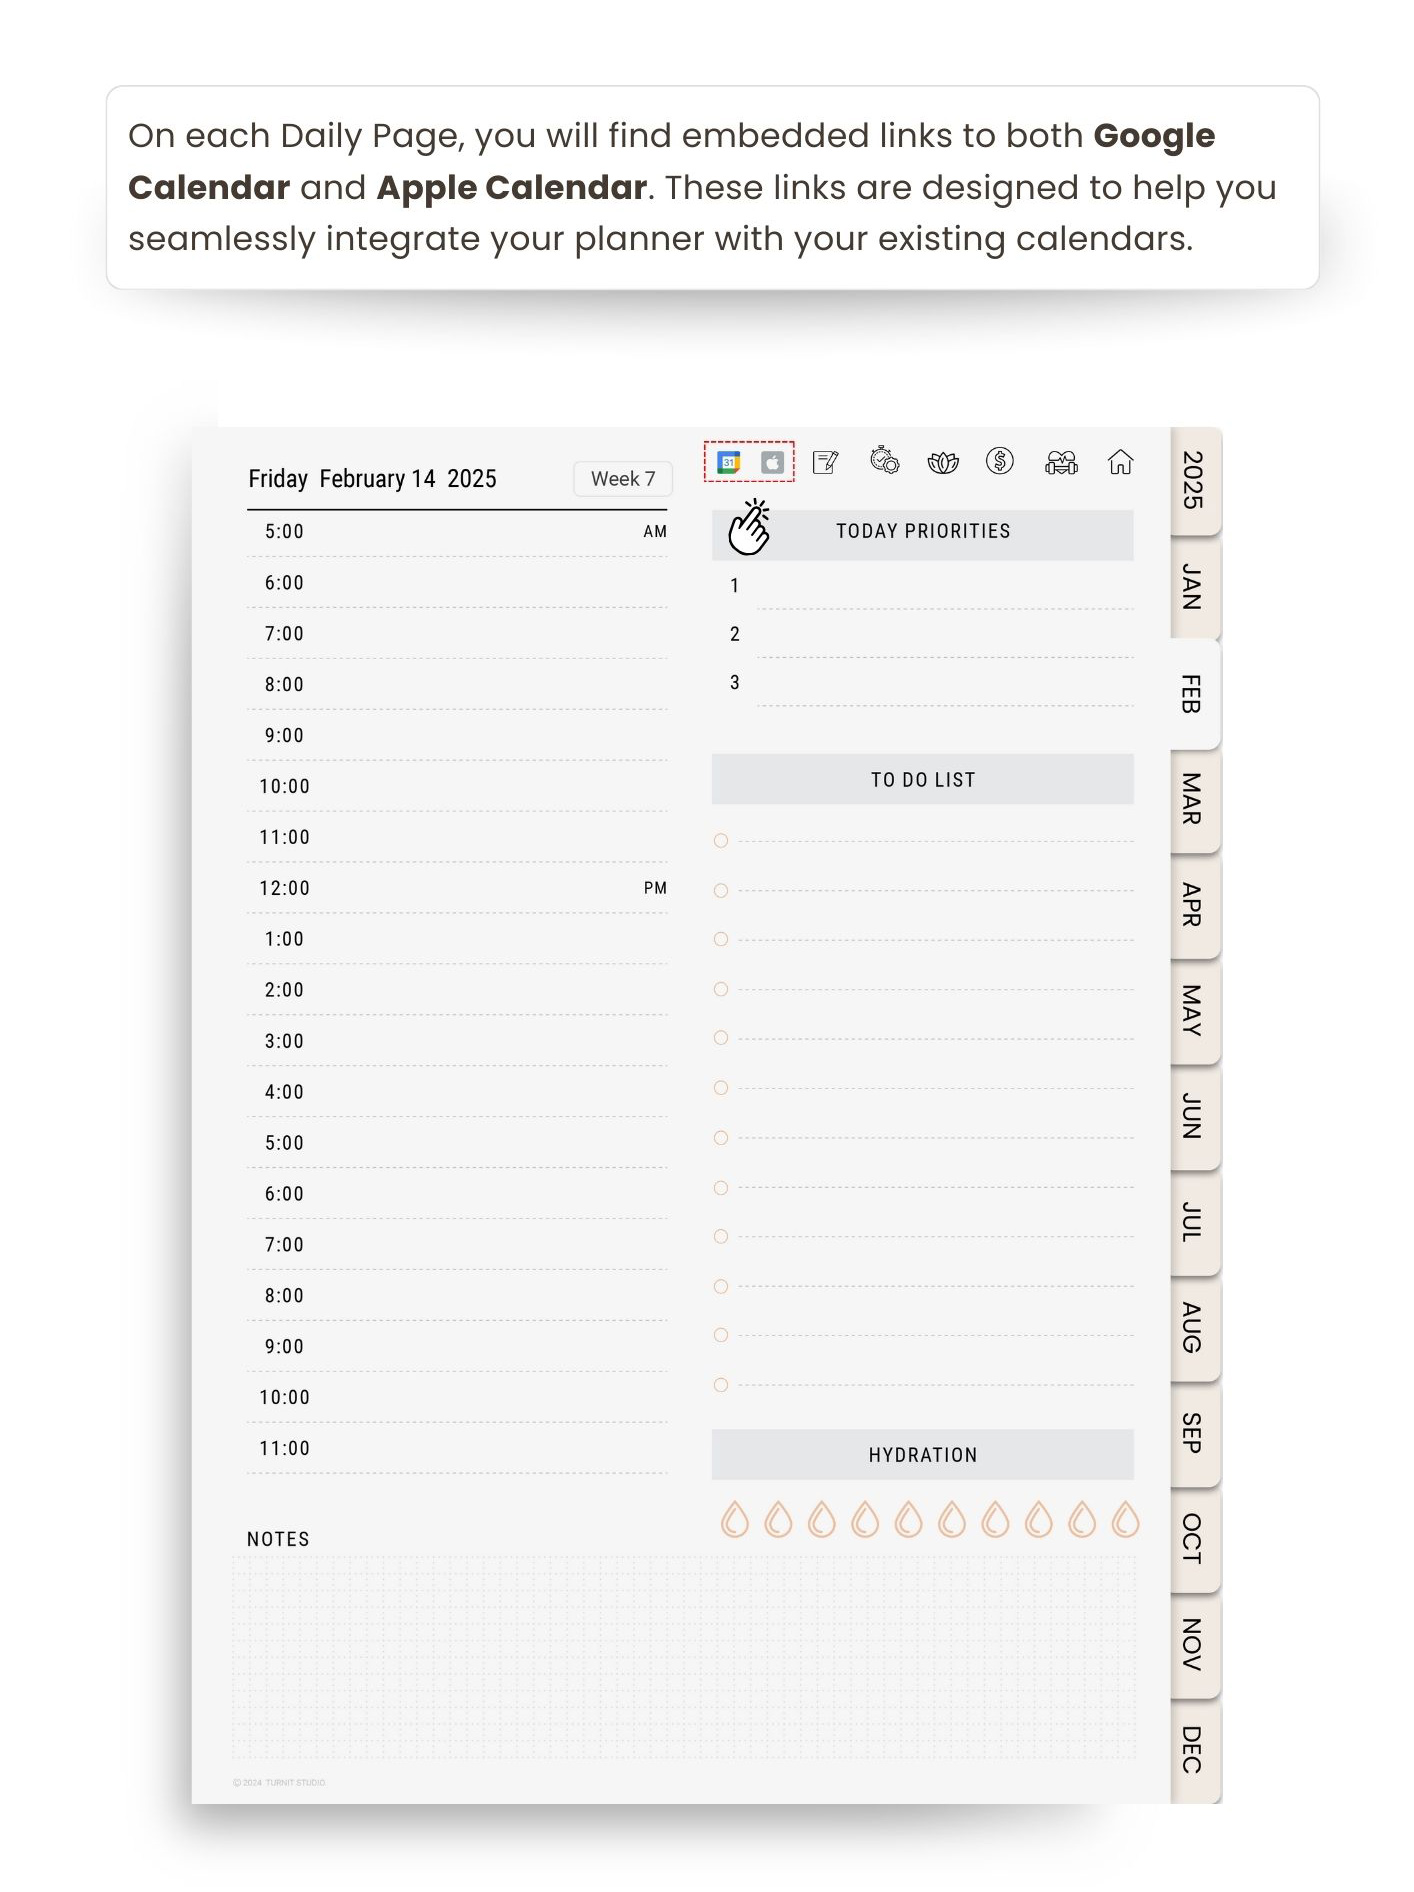
Google and Apple Calendar Links on Daily Pages
Google Calendar Link:
- Tapping the Google Calendar link will open Google Calendar directly to the date displayed on your daily page.
- If you have the Google Calendar app installed, it will open in the app. Otherwise, it will open in your device's browser.
- This feature makes it easy to see any events or appointments scheduled for that day, so you can quickly review and add to your plans.
Apple Calendar Link:
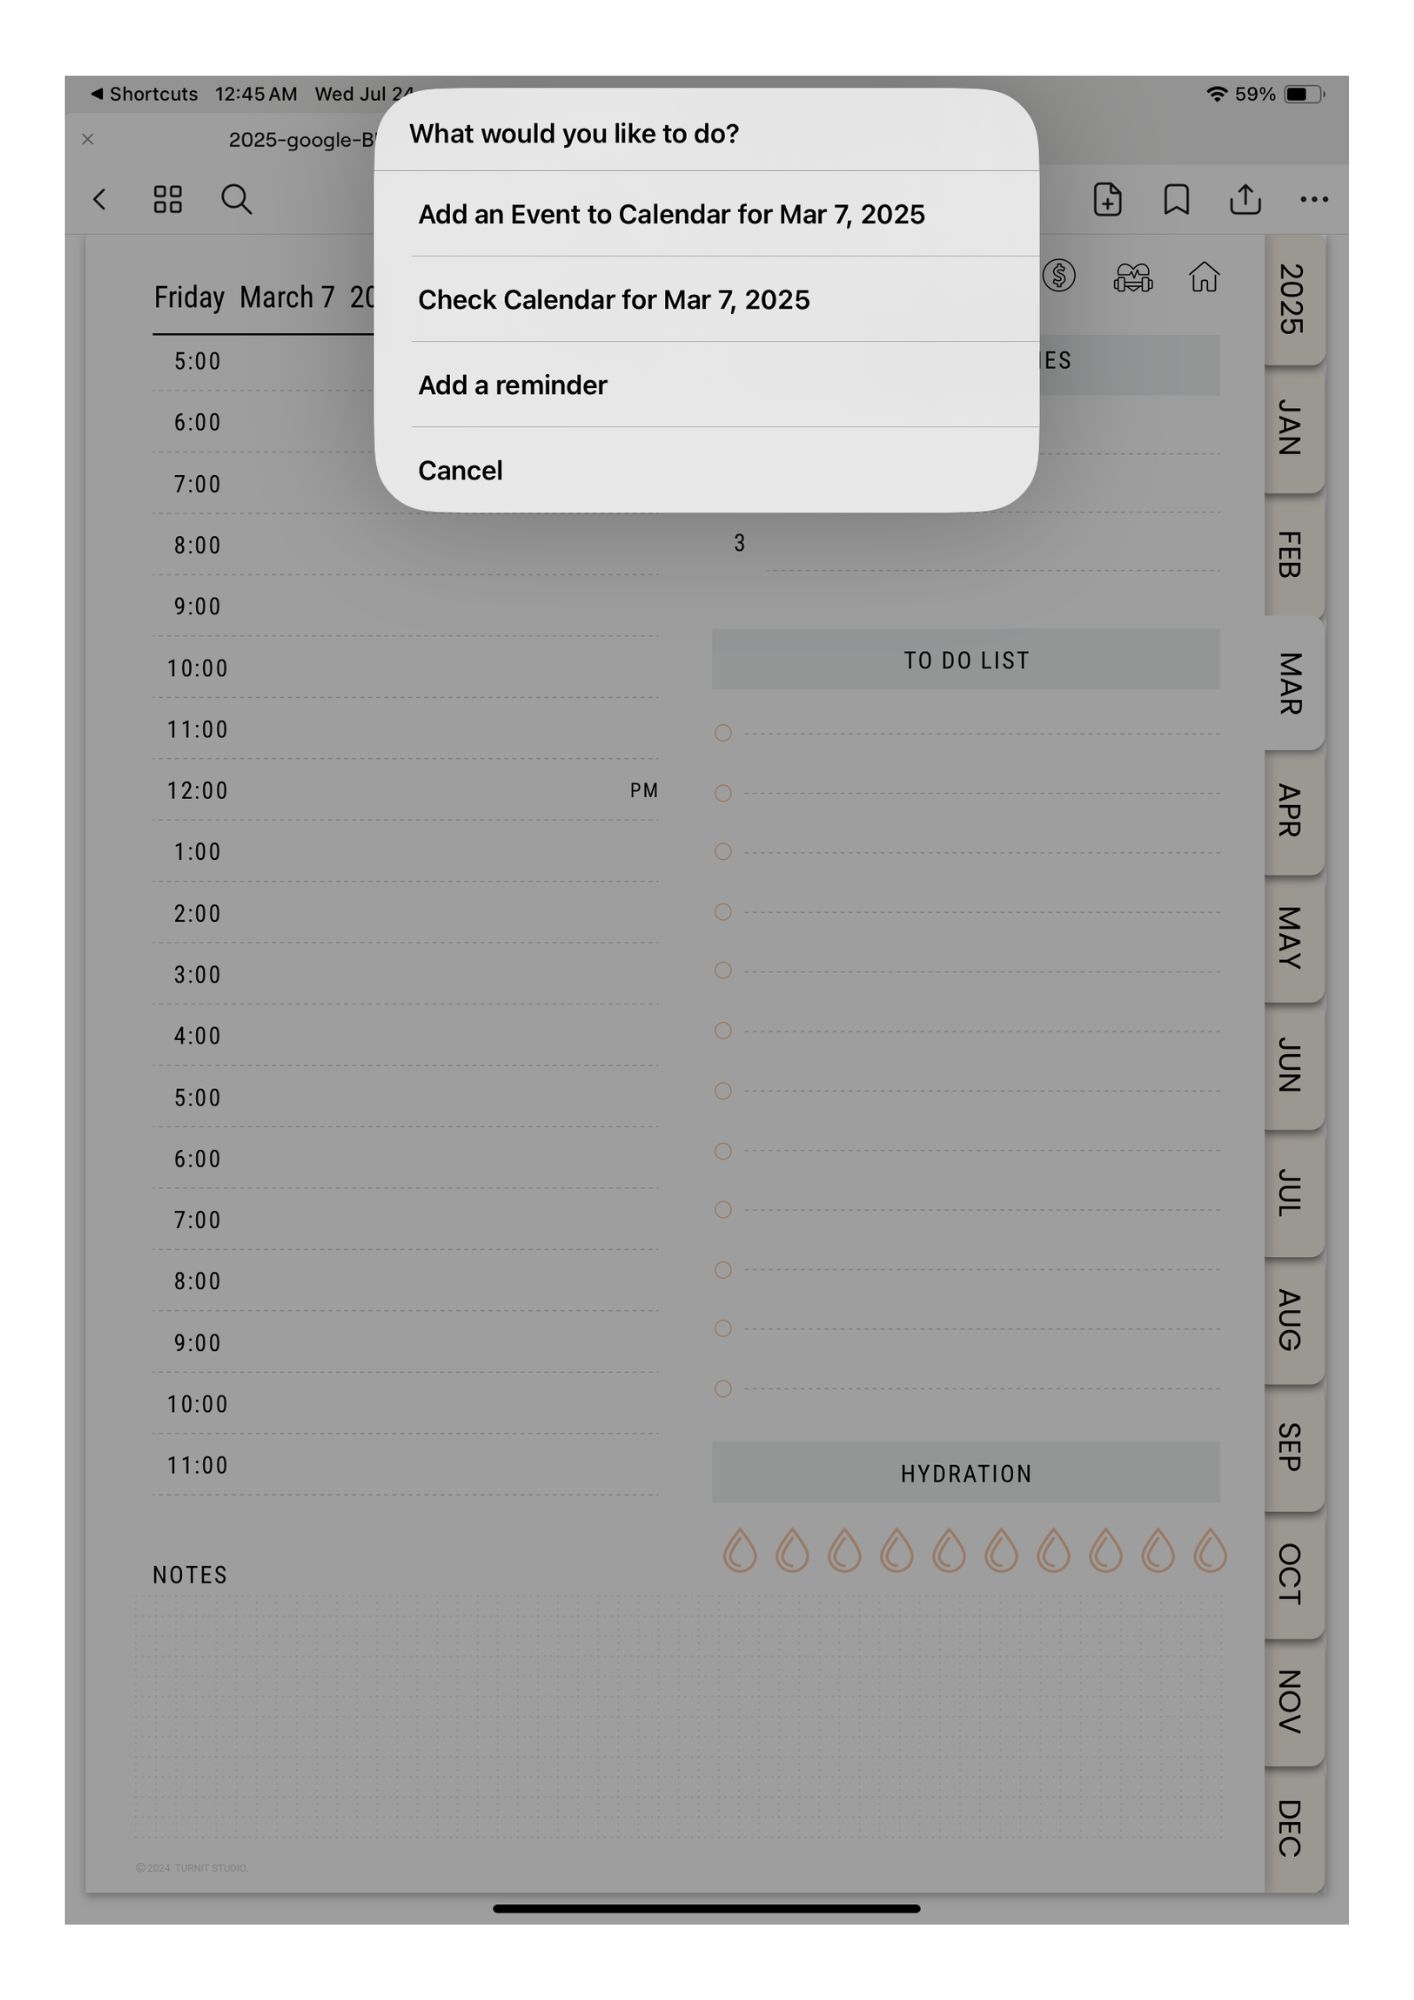
- When you tap the Apple Calendar link, a prompt appears at the top of the page with three options:
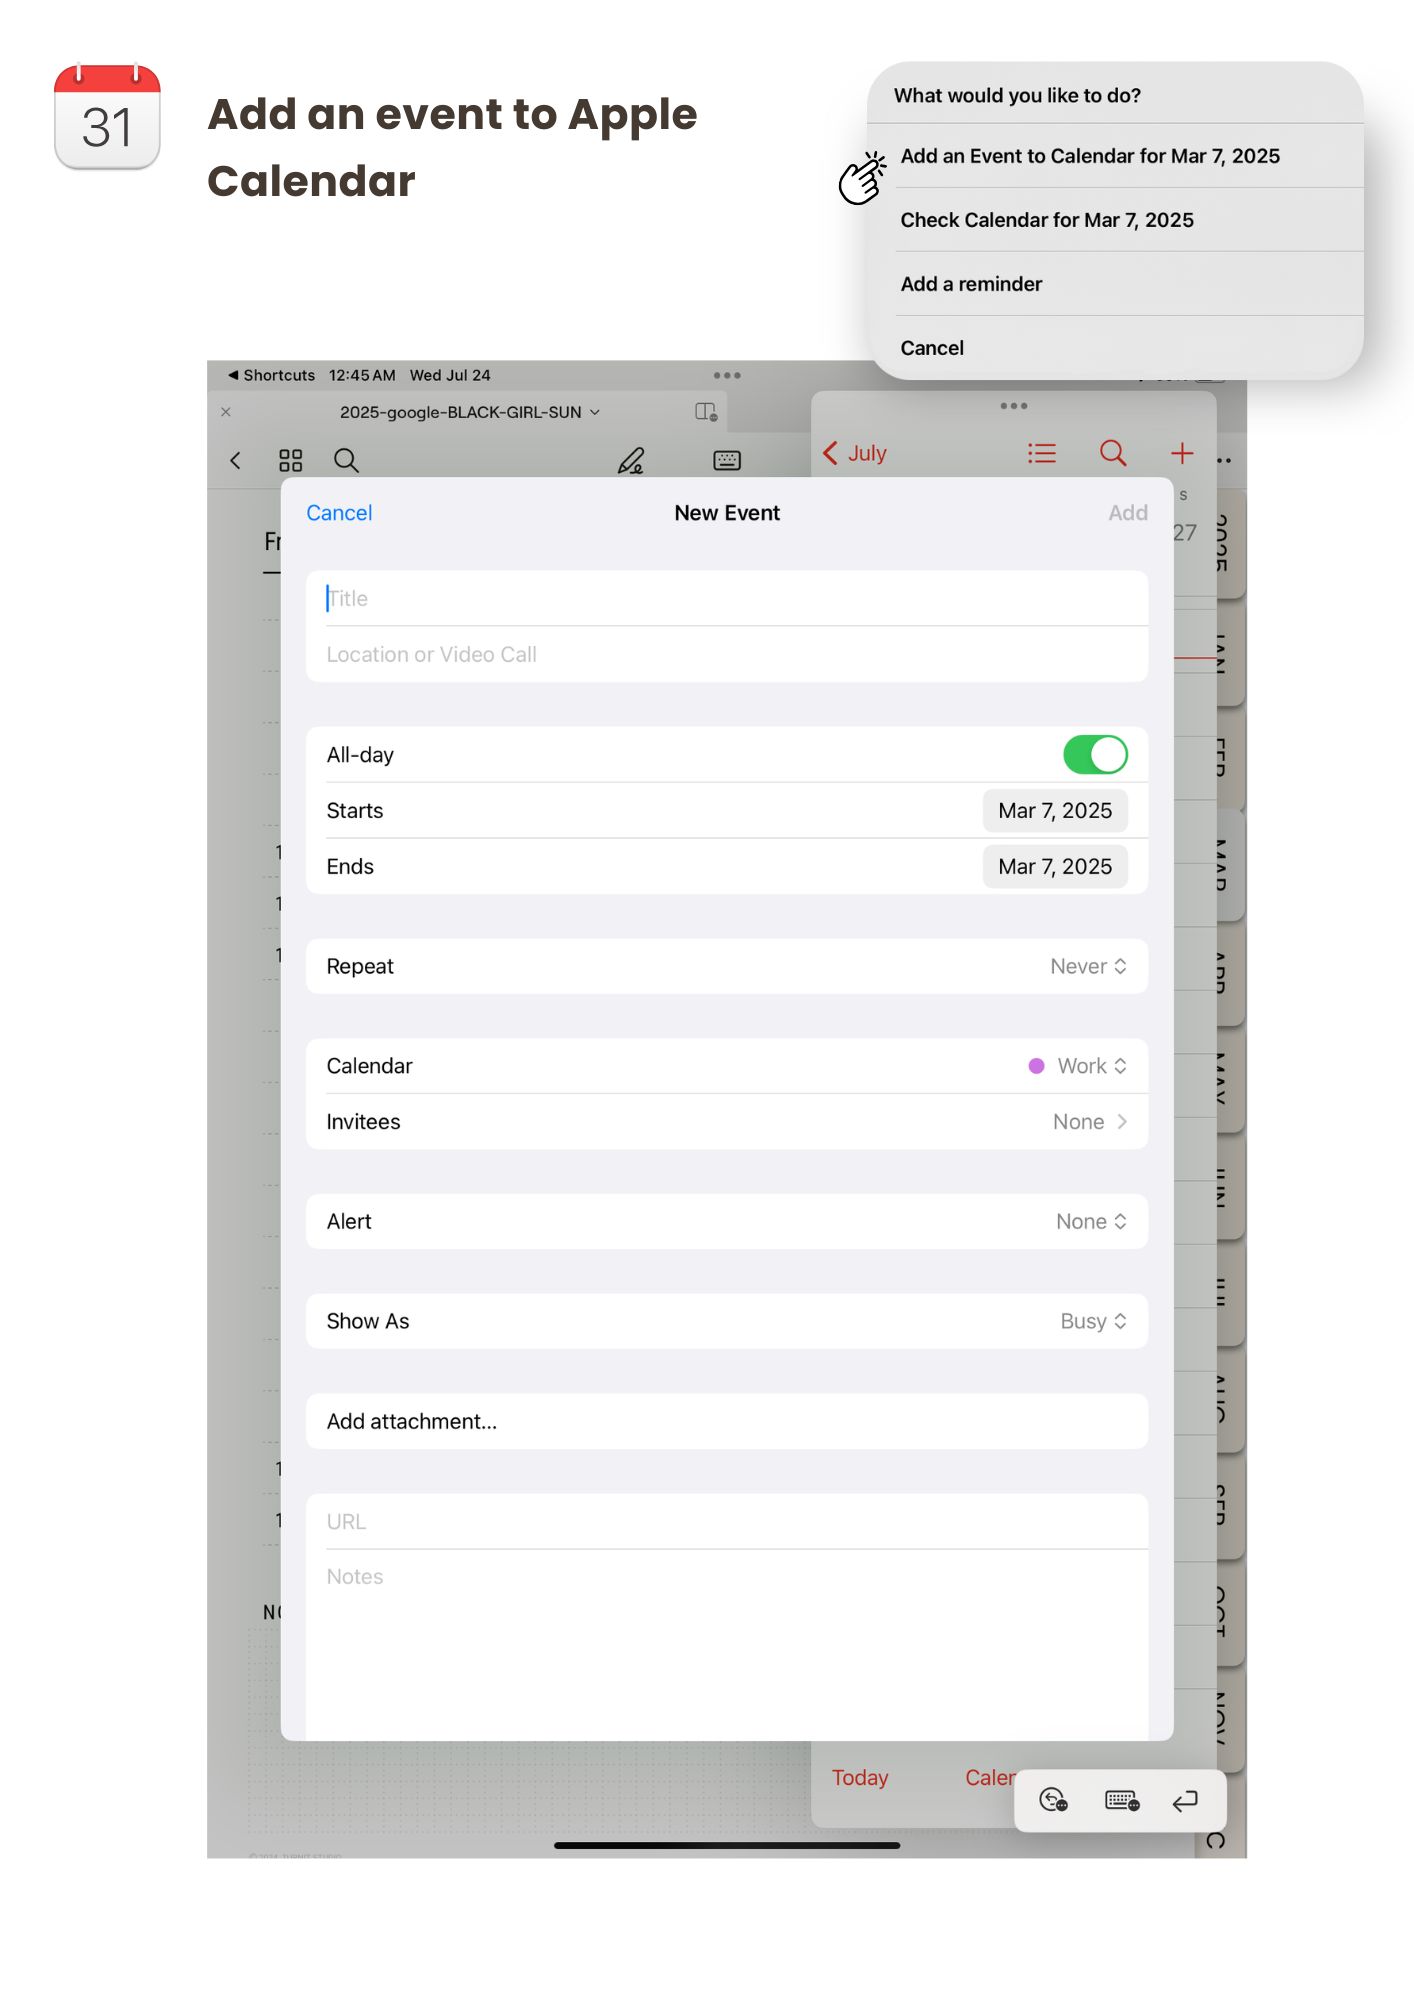
- Add Event: Instantly create a new event for that day, right from your planner.
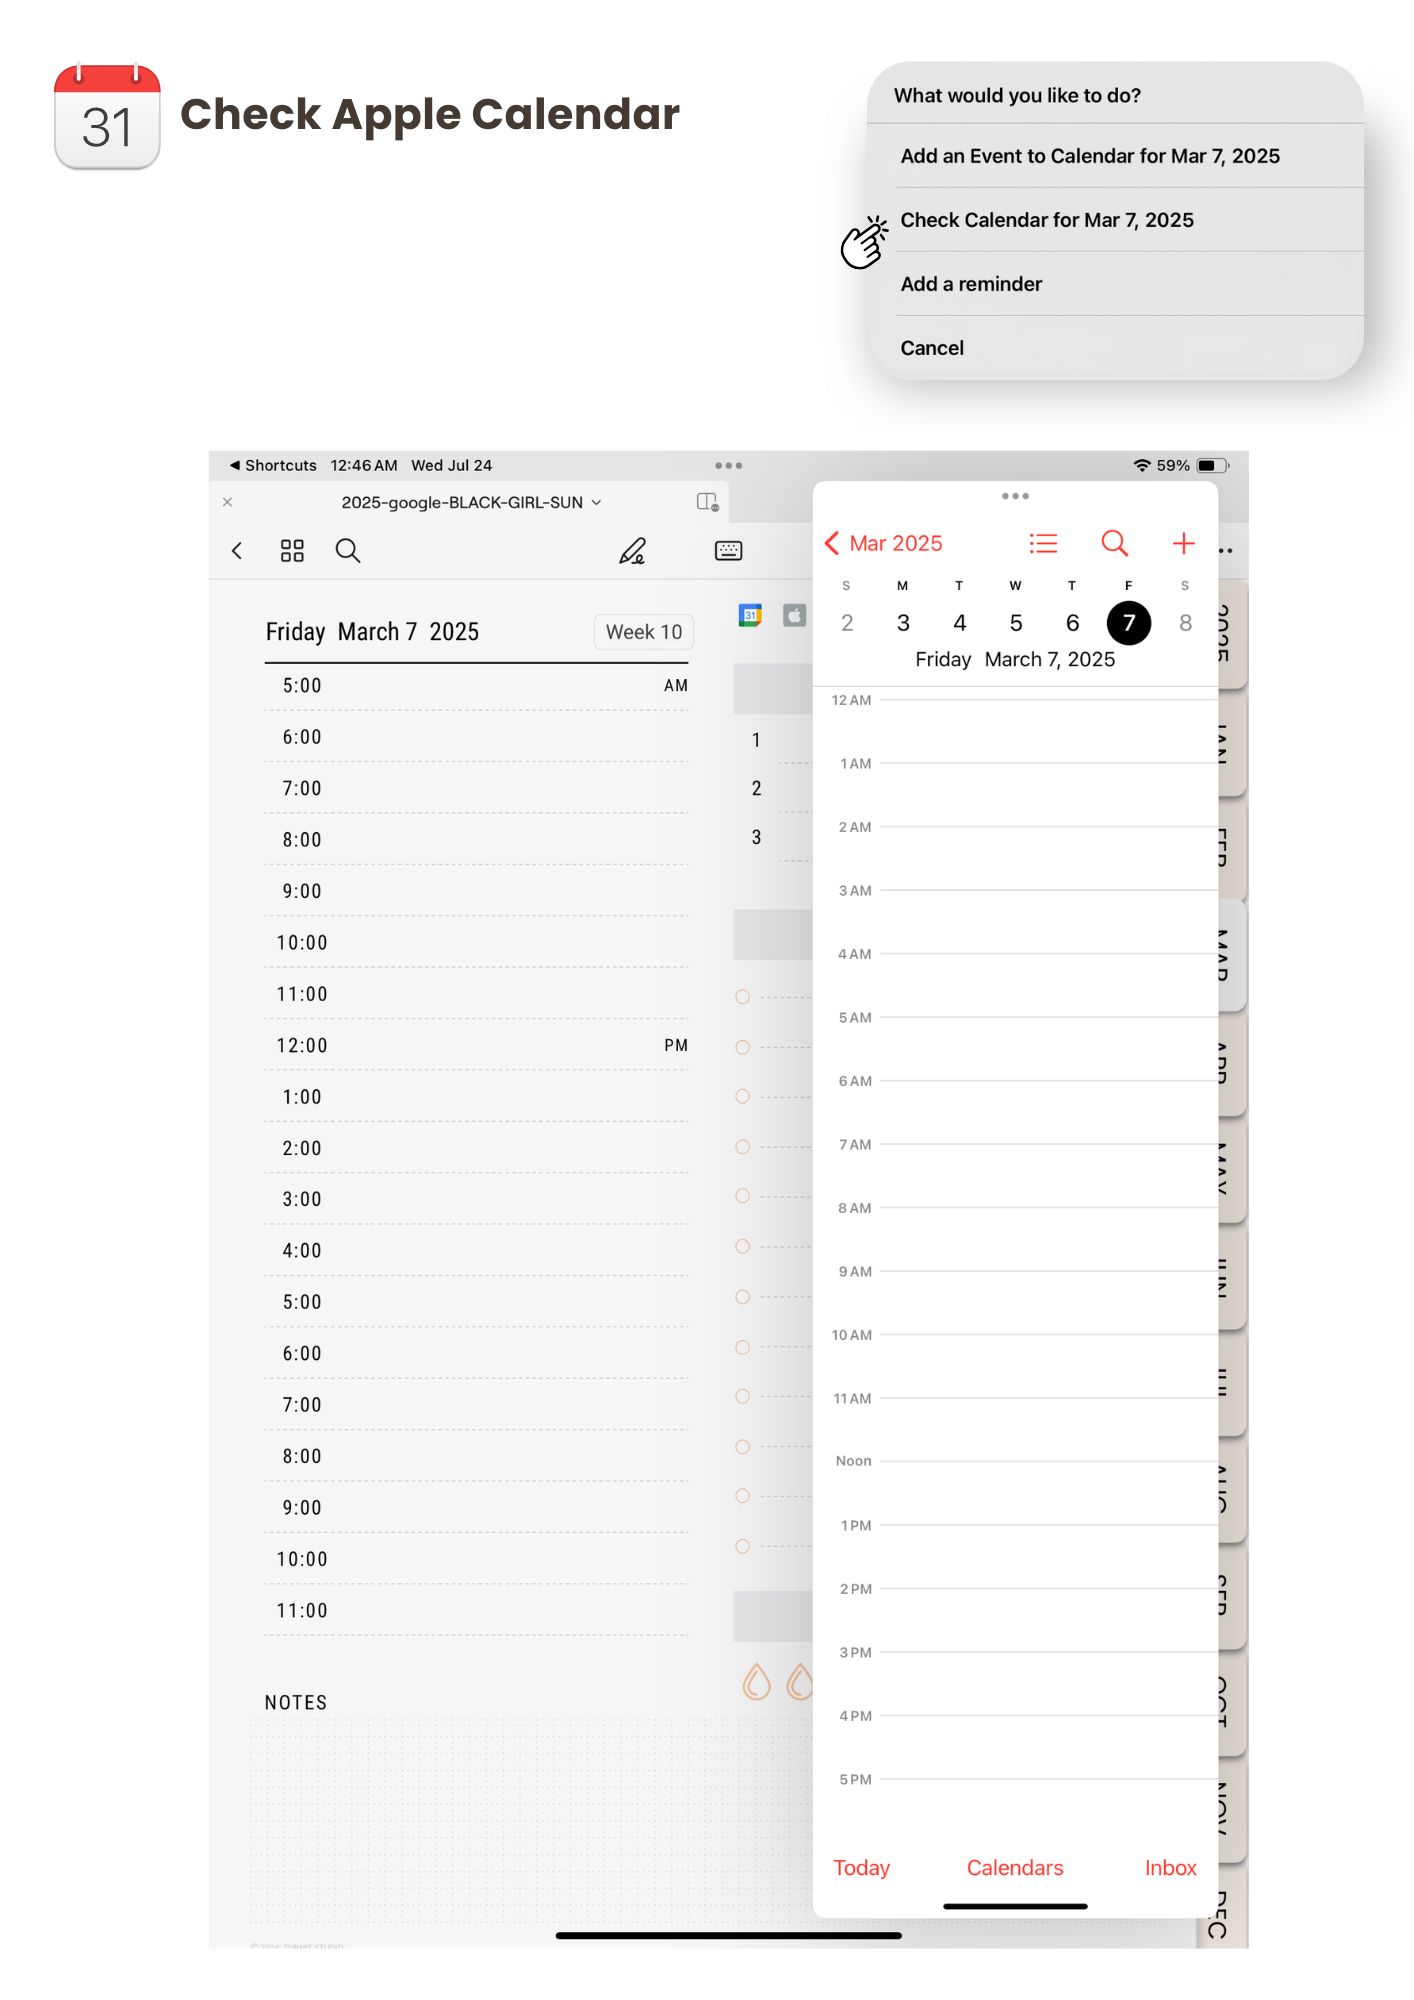
- Check Calendar: Open Apple Calendar to view any events for that day.
- Add to Reminders: Create a reminder associated with that date.
- This prompt allows you to customize how you interact with your Apple Calendar, making it easy to check or add events and reminders as needed.
- When you tap the Apple Calendar link, a prompt appears at the top of the page with three options:
Add an event to Apple Calendar:
Check Apple Calendar:
GoodNotes Tips & Tricks: Getting the Most Out of Your Digital Planner
GoodNotes offers a range of features that make navigating and organizing your planner smooth and intuitive. Here are some essential tips and tricks to help you make the most out of your digital planner in GoodNotes:
Switching Between Read Mode and Edit Mode
- Read Mode: Use Read Mode to activate hyperlinks and quickly navigate through your planner. In this mode, links will work seamlessly, and you won’t accidentally write or draw on the page. To enter Read Mode, tap the hand icon in the top toolbar.
- Edit Mode: Switch to Edit Mode when you want to write, draw, or add annotations. This mode lets you use the Apple Pencil or your finger to add notes, doodles, and highlights. To enter Edit Mode, tap the pen icon.
Tip: Switching between these modes frequently will make it easy to navigate and edit your planner without errors.
Organizing Pages and Sections with Bookmarks
- GoodNotes allows you to bookmark any page, making it easy to return to essential sections like Monthly Overviews, Notes, or Habit Trackers.
- To add a bookmark, go to the page you want to mark, tap the three dots at the top right, and select “Add Bookmark.” You can name the bookmark for easy access.
- Access all your bookmarks by tapping the thumbnail view icon and selecting “Bookmarks.”
Tip: Use bookmarks for sections you frequently refer to, like the current month or daily habit trackers, for quick navigation.
Using the Thumbnail View for Quick Navigation
- The Thumbnail View gives you a visual layout of all pages in your planner, making it easy to jump around or organize pages.
- Tap the thumbnail icon in the toolbar to see an overview of all your pages, move pages around, or delete them if necessary.
Tip: Use Thumbnail View to rearrange pages if you want to customize your planner layout.
Duplicating Pages for Repeated Use
- Many users like to duplicate daily or weekly pages to customize their planner further.
- To duplicate, open Thumbnail View, tap on the page you want to duplicate, and select “Duplicate.” This creates a copy you can move or edit without affecting the original.
Tip: Use this feature to create additional note pages or to extend sections like weekly planning or goal setting.
Working with Layers and Templates for Customization
- GoodNotes doesn’t have traditional layers, but you can simulate layers by adding images or stickers on top of your planner pages.
- Use digital stickers, PNGs, or imported images to personalize your planner without altering the underlying template.
Tip: Save common stickers or images to the Elements tool in GoodNotes for easy, repeated use across different pages.
Quickly Access Your Favorite Tools with the Toolbar Customization
- You can customize the toolbar to keep your favorite tools (pen, highlighter, eraser) accessible.
- Long-press any tool in the toolbar to customize the color or thickness, making it quicker to write or highlight consistently.
Tip: Set up different colors and thicknesses for pens and highlighters to quickly switch between them while note-taking or annotating.
Search Function for Quick Reference
- GoodNotes’ search function allows you to search handwriting, typed text, or even text within images if OCR is enabled.
- This can be handy for quickly finding specific notes, dates, or events within your planner.
Tip: Use keywords or consistent naming for sections to make searching faster.
Exporting Pages or Entire Notebooks
- If you want to share or archive parts of your planner, GoodNotes allows you to export pages or entire notebooks as PDFs.
- Tap the share icon to choose from different export options, which are perfect for backing up or sending specific pages.
Tip: Export your completed monthly planner pages at the end of each month for reference or record-keeping.
Happy Planning!

Hello,
Is it possible to have this page ‘Step by Step guide to customer planner generator’ emailed to me? I’d like to print it out since I’m new to digital planning.
Thank you